 Setting up apparatus
 Video capture & tracking
 Observing behaviour
 Connecting equipment
 Automating complex tests
 Running tests
 Results
 Visualising data
 Analysis
 Transferring data
 Open field
 Water-maze
 Y-maze
 Fear conditioning
 Novel object
 Barnes maze
 Radial arm maze
 Light/dark box
 Operant conditioning
 Zebrafish
 Computers
 Multifunction remote
 Accessories
 Digital interface
 Optogenetic interface
 Synchronisation interface
 Relay interface
 Audio interface
 Touch interface
 Analogue interface
 USB TTL cable
 Animal shocker
 Components
 Place preference
 ANY-box
 T-maze
 Zero maze
 Hole board
 Sociability cage
 OPAD
OPAD RAPC
RAPC Waterwheel forced swim test
 Thermal gradient ring
 Operon
 Activity Wheel
 Full ANY-maze licence
 Other licence types
 Developing countries licence
 Contact support
 Support Policy
 FAQs
FAQs Guides
 Downloads
 Send us files
 Activate a licence ID
 Documentation
 Contact us
 Blog
Blog About
About Testimonials
 Privacy Policy
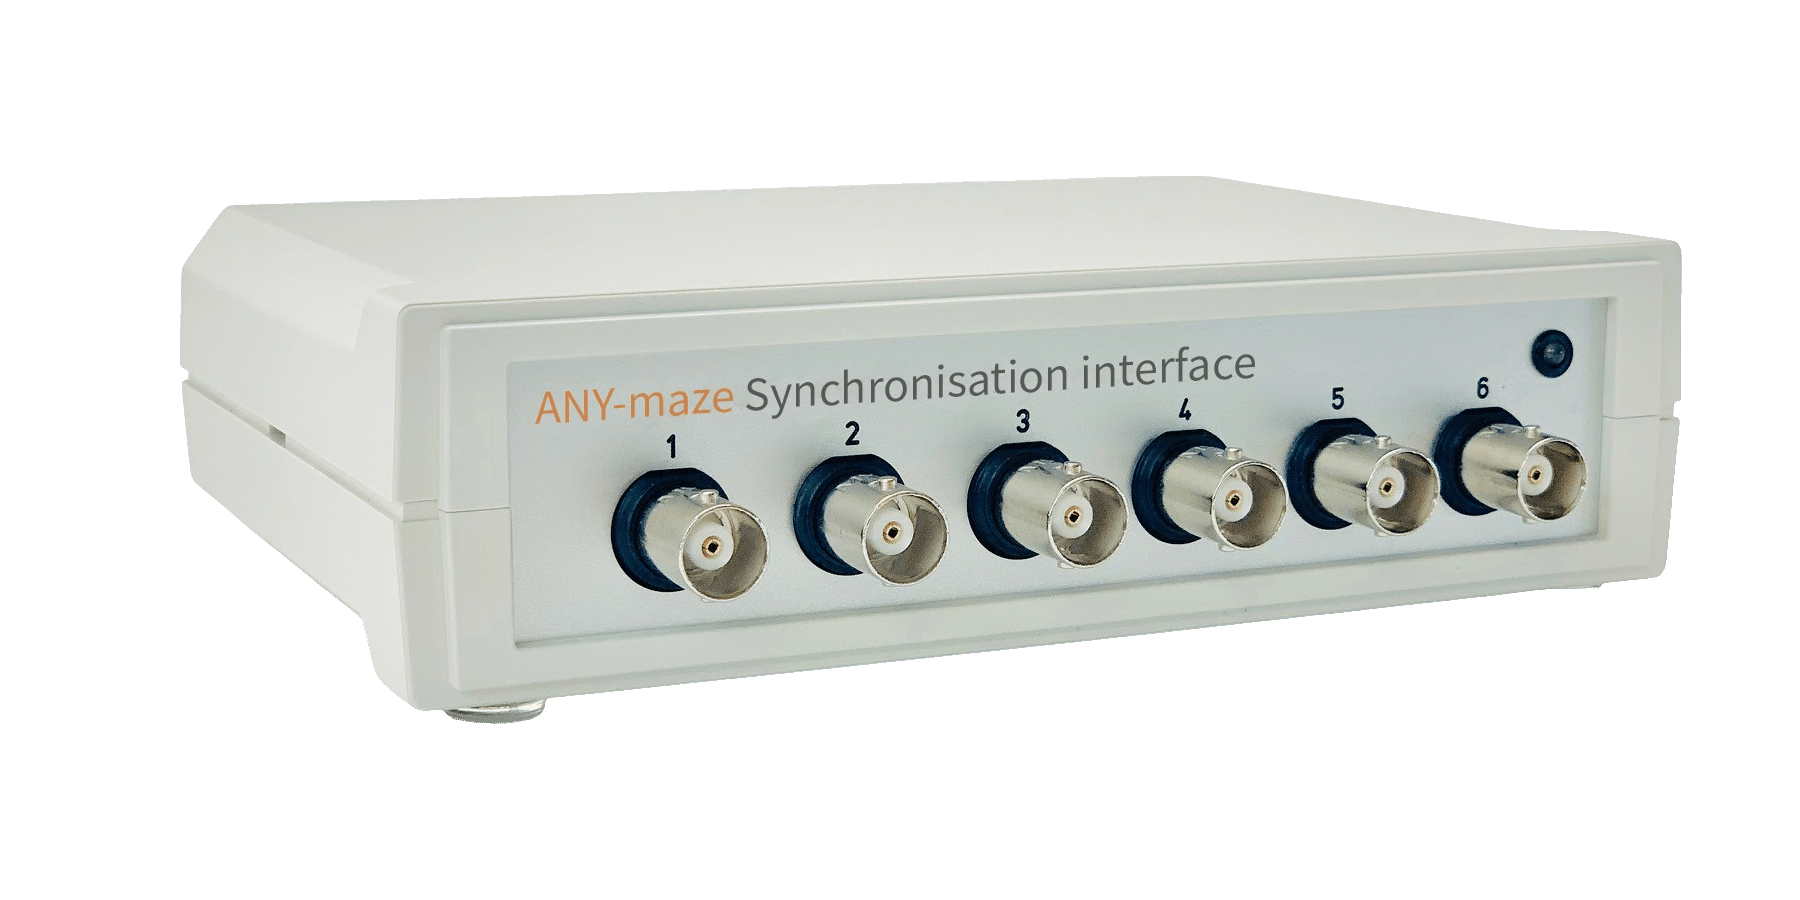
The ANY‑maze Synchronisation interface is designed to help synchronise tests performed in ANY‑maze with other equipment, such as electrophysiology or fiber photometry systems. In fact, it will work with any system which can accept TTL inputs or send TTL outputs. This guide will walk you through how to configure the interface, test it, and how to set up your Protocol for the most common use cases, which include:
- Sending a ‘Test’ synchronisation signal
- Triggering the ANY-maze test start with a TTL from the third-party system
- Using ‘Frame’ synchronisation
- Outputting a TTL when the animal enters a particular zone
Note: Throughout this guide, I will refer to the Synchronisation interface simply as “the interface” for the sake of brevity.
Section 1
Configuring the interface on the I/O page
ANY-maze interfaces can be configured and tested using ANY-maze’s I/O page. Start by connecting the interface to the computer via the USB port on the back. Then open ANY-maze and navigate to the I/O page to confirm that your interface is shown in the list on the left – see image below.

The interface has 6 independent ports, each of which can be configured as a TTL input or a TTL output, depending on how you wish to use it in your experiment. To configure the interface, select it from the list on the left, then click Configure this device at the top of the page. The configuration window will open, as in the image below. Simply select which ports will receive inputs to ANY-maze from your third-party equipment and which ones will generate outputs from ANY-maze to your third-party equipment.

As for the other settings, you will most likely want to keep the default selections, but I’ll explain them below in case you need to change them.
Debouncing inputs
Debouncing an input is useful when the input is connected to a physical switch, but in general, the Synchronisation interface will be connected to a TTL output on your electrophysiology or photometry system, in which case the input does not need to be debounced. Also, debouncing an input adds a delay of 20ms, so you should avoid debouncing unless it’s required. For this reason, the option is switched off by default.
Active states
A TTL signal can adopt one of two states: high (5V) or low (0V). But which of these should be considered the ‘active’ state? It might seem intuitive to say that the active state is high and the inactive state is low (in fact, this is the default setting), but some TTL systems use low as the active state. For this reason, you can configure the active state of the inputs and outputs.
Now that your device is configured, you can test that it’s properly sending and receiving signals in the next section.
Section 2
Testing the interface on the I/O page
Your interface should already be connected to the computer via USB, and now you’ll need to make connections to the 5V TTL-compatible ports on your external system (i.e., your electrophysiology system, photometry system, etc.) using BNC cables.
Then on the I/O page, select the ANY-maze Synchronisation interface in the list on the left, and you’ll see the inputs and outputs listed beneath it, depending on how you configured the ports.
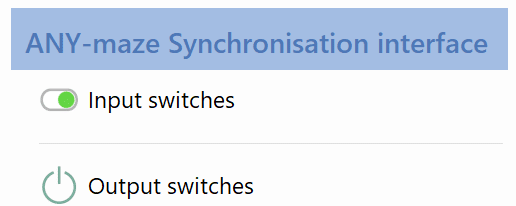
If you’re using inputs, select Input switches. The ports configured as inputs will be displayed on the right and should be shown as inactive (white). If they’re currently green, then this would indicate that either you’ve set the active state to ‘active low’ or that the port isn’t connected to your third-party system yet. Then using your third-party system, send a TTL to ANY-maze and you should see the port turn green – see image below.

If you have outputs, select Output switches. Just as with the inputs, they should all be inactive. To activate a port, click on the corresponding square in ANY-maze and it will turn green – see image below. You should then confirm that this TTL is registered by your third-party system. Click the port again to deactivate it. Once again, check your external system to confirm the signal is no longer active.

Now that you’ve configured and tested the ports, you can build your Protocol to use the interface in tests.
Section 3
Adding the interface to your Protocol
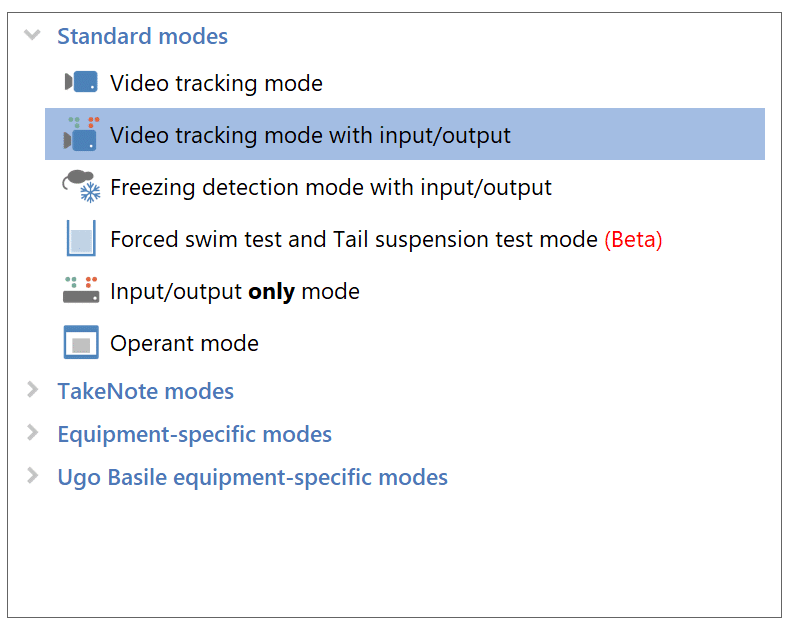
Start by creating a new experiment from the File page, and this will bring you to the Protocol page. Give your Protocol a name, then change the Protocol mode to one which supports I/O: either Video tracking mode with input/output or Input/output only mode, depending on whether you plan to include video tracking in your experiment. For this example, I will use Video tracking mode with input/output.
After setting the Protocol mode, you’ll be able to add the interface to the Protocol as an I/O device. Right-click on I/O devices, select New I/O device, then choose your interface from the drop-down menu.

After that, go ahead and set up the rest of the required protocol items which will be marked with a red asterisk. If you’re unfamiliar with any of these, please watch our Introductory video to learn the basics of building an ANY-maze Protocol and write to us at [email protected] if you need any help.
Now that the required elements of your Protocol are complete, you’ll need to decide how exactly you want to use the interface in your experiment. I will detail the most common applications in the next few sections.
Section 4
Using ‘Test synchronisation’
In most cases, you’ll want to align your ANY-maze behaviour data with your third-party data. To do that, you’ll need to synchronise the two systems with a common signal. The simplest form of synchronisation is Test synchronisation, which activates a TTL output when the ANY-maze test starts and deactivates it at the test end. This will mark ANY-maze time 00:00.000 in your third-party system so you can align the two datasets post-hoc.
- Under the ‘Inputs and Outputs’ section of the Protocol, select Synchronisation with other systems.
- Select “Use ‘Test’ synchronisation”.
- Choose a port to use.
That’s all you need to do. ANY-maze will handle the rest. I’ll explain in Section 8 how to access your data for alignment with the third-party system.
Section 5
Triggering the ANY-maze test start
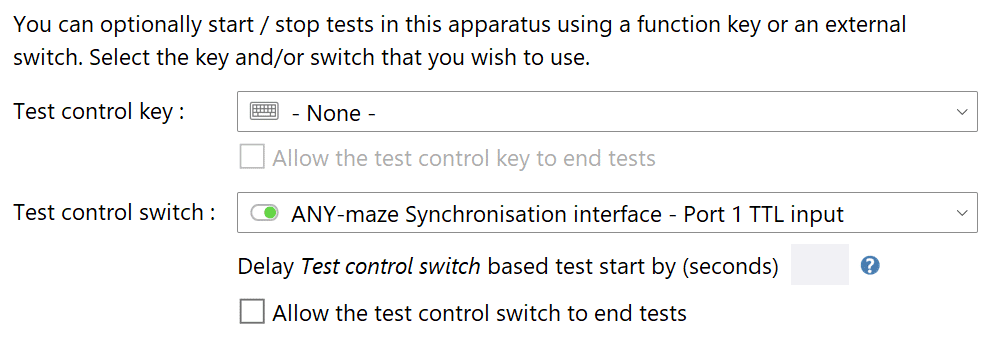
Another way to synchronise ANY-maze with your external system is to send a TTL to ANY-maze to trigger the ANY-maze test start. To do this, you’ll just set up a Test control switch for each apparatus.
- Go back to the Apparatus Protocol item and select one of your apparatus.
- In the drop-down menu for Test control switch, select the interface port you want to use to trigger the test start.
- Repeat for the other apparatus if you have multiple.
With this method, there is a latency of 4 to 8 milliseconds from the Test control switch changing state and the test starting in ANY-maze. Therefore, you may want to also use the Test synchronisation signal, as its latency is typically around 1ms.
For video tracking only
If you’re including video tracking, there are a couple more things you’ll need to change in the Protocol to make this work, starting with turning off the test ‘auto-start’. By default, ANY-maze will automatically start your tests when you place the animal in the apparatus, but if you’ll be using your third-party system’s TTL to do this instead, you’ll obviously not want ANY-maze’s auto-start to interfere. To turn off auto-start, go to Protocol > Automatic starting of tests and select “No, I’ll start the tests manually”.
The other setting you’ll want to change is related to background pictures. To quickly determine where the animal is at the beginning of the test, ANY-maze needs to know what the apparatus looks like without the animal in it. This is called the “background picture”. Normally ANY-maze captures this picture for itself moments before the start of your test, because your animal is presumably not in the arena prior to the test start. However, if you’ll be using a TTL to trigger the test start, it’s possible that your animal will already be in the apparatus moments before the test starts, meaning the animal might be included in the background picture, which isn’t ideal. To avoid this, you can manually capture the background picture:
- Go to Protocol > Tracking options.
- Select “The animal will be in the apparatus before the start of the test”.
- Then before you can start a test, ANY-maze will ask you to capture an image of the empty apparatus. You will do this by clicking the small camera icon above each apparatus on the Tests page – see image below.

You can capture this image any time before the test; just be sure the apparatus is exactly as it will be during testing, except with no animal. If you accidentally mess this up, you can re-take it as many times as needed before the test. You can also hold down the camera icon to view the currently-stored background picture.
That’s all you need to do to trigger the ANY-maze test start! Just have your third-party system send the TTL (a 10-ms pulse is sufficient) through the assigned port to start the test, then the ANY-maze test will end when the test duration is reached (which you will have specified under Protocol > Stages). Or, you could have opted to use the ‘Test control switch’ to also end the ANY-maze test with an additional TTL pulse.
Section 6
Using ‘Frame synchronisation’
Initiating the ANY-maze test start with a Test control switch or sending a common signal from ANY-maze to the external system with Test synchronisation are usually sufficient ways to align your ANY-maze data with your third-party system data. But some may prefer to synchronise the tests at a far more granular level, synchronising the data on a frame-by-frame basis (of course, only if you’re using video tracking). We argue this granularity probably isn’t necessary given the inherent imprecision of behavioural tests (see Section 9 for commentary about this), but this option is still available to you, and I will explain how to use it.
With Frame synchronisation, ANY-maze will activate a TTL signal every time it captures a frame from the apparatus’s video source (usually a camera). To include ‘Frame synchronisation’ in your Protocol:
- Go to the Synchronisation with other systems Protocol item.
- Select “Use ‘Frame’ synchronisation”.
- Choose an output port on the interface to send this signal.
Frame synchronisation options
There are two other options shown beneath ‘Frame synchronisation’ which I recommend you select:
- Record every position of the animal
- Record frames in which the animal was not tracked
When ANY-maze receives a frame from the camera, it will analyse it to determine the animal’s position (XY coordinate), then store this position in the test results. However, ANY-maze can be set to not record every position of the animal. This is advantageous for some tests such as a 24-hour home cage observation; the animal will probably be immobile or slowly ambulatory for most of the test, so you might only want to collect, say, 10 positions per second instead of the typical 30, thus reducing the overall file size.
In fact, ANY-maze will do this by default, automatically determining how many positions it should record based on the duration of the test. But when trying to synchronise with another system frame-by-frame, you’ll probably want ANY-maze to record every position of the animal so there are no gaps in your two datasets. To ensure this is done, you’ll want to select “Record every position of the animal” under Synchronisation with other systems.
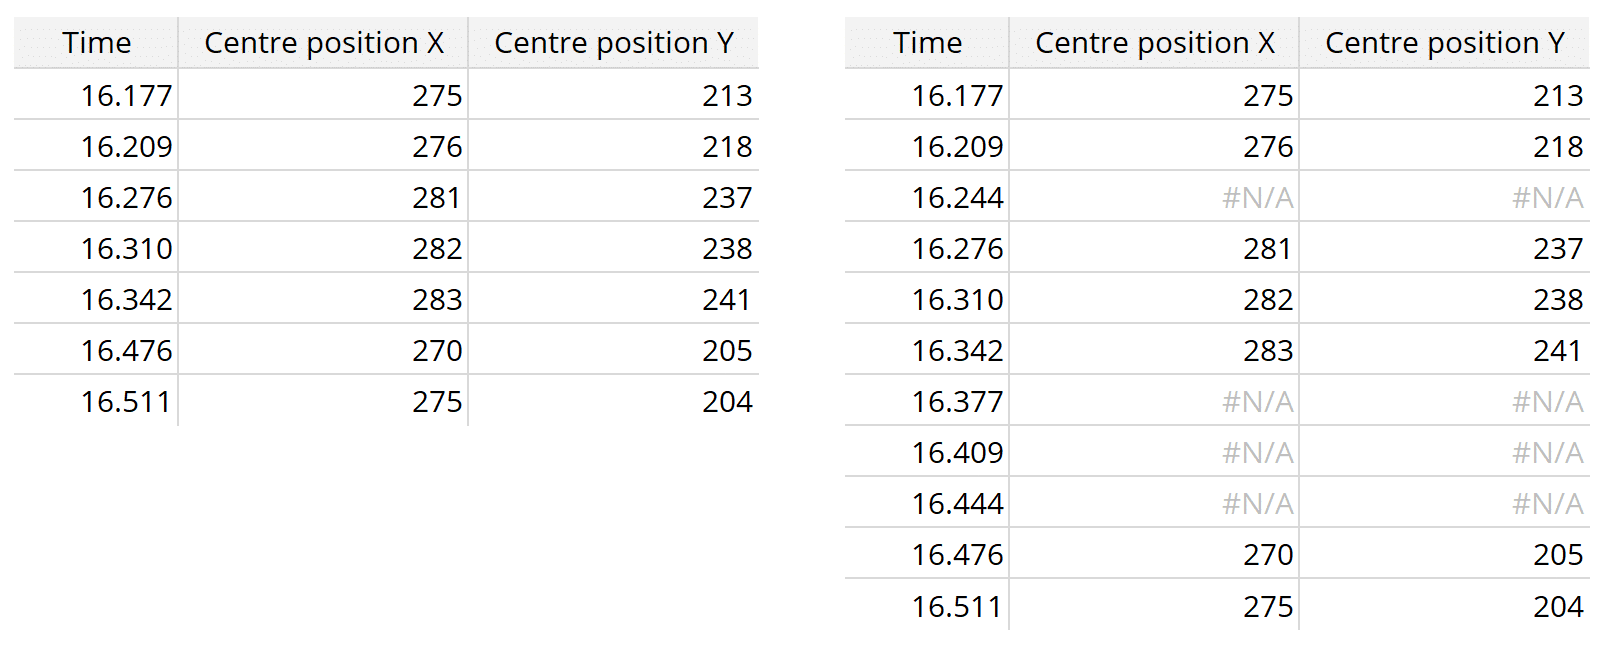
Furthermore, it’s possible the system may fail to identify a position for a frame, and when this happens, it simply won’t store any information about that frame in the test results. So, for example, the results might have a position recorded at time 33ms (frame 1), no position for 66ms (frame 2), then another position at 99ms (frame 3). The results will have a gap. To avoid this, you can opt to have ANY-maze record frames in which the animal was not tracked, a setting under Synchronisation with other systems.
Normally a frame in which the animal was not tracked will be entirely excluded from the test data (see left-side image below), but with this option selected, those frames will instead be recorded with a “#N/A” placeholder (see right-side image below). That way they’re at least accounted for.
Other considerations
There are a few other things to be aware of when using Frame synchronisation. One is that, although a camera may be providing 30 frames per second, this does not mean the first frame in the test will arrive at 33ms. This is because the test start is not synchronised with frame capture. For example, the test might start 10ms after a frame was last captured, which would mean the first frame in the test would arrive at 23ms, the second at time 56ms (i.e., 33ms later), etc.
Another consideration is that, while a camera will generate frames at a strict frequency, the software may not ‘capture’ them immediately. The path from the camera, through the physical connection to the computer, into Windows’ video processing sub-system and finally into ANY-maze, is complex and ANY-maze won’t necessarily receive frames at exactly 33ms intervals. Over time, the average inter-frame interval will indeed be 33ms, but the individual frame times may differ from this by as much as ±4ms.
A final point to be aware of, is that ANY-maze may not actually capture some frames. This can occur if it takes so long to analyse one frame that by the time ANY-maze is ready to capture the next frame, an intervening frame has been ‘dropped’. For example, ANY-maze captures a frame at time 33ms and then takes 70ms to analyse the frame. When it is ready to capture another frame at time 103ms, it will receive the frame timed at 99ms, so the frame at time 66ms will have been ‘dropped’. This situation is rare, as ANY-maze usually only takes a few milliseconds to analyse a frame. However, if you are using very large frames, or you’re using an older (slower) computer, or the computer is doing other things as well as running ANY-maze, or (most commonly) a combination of these, then ANY-maze may drop some frames. In this situation there will be ‘missing’ frames in the results, even if you have switched on both the options above.
Section 7
Sending a TTL when the animal enters a zone
Another way to synchronise data between ANY-maze and your third-party system is to output a TTL when certain events occur in the test. A common example of this is to activate a TTL when the animal enters a zone and deactivate it when the animal exits.
Start by adding the area of interest to your apparatus map, under Protocol > Apparatus. For example, if you want to send a TTL when the animal enters the centre of an open field, draw the centre delineation in the apparatus map. Then add a Zone for this area so ANY-maze can measure entries into it.
Next, add an On/off output to the Protocol (listed under the ‘Inputs and Outputs’ section) to represent your TTL output. You can call this something sensible, such as “Centre zone TTL”.
You also have some options here to control the duration of the signal, but I will stick with the default for this example, “Turn the output on”. Finally, select the port you want to use for this output.
The final step is to write a Procedure to instruct ANY-maze to output the TTL when the animal enters the zone. So, add a new Procedure to the protocol and give it a name, such as “Centre zone TTL”. Then build the procedure by clicking-and-dragging the coloured commands into the white space on the right, and ANY-maze will perform them from top to bottom.
In our example, we want ANY-maze to wait until the animal enters the zone, then activate the TTL. Likewise, we want ANY-maze to wait until the animal exits this zone, then deactivate the TTL, on repeat. Here’s what this Procedure would look like:
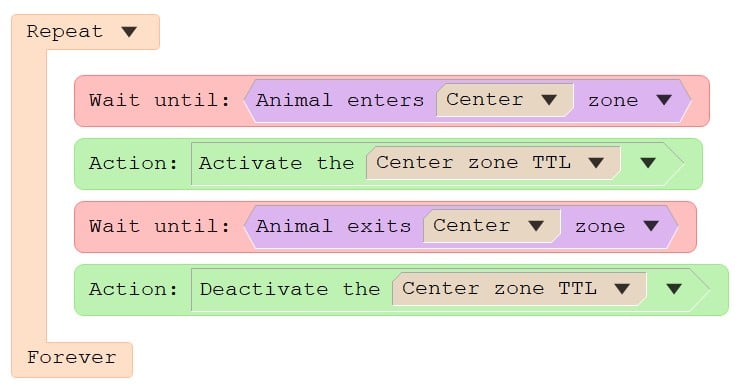
Again, it’s important to build the procedure in the white space and NOT the orange space above it. The orange space is designated for commands that should run before the test starts, and the white space is for commands that should run during the test.
Section 8
Accessing the raw test data
As you will have learned in the Introduction to ANY-maze video, you can analyse and export your data using the Results and Data pages, respectively. These analyses and exports are done on ‘cooked’ data (i.e., the raw XY coordinates and test events have been converted into consumable measures such as Total distance travelled, Average speed, Number of lever presses, etc.). But if you’ll be performing frame-by-frame or general synchronised analysis, you’ll probably need to view the raw, timestamped data for each test instead. ANY-maze reports this information in what’s called the “Test data report”, which you’ll have already seen in this figure from Section 6:
As you can see, the Test data report is organised as a spreadsheet of timestamps, and if you want to merge the ANY-maze data with your external system’s data, you will probably want to export this spreadsheet and merge the data in another program, such as Excel. Full details about the Test data report, including how to copy or export it, can be found here.
Section 9
Appendix: Inherent imprecision of behavioural data
A common concern when synchronising an electrophysiology or fiber photometry system with ANY-maze, is the temporal accuracy of the signals that ANY-maze generates.
The signals generated by ANY-maze will always be a little delayed, because there is necessarily some latency from the moment that ANY-maze recognises that a signal needs to be generated to the moment the physical hardware changes the state of the relevant output port. This delay depends on several factors, such as what else the computer is doing, what hardware is actually generating the signal, etc., but the delay will usually be no more than 3ms (and is typically around 1ms).
Of course, in the electrophysiology world this still seems like quite a long delay and is made worse by the fact that it’s not uniform. However, the delay needs to be viewed in the context of what we’re actually trying to do, which is synchronise data from a system which typically only has a sampling rate of 30sps (i.e., the frame rate of the camera). Sure, some cameras might provide 100 frames per second (i.e., 100sps) but in any case, a delay of a few milliseconds when synchronising data that has a sampling time of 33ms (or perhaps just 10ms) is not very relevant.
In fact, you might look at this information and think that it would be a benefit to use a camera that captures 100 frames per second, because then you will be sampling the animal’s position at 100sps which will be ‘more accurate’ than 30sps. However, it’s worth considering how you’ll be using the position data. For example, you might want to look at your electrophysiology results at the moment the animal moves onto the open arm of an elevated plus maze. If you use a 100fps camera then, yes, you will get told when the animal moves onto the open arm with a timing resolution of 10ms, but you need to step back from that for a moment and consider what ‘moving onto the open arm’ actually means.
In ANY-maze, a zone entry can be determined in a number of ways, but in the case of the plus maze, the most common method is to use the percentage of the animal’s body that is in the zone, with a value of 80% typically being used for an open arm entry (this equates well with the traditional ‘4-paws-in-the-arm rule’). But this is quite arbitrary; you could use 75% or 85% instead, and if you did so, then the time when the animal enters the arm would almost certainly change by tens or hundreds of milliseconds.
The important point here is that, yes, at time, say, 9s, you can see that your animal is clearly not in the open arm, and at time, say, 12s, you can see that it clearly is in the open arm, but the precise time when it entered the arm is hard to pin down, and trying to do this to the nearest 10ms, or even 33ms, is really quite arbitrary. Realistically you can probably attribute the time of something like an arm entry to a period of 250ms at best.
So, my point is that worrying too much about capturing lots of frames per second, or about having very precise timing for synchronisation signals, is all a bit pointless when the resolution of the data you are actually interested in is, in reality, only 250ms.
Having said all that, there is a situation in ANY-maze when the timing of behaviour can be viewed as quite precise, and that’s when the animal’s behaviour is being detected by I/O devices. For example, you might be interested in the time when an animal pressed a lever. The hardware to detect the lever will typically generate a signal which ANY-maze will detect and store in the results within 5ms, so in these cases you would want the synchronisation between ANY-maze and the other system to be as tight as possible. But with a typical value of 1ms, it is usually good enough for this task.
Section 10
Summary
In this guide you learned how to:
- Configure and test the interface on the I/O page.
- Add the interface to the Protocol as an I/O device.
- Use the interface to send a ‘Test’ synchronisation signal.
- Use the interface to receive a TTL from your third-party system to trigger the ANY-maze test start.
- Use the interface for ‘Frame’ synchronisation.
- Use the interface to output a TTL when the animal enters a particular Zone.
Of course, you may have other use cases for the interface beyond what I’ve outlined. If you need help implementing them, or if you have other questions, please reach out to us at [email protected] and we’ll be more than happy to assist you!