 Setting up apparatus
 Video capture & tracking
 Observing behaviour
 Connecting equipment
 Automating complex tests
 Running tests
 Results
 Visualising data
 Analysis
 Transferring data
 Open field
 Water-maze
 Y-maze
 Fear conditioning
 Novel object
 Barnes maze
 Radial arm maze
 Light/dark box
 Operant conditioning
 Zebrafish
 Computers
 Multifunction remote
 Accessories
 Digital interface
 Optogenetic interface
 Synchronisation interface
 Relay interface
 Audio interface
 Touch interface
 Analogue interface
 USB TTL cable
 Animal shocker
 Components
 Place preference
 ANY-box
 T-maze
 Zero maze
 Hole board
 Sociability cage
 OPAD
OPAD RAPC
RAPC Waterwheel forced swim test
 Thermal gradient ring
 Operon
 Activity Wheel
 Full ANY-maze licence
 Other licence types
 Developing countries licence
 Contact support
 Support Policy
 FAQs
FAQs Guides
 Downloads
 Send us files
 Activate a licence ID
 Documentation
 Contact us
 Blog
Blog About
About Testimonials
 Privacy Policy
This is the second instalment of a two-part guide, which explains how to set up a Novel Object Recognition (NOR) experiment in ANY-maze. In the first part, I explained how to build a basic protocol to perform a full NOR experiment. In this second part, I’ll cover some more advanced topics, such as how to automatically assign the novel object’s shape and position between animals, how to label your objects for testing, how to mark the latency for the animals to investigate the objects for 20s, and how to calculate the discrimination index.
Most of the information from Part 1 will carry over in this guide, so please be sure to read Part 1, if you haven’t already done so.
Section 1
Changing how to assign your objects for each Stage
In the previous guide, we were able to make our zones moveable by selecting that their Position varies within (and possibly between) the animals. In doing so, we were prompted to tell ANY-maze how we would like to assign the location of these moveable zones for each Stage – see the image below.
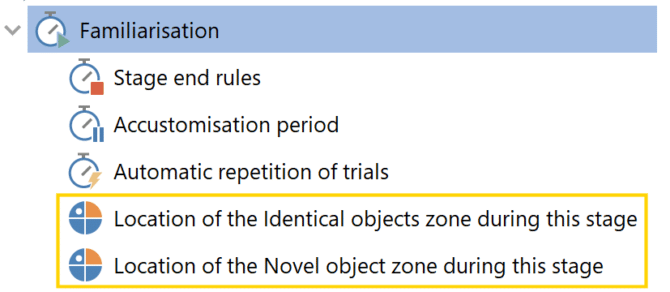
Here, we selected that the user would specify the location at the start of each test, but now we’re going to see how we could change this so that ANY-maze will automatically select the zones’ positions for us.
Familiarisation stage
First select Stages > Familiarisation > Location of the Identical objects zone during this stage and then choose the option The location will be set by a procedure.
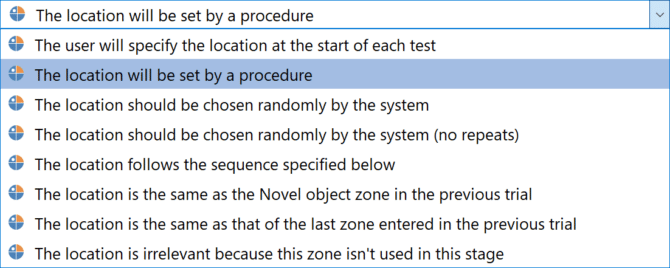
Next, select Stages > Familiarisation > Location of the Novel object zone during this stage and choose The location is irrelevant because this zone isn’t used in this stage (during Familiarisation there is no novel object!).
Testing stage
Moving on to the Testing stage, select Stages > Testing > Location of the Identical objects zone during this stage and choose The location is irrelevant because this zone isn’t used in this stage (the only objects in the Testing stage are the novel and familiar objects).
Finally, select Stages > Testing > Location of the Novel object zone during this stage and choose The location will be set by a procedure.
I’ll explain how to create the Procedure that will actually set the zones’ locations in a later section, but first we need to learn about Fields.
Section 2
Setting up Fields to assign object locations
You will probably already have a list of your animals and their pre-assigned novel object location and shape – what we need to do now is input this into ANY-maze, which we can do by using Fields.
First you need to add a new field to the protocol and call it Novel object shape. As you’ll be assigning a novel object shape for each animal, you should select that the field applies to ‘Animals’. Then specify the field type as ‘Choice’, and finally, enter the choices separated by a comma. In this experiment, the choices are Cube and Sphere.

Then, add another field and call it Novel object side. Just as above, you’ll select ‘Animals’ and ‘Choice’, although in this case the choices will be Left and Right, again separated by a comma.
On the Experiment page, you’ll now be able to specify for each individual animal, the Novel object shape (cube or sphere) and side (left or right) – but before we do that let’s first complete the Protocol setup.
Section 3
Writing the Procedures
In Part 1 you learned how to manually click on the objects in the video picture to select the positions of the objects – what you’re about to learn is that a Procedure can do this for you! We’re going to create a procedure that will automatically select the zone position in each test based on the Field assignments of the animal.
Set object positions
First, let’s add a new procedure to the protocol – we can call it ‘Set object positions’ to describe what it will be doing.
You construct a procedure by clicking and dragging items in the procedure editor, pictured below. Specifically you’ll drag items from the left into the blank area on the right.
The 4 categories of items available to you in the procedure editor are:
- Statements – These are the building blocks of the procedure, providing instructions for what it should actually do. For example, ‘Wait until: animal enters the target zone / Action: Activate the cue light’.
- Events – These are things that occur in a single moment in time. For example, the animal enters the target zone.
- Variables – These represent the state of the test as it progresses. For example, a variable might be Animal is in the target zone. At any time, we can check whether this variable is true or false.
- Actions – These are commands given to ANY-maze to do For example, Activate the cue light or End the test.
Usually, a good first step in creating a procedure is to write in your own words what you want it to do. In our case we want it to set the position of our moveable zones as follows:
When we’re in the Familiarisation stage:
If the field for Novel object shape is a cube, then set the Identical objects zone to be in the ‘spheres’ position (because we’re going to use two spheres as our familiar objects).
Otherwise, if the field for Novel object shape is a sphere, then set the Identical objects zone to be in the ‘cubes’ position.
When we’re in the Testing stage:
If the Novel object shape is a cube: If the Novel object side is on the left, then set the Novel object zone to be in the ‘left cube’ position, whereas if the Novel object side is on the right, then set the Novel object to be in the ‘right cube’ position.
On the other hand, if the Novel object shape is a sphere: If the Novel object side is on the left, then set the Novel object zone to be in the ‘left sphere’ position, but if the Novel object side is on the right, then set the Novel object to be in the ‘right sphere’ position.
By the way, as you may remember from Part 1, when in the Testing stage ANY-maze will automatically set the position of the familiar object based on the position of the novel object, so we don’t need to include this in our procedure.
Now we can start building the procedure, which we’ll do by placing statements inside the orange area at the top of the page (as opposed to the white area below it). ANY-maze will perform these statements when the test is in the Ready state, i.e. before the test starts. This makes sense, because we’re using the procedure to set the location of our objects, so that we know what the shapes are and where to place them before the test begins.
The video below shows how to build the procedure – as you’ll see, it’s quite simple and ends up being very similar to the description we wrote above.
Label zones
Next, we’ll write a procedure to label the zones so that you know which object to place on which side before each test. We want the procedure to do the following:
Before the test starts:
When we’re in the Familiarisation stage:
If the location of the Identical objects zone is ‘Spheres’, then label the zone with “Sphere”.
Otherwise, label the zone with “Cube”.
When we’re in the Testing stage:
If the location of the Novel object is either ‘left sphere’ or ‘right sphere’, then label the novel object with ‘Sphere’ and the familiar object with ‘Cube’.
Otherwise, label the novel object with ‘cube’ and the familiar object with ‘sphere’.
Once the test starts:
Remove all zone labels from before the test started, then…
When we’re in the Testing stage:
Label the novel object with ‘Novel’.
Having learned how to build a procedure in the previous step, I expect you can build this one by simply referencing the image below.
![]()
With your procedures written and your Protocol now complete, it’s a good idea to save it using the Save protocol button in the ribbon bar.
Section 4
Recording latency to investigate for 20s
In many NOR paradigms, it’s common to end the test when the animal investigates both objects for a total of 20s. Alternatively, you can simply record the time it takes to achieve this (latency), but continue the test for the full test duration. The latter is more flexible because it allows you to analyze the results for the full test duration and from the start of the test until this ’20s investigation’ occurred. I will show you how to do the latter.
Virtual switch
First, we’ll create a Virtual switch to keep track of when the animal is investigating either the Familiar object or the Novel object. The switch will ‘turn on’ (virtually, of course) when either event occurs.
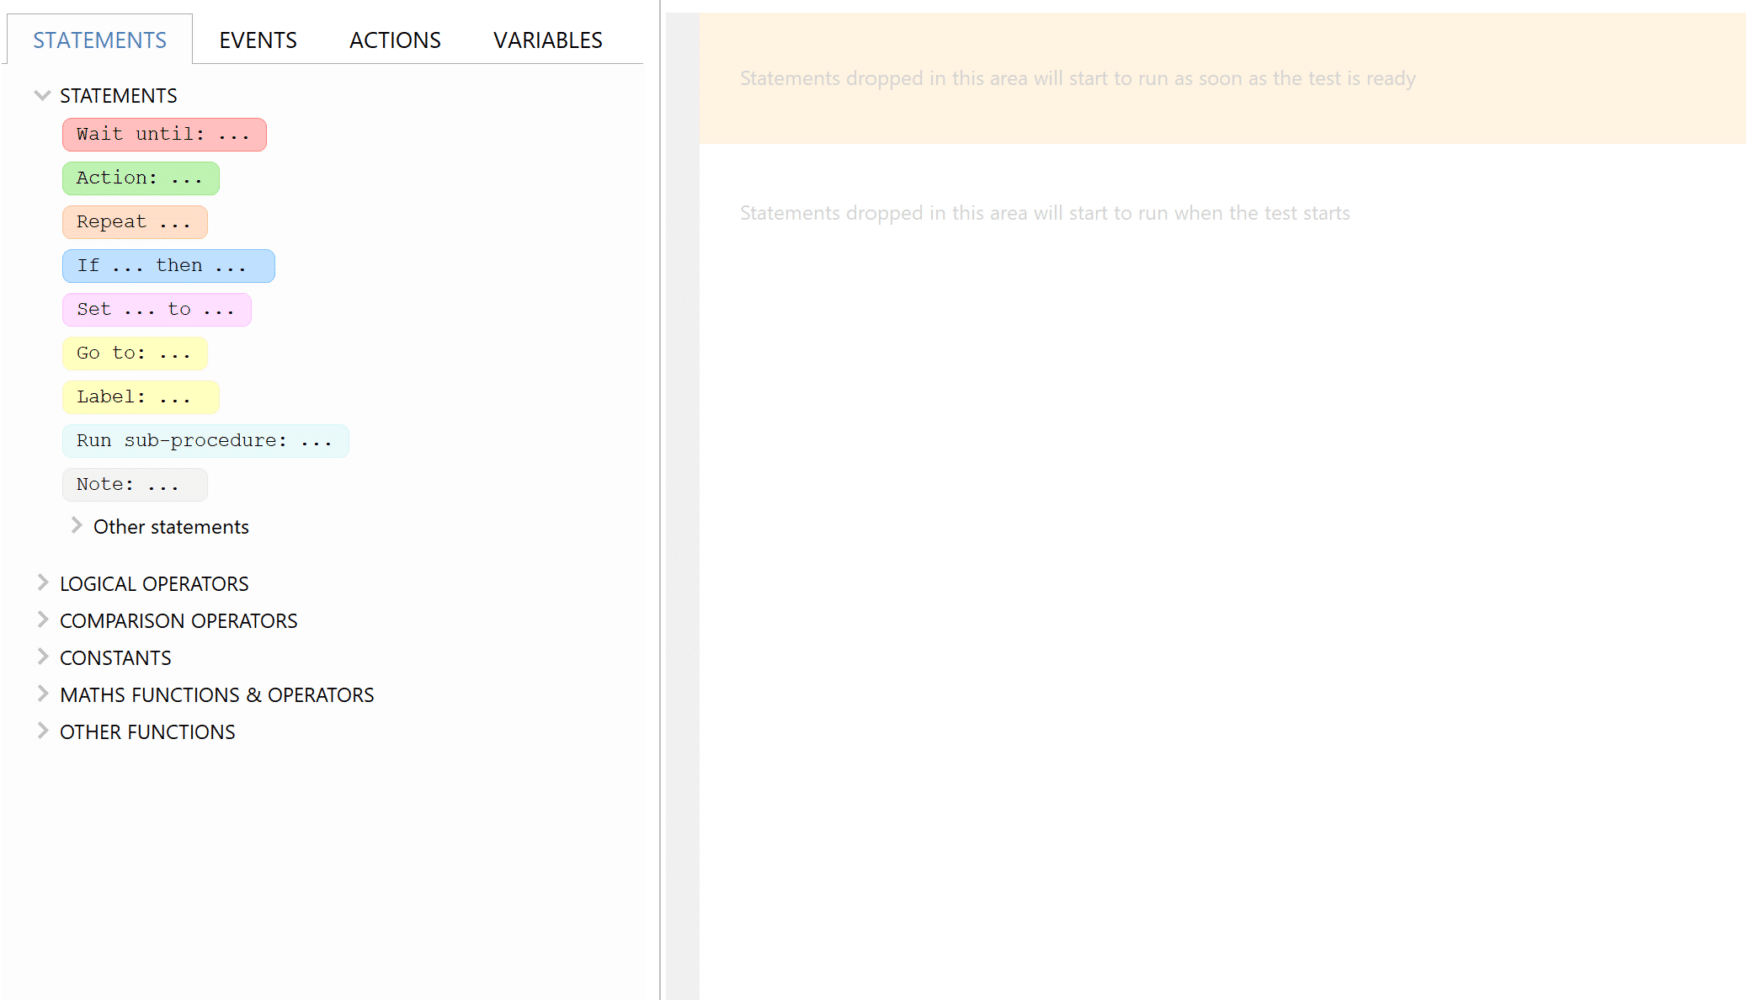
- Add a Virtual switch to the Protocol.
- Call it something such as “20s investigation virtual switch”.
- Select “When any of the items selected below are active”.
- Select “The animal is investigating the Novel object zone” and “The animal is investigating the Familiar object zone”.
Procedure
Then, we’ll use a Procedure to identify when the animal has investigated for 20s total, with the help of the Virtual switch.
- Add a new Procedure to the Protocol and call it “20s investigation”.
- At the top of the page, select “Create event” and give it a name such as “20s total investigation”.
- Select “Triggers that relate to activity in the apparatus as a whole”.
- Select “Cumulative 20s investigation virtual switch time exceeds a certain value”.
- Enter “20s”.
- Click “Finish”.
- Then write the following procedure:

Time period
Lastly, we’ll create a Time period to use for analysis from the start of the test to the Time marker set by the Procedure above.
- Add a new Time period to the Protocol and call it something like “Test start to 20s investigation”.
- Select “This time period is based on the following time marker” and choose “20s investigation – time marker” from the drop-down.
- The period will start 5min before the time marker and end 0s after the marker. Because the test is a maximum of 5min, then this guarantees that the start of the Time period will be the start of the test, regardless of when the Time marker is placed in the test. And, we want the end of the period to be equal to the time marker, so we set it to end 0s after the marker.

Using the Time period
You can then analyze your results within the limits of this Time period by grouping or filtering your data. For example, on the Data page where you select your data, in the “Select columns” section, choose “Time period”. Then your spreadsheet will contain a column for Time period to indicate that the results within that row are just within the Time period.
Section 5
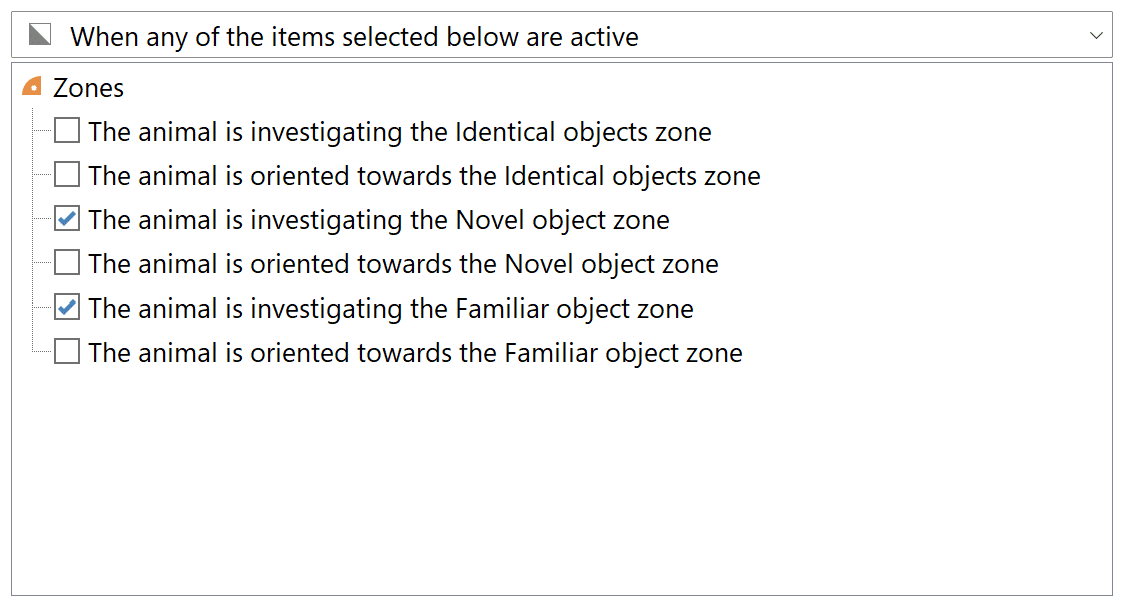
Assigning object locations on the Experiment page
Now we can set up our Experiment page. You may already have entered some Treatment groups when you worked through part 1 of this guide, but if not, then do so now by entering some treatment group names and the number of animals per group. Then select View animals in the ribbon bar, and you’ll find you have two columns titled Novel object shape and Novel object side. This is where you’ll assign the Field values we set up in Section 2.
Once you’ve entered the values for each animal, you’ll be ready to perform your tests!
Section 6
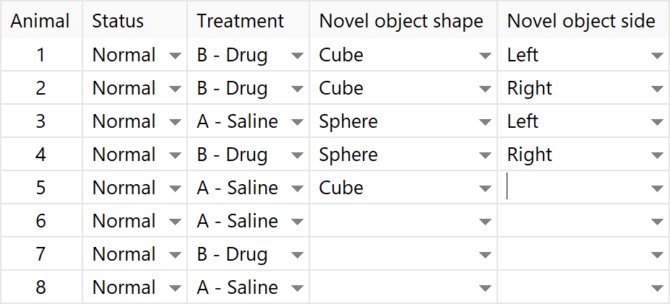
Running the tests
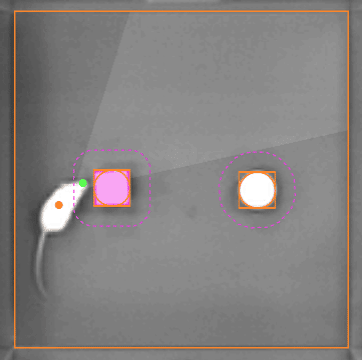
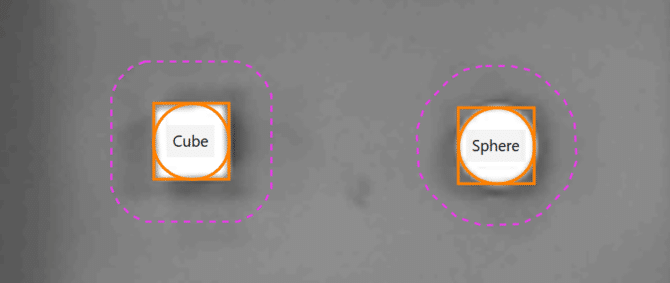
On the Tests page, you’ll find you have labels on your video picture indicating the shape and position of the objects. For example, in the image below, we’re about to perform a Testing stage test and ANY-maze is indicating that we should place the cube on the left and the sphere on the right.
If you’re running tests live, you can place the objects in the arena according to these on-screen labels (be careful to place the objects inside the shapes you’ve drawn in). Then when you’re ready, click the Start test button, place your animal in the arena, step away, and your test will start automatically.
In the Familiarisation stage, when the test starts, the above labels will be removed, and in the Testing stage, the labels will be replaced with a single label indicating which is the novel object.
When the first test is complete, click the orange, circular arrow to prepare the next test – see image below. The next set of object labels will then appear on screen.

Section 7
Calculating the discrimination index
Finally, let’s learn how you could set up ANY-maze to automatically calculate the discrimination index. You’ll do this on the Protocol page, using Calculations. Of course, ANY-maze reports various measures automatically, such as time investigating a zone, but you can use Calculations to derive new information from those measures.
Start by adding a new calculation to the Protocol. Give it a suitable name and change ‘Number of decimal places to show in the result’ to 2.
Then, to build the formula for your calculation, you’ll add measures by right-clicking inside the area at the bottom of the page. The final calculation for discrimination index will look like this:

Here are the first few steps to get you started:
- Type an open parenthesis: (
- Right-click and select Novel object zone measures > Time investigating the Novel object zone
- Type a minus: –
- Right-click and select Familiar object zone measures > Time investigating the Familiar object zone
You get the idea. As you can see, Calculations are customizable, so you can use them to calculate other indices such as the Recognition Index or the Preference Index. In other words, ANY-maze allows you to calculate what you want!
Once you’ve added a Calculation to your Protocol, you’ll have the results available in your dataset. Simply search the list of measures for “Calculation results” to add them in.
Section 8
Summary
That’s a novel object recognition experiment set up in ANY-maze to automate your experiment!
To summarize, in this guide you learned how to:
- Set up Fields where you can specify the locations of your objects for each animal
- Write a Procedure to set the location of the objects before each test
- Write a Procedure to label the objects on-screen
- Create a time marker for the latency to investigate the objects for 20s total
- Use Calculations to report the discrimination index
If you have any questions about the topics covered in this guide, then please do contact us at [email protected] – remember, free technical support is available to all ANY-maze users for ever.