 Setting up apparatus
 Video capture & tracking
 Observing behaviour
 Connecting equipment
 Automating complex tests
 Running tests
 Results
 Visualising data
 Analysis
 Transferring data
 Open field
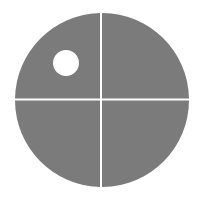 Water-maze
 Y-maze
 Fear conditioning
 Novel object
 Barnes maze
 Radial arm maze
 Light/dark box
 Operant conditioning
 Zebrafish
 Computers
 Multifunction remote
 Accessories
 Digital interface
 Optogenetic interface
 Synchronisation interface
 Relay interface
 Audio interface
 Touch interface
 Analogue interface
 USB TTL cable
 Animal shocker
 Components
 Place preference
 ANY-box
 T-maze
 Zero maze
 Hole board
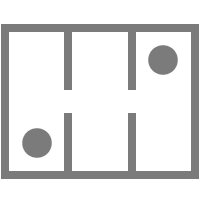 Sociability cage
 OPAD
OPAD RAPC
RAPC Waterwheel forced swim test
 Thermal gradient ring
 Operon
 Activity Wheel
 Full ANY-maze licence
 Other licence types
 Developing countries licence
 Contact support
 Support Policy
 FAQs
FAQs Guides
 Downloads
 Send us files
 Activate a licence ID
 Documentation
 Contact us
 Blog
Blog About
About Testimonials
 Privacy Policy
In this guide, I will walk you through setting up a Barnes Maze experiment in ANY-maze which includes movable escape holes and a hidden zone. I will also explain how to add zone labels, calculate primary and total measures, and cope with the start box during testing.
If you’re new to ANY-maze, then I recommend watching our introductory video before reading this guide.
Section 1
The paradigm
To walk you through this setup, I’ll use an adapted Barnes Maze paradigm for spatial learning and memory, conducted in 2 parts:
Training: The escape hole is placed in one of two positions: quadrant 1 or quadrant 3. The animal is placed in a start box for 15 seconds, then released and allowed to explore the apparatus. The test ends when the animal enters the escape hole or when 3 minutes elapse – whichever occurs first. This is repeated for 5 days.
Probe: The escape hole is replaced with a false hole. The animal is placed in a start box for 15 seconds, then released and allowed to explore for 1 minute.
We’ll evaluate the following measures:
- Primary latency: latency to locate the escape hole
- Primary errors: number of incorrect holes checked prior to locating the escape hole
- Primary distance travelled: distance travelled prior to locating the escape hole
- Total latency: latency to enter the escape hole
- Total errors: number of incorrect holes checked prior to entering the escape hole
- Total distance travelled: distance travelled for the entire test
Now that we understand the paradigm, let’s start by creating a new experiment, which you can do by selecting New experiment on the File page.
Section 2
Setting up the apparatus
First, we need to build the Protocol, which we’ll do using the Add item button in the ribbon bar. Let’s start by adding a Video source. Here you will select the camera or video that shows your apparatus.
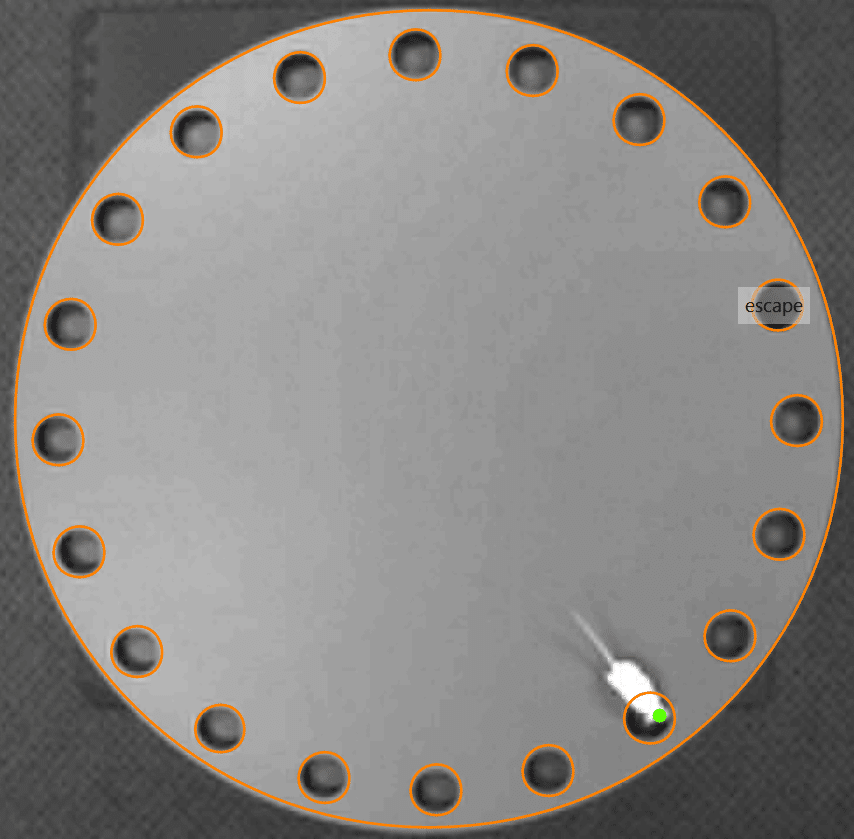
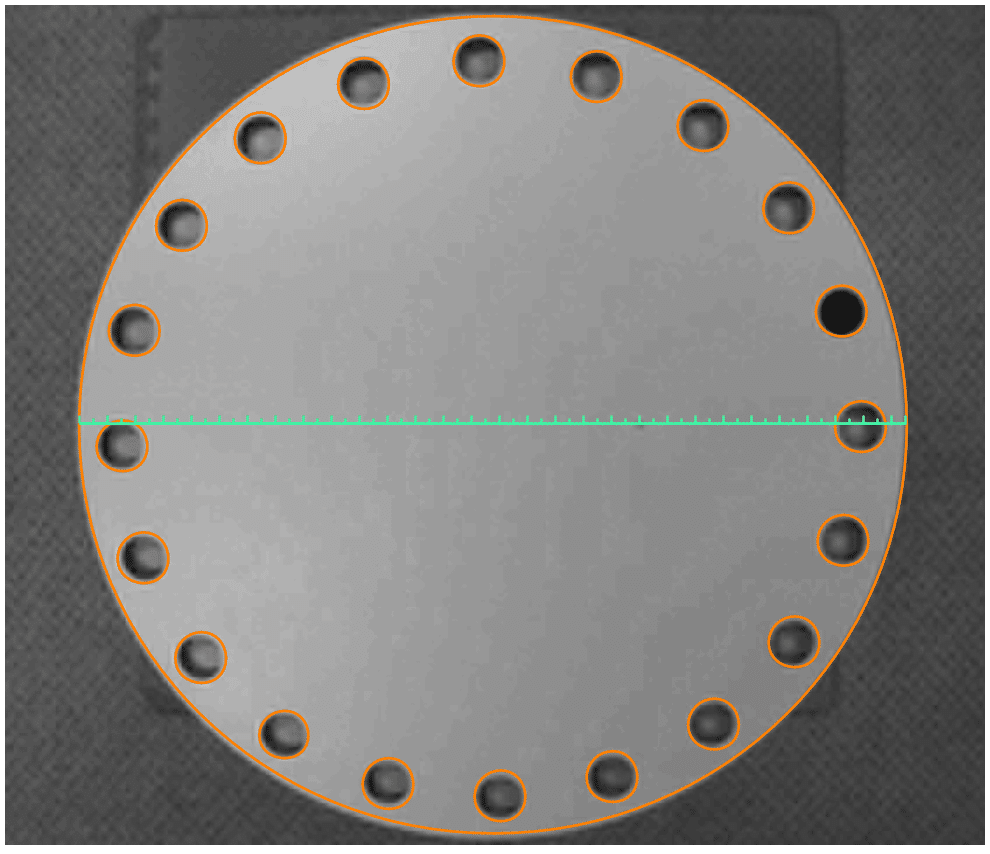
Then add an Apparatus to the Protocol which corresponds to your video source. It is here that you’ll draw the apparatus map, which defines both the outline of the maze and any important areas within it – in this case, the holes.
Also, don’t forget to calibrate the size of the maze using the green ruler. Stretch it across the diameter of the maze, then enter this physical distance into ANY-maze. For example, if your Barnes maze is 1 metre across, enter “100cm” into this field.
Section 3
Background pictures
At the very beginning of a test, ANY-maze needs to have an image of the empty apparatus so it can start tracking without any delay. This image is called the “background picture”.
ANY-maze normally captures this background picture for itself, just moments before you start a test. However, if the animal is already in the apparatus, or if you have objects in the apparatus such as the start box, then that object will be present in this background picture, possibly throwing off the tracking at the beginning of the test. To cope with this, I suggest you manually take your background pictures. Here is how:
- Go to Protocol > Tracking options
- Tick the box, “The animal will be in the apparatus before the start of the test”.
- Then before you can start a test, ANY-maze will ask you to capture an image of the empty apparatus. You will do this by clicking the small camera icon above each apparatus on the Tests page – see image below.

You can capture this image any time before the test; just be sure the maze has no animals or start box present. If you accidentally mess this up, you can re-take it as many times as needed before the test. You can also hold down the camera icon to view the currently-stored background picture.
Section 4
Adding zones
With the apparatus map drawn, you will then add some Zones for the holes. The first Zone we’ll add is for the Escape hole.
Escape hole (hidden) zone
As with any standard Barnes Maze, the escape hole is a tunnel, and the animal is meant to escape down into it. Of course, when he does, he disappears from view of the camera. Because of this, we’ll need to set the escape hole as a Hidden zone.
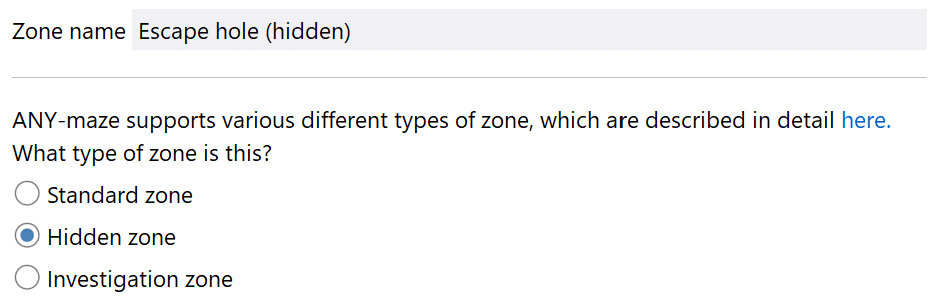
The way a hidden zone works is that when ANY-maze can no longer see the animal, it posits that he has entered the hidden zone. ANY-maze doesn’t care where the hidden zone is – just that the apparatus has one and the animal has entered it.
Note: I’ve titled the zone ‘Escape hole (hidden)’ because in the next section we’re going to include another escape hole zone to measure exploration of the escape hole. This title will make it easier to distinguish between the two zones.
Escape hole (standard) zone
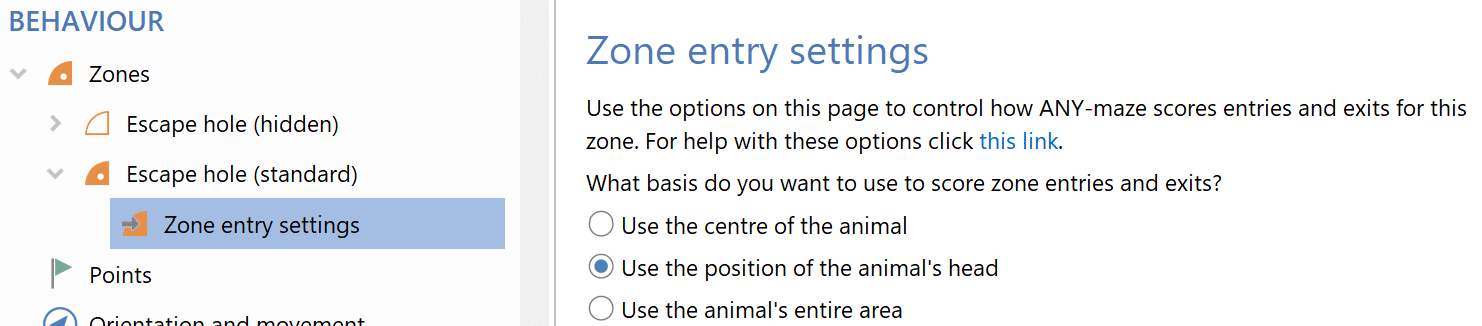
In addition to including an escape hole Hidden zone to measure when the animal enters down into the escape tunnel, we’ll also include an Escape hole Standard zone to measure investigations of the escape hole prior to entry, which I’ve called ‘Escape hole (standard)’.

Just beneath the zone you just created, select Zone entry settings. You will probably want to use the animal’s head to score entries into this zone, as opposed to the animal’s center, so select that option.
Alternatively, you could use Investigation zones instead. While a Standard zone will measure interactions when the head hovers over the hole, an Investigation zone will measure interactions when the animal’s head is within a certain distance of the hole and oriented toward it. The images below illustrate the difference between these two zone types.
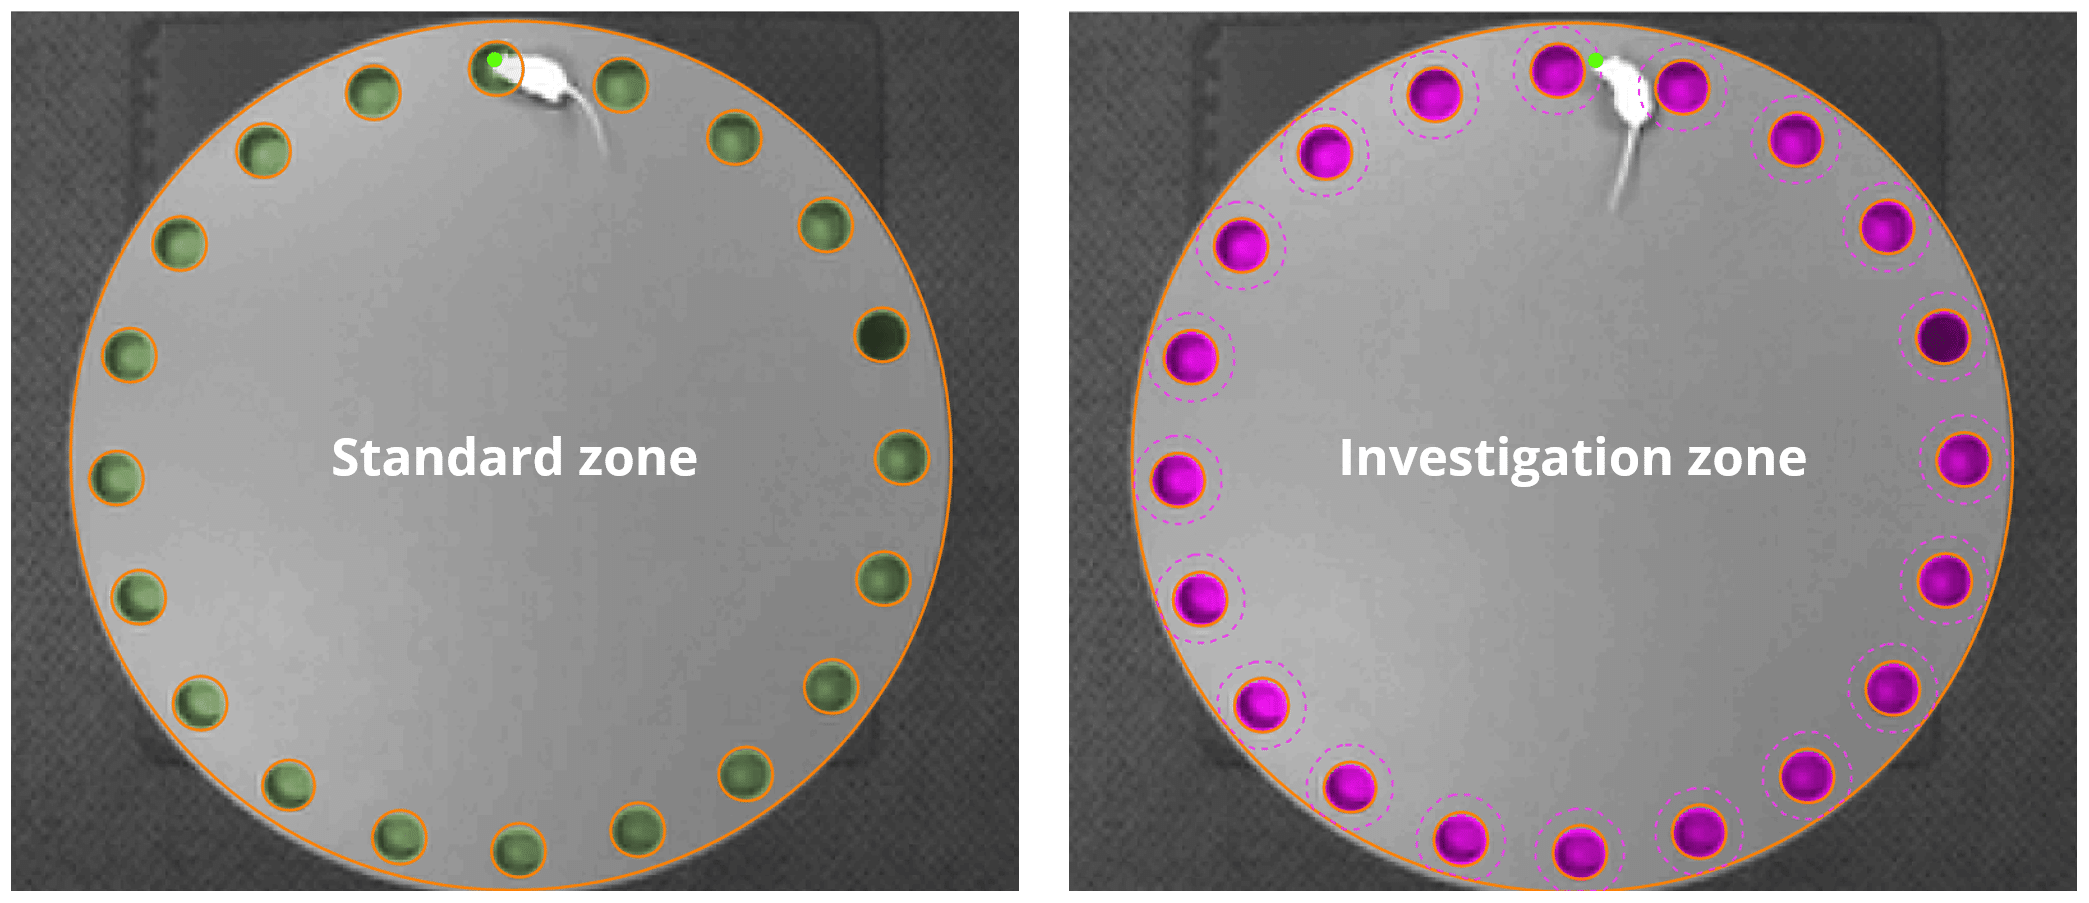
While Investigation zones are really intended for use in, say, a Novel Object Recognition experiment, you might find Investigation zones helpful if your holes lack contrast with the animal (e.g., if the holes are black and so is the animal). ANY-maze requires a reasonable degree of contrast between the animal and his testing apparatus for accurate tracking, so in the case of a black animal with black holes, it may not accurately detect head entries into the holes. Thus an Investigation zone would be most suitable.
For my example, I will stick with Standard zones.
Non-escape holes
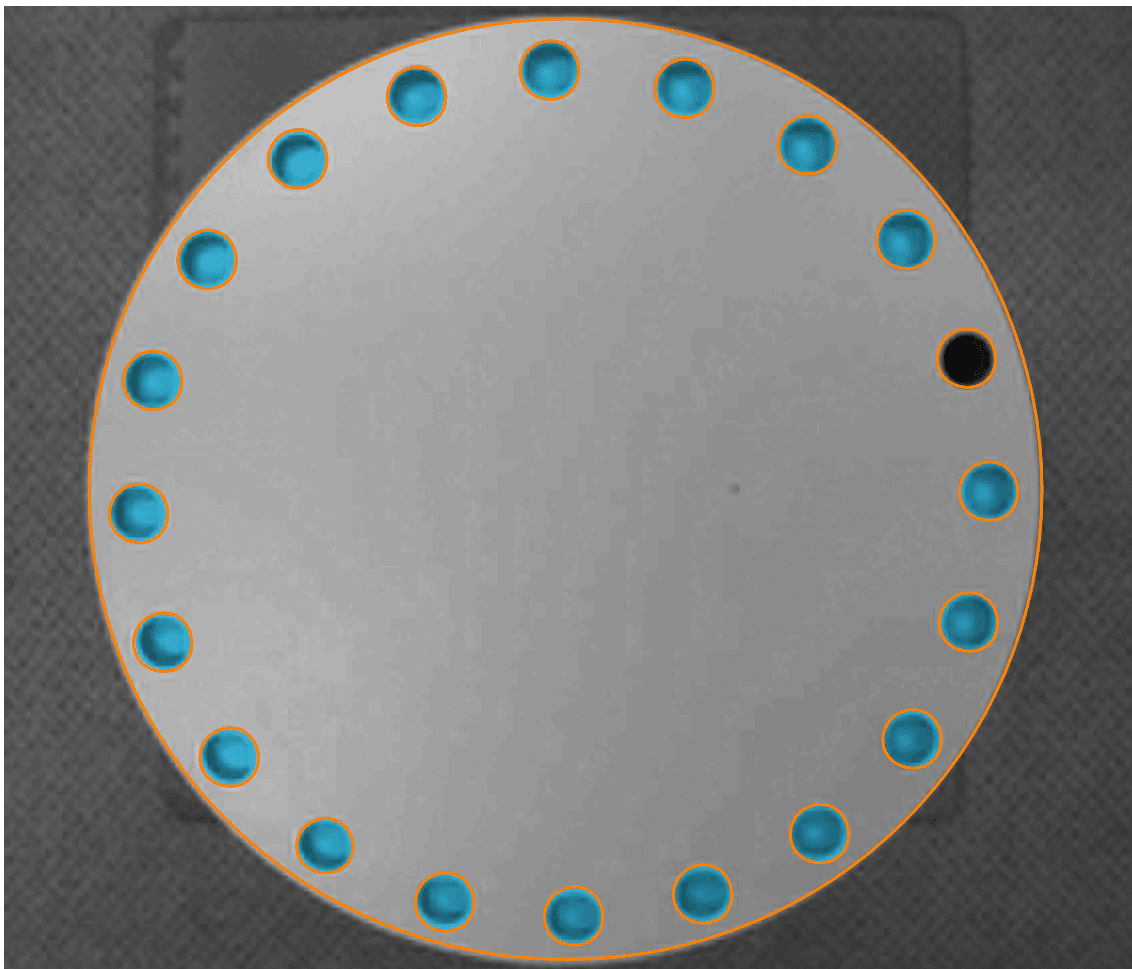
Lastly, let’s add a zone for the Non-escape holes. Then select all the holes except the escape hole – see image below.
And to match the zone entry criteria of the escape hole, let’s also make this a Standard zone and score entries using the animal’s head. But if you set up the ‘Escape hole (standard)’ zone as an Investigation zone, you should also set up the ‘Non-escape holes’ zone as an Investigation zone – they should match.
Section 5
Making the zones movable
At this point you have your zones created for your holes, but how do we tell ANY-maze that the Escape hole (and, consequently, the Non-escape holes) will be in different places for different animals (sometimes in quadrant 1, sometimes in quadrant 3)? To set this up, you will make your zones into movable zones.
From ANY-maze’s perspective, a zone that is movable is the same zone at the end of the day, regardless of its position. This means that when you analyse your results for investigation of the Escape hole or Non-escape holes, you don’t need to consider that the Escape hole was in quadrant 1 for one animal and in quadrant 3 for another; ANY-maze will cope with this for you and simply display the results for the Escape hole.
For this example, I will only set up 2 zone positions, but you can add as many as your paradigm requires.
Escape hole (standard)
To make your zones movable, select the Escape hole (standard) zone and expand the drop-down menu where it says Position of the zone remains the same in all tests. Change this to The position varies between (but not within) the animals. This is telling ANY-maze that the holes can assume more than one position – thus, movable zones.

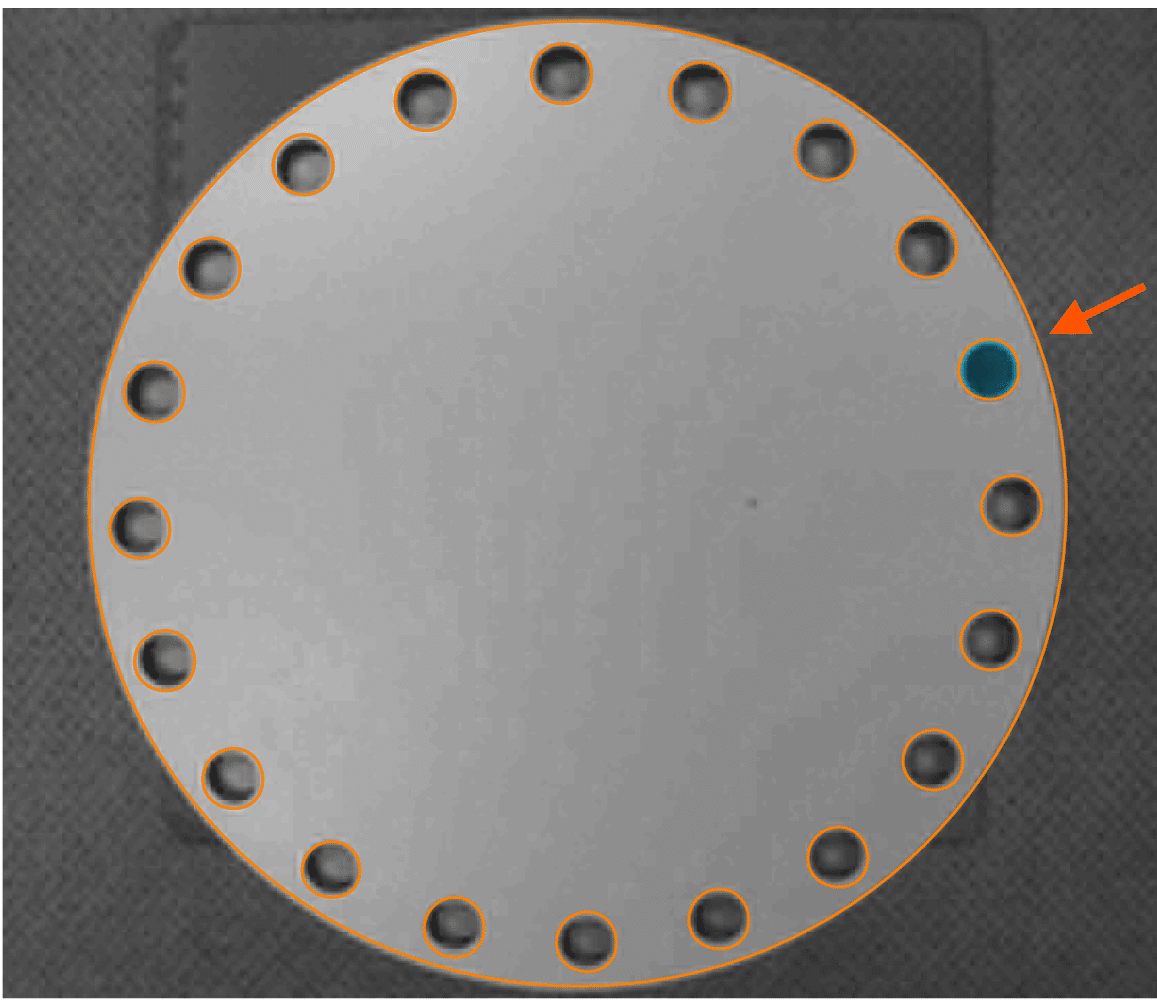
Now you need to tell ANY-maze exactly where the holes can move to. Right-click on the ‘Escape hole (standard)’ zone and add a New zone position. In this example, the first position will be “Quadrant 1”. Then in the video picture, click inside the Quadrant 1 hole on the apparatus map – see image below.
Then add another New zone position for the Quadrant 3 position – see image below.
![]()
Note: These positions I’m using in my example are not prescriptive. You should place the zone positions in whatever locations they are/were for your tests. And again, you can add as many different positions as you need; it’s not limited to 2.
Non-escape holes
Because the escape hole is movable, so too are the Non-escape holes. Start by selecting your Non-escape holes zone and this time choose Position depends on the position of the Escape hole (standard) zone.
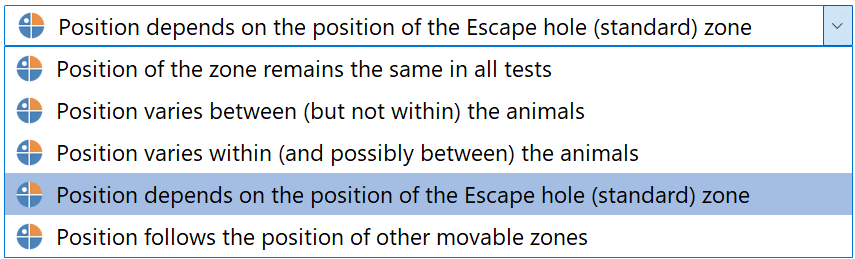
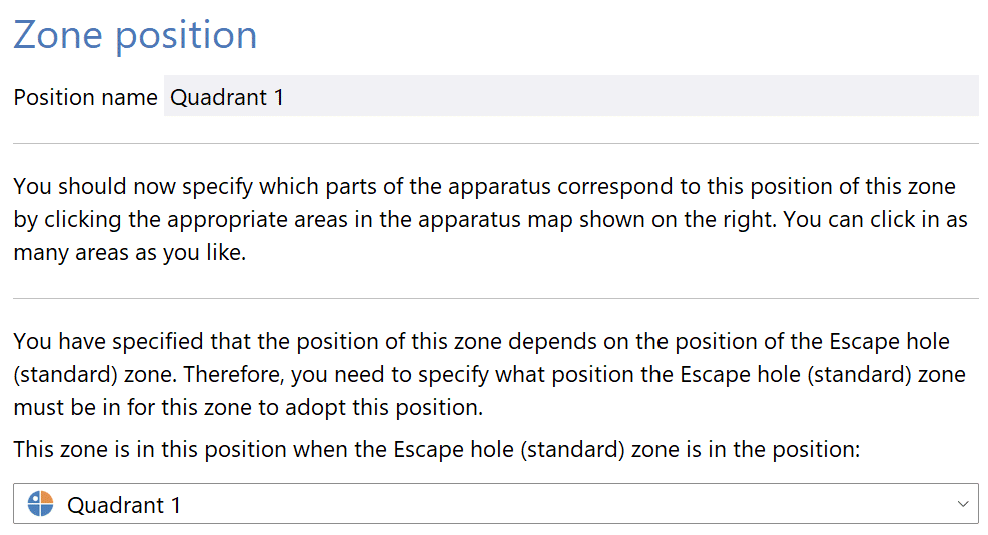
Then right-click on the ‘Non-escape holes’ zone in the Protocol list and add a New zone position. We can call this “Quadrant 1” to easily identify that the non-escape holes are in these locations when the escape hole is in Quadrant 1. As such, you’ll also select “This zone is in this position when the Escape hole (standard) zone is in the position: Quadrant 1” – see image below.
Lastly, select the non-escape holes in the video image, of course skipping over the Quadrant 1 escape hole position.
Then add the other zone position, this time for “Quadrant 3”. Select “This zone is in this position when the Escape hole (standard) zone is in the position: Quadrant 3” and choose the appropriate holes in the video image. I will explain later how to assign the zone positions for each animal.
Your list of Zones should now look like this:
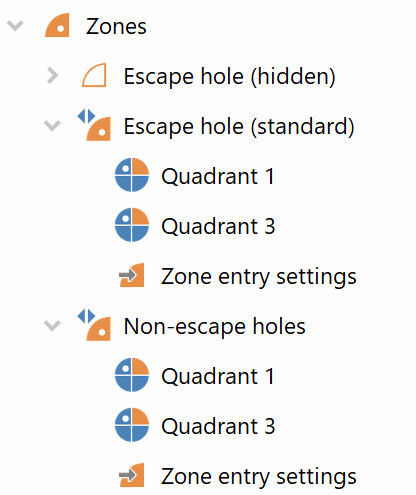
At this point you might be wondering why we haven’t made the Escape hole (hidden) zone movable, and that is because, as I said, ANY-maze doesn’t care where the hidden zone is – it just needs to know that there is one if the animal can hide from view during testing.
Section 6
Dividing your experiment into Stages
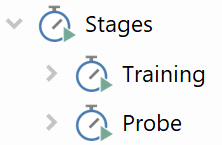
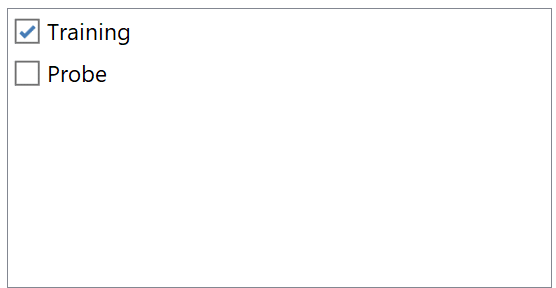
The next thing to consider is the fact that our experiment is divided into two parts: Training and Probe. In ANY-maze, these different parts are called Stages.
All experiments in ANY-maze consist of at least one stage, which is why you’ll notice there’s a stage already added for you. You can rename this stage as Training, as this will come first in our experiment. Then add a second stage for Probe.
And within each stage, input the Test duration and Maximum number of trials. In this example, the Training and Probe test durations are 3min and 1min, respectively. And the maximum number of trials are 5 and 1, respectively.
Section 7
Writing Procedures to end tests and label zones
Another useful tool to use in a Barnes Maze experiment is Procedures. We will use a Procedure to end the test when the animal enters the Escape hole (hidden) zone and another Procedure to label our escape hole positions (since they’re movable).
End test when animal enters escape hole
We want the tests in the Training stage to end after 3 minutes or when the animal enters the escape hole – whichever occurs first. If the animal never enters the escape hole within 3 minutes, the test will automatically end when 3 minutes elapse because that’s the test duration we set under Stages. However, to end the test when the animal enters the escape hole before 3 minutes, we need to write a Procedure.
Scroll down to Procedures in the Protocol list, right-click it, and select New procedure. We can call it “Enters escape hole end test”. Then beneath that, select that it should only apply to the Training stage.
Now we can build the procedure by placing statements inside the white area on the right (as opposed to the orange area above it). The procedure is as follows:

Note that the procedure refers to the Escape hole (hidden) zone because the hidden zone is used to detect when the animal goes down into the escape tunnel (as opposed to the Escape hole (standard) zone which measures exploration of the holes).
Label zones
We can optionally also label the escape hole zone for each test to ensure we’ve put the escape tunnel in the correct place for each animal. So, add another Procedure and call it “Label zones”. Then use the following Action item, this time in the orange area at the top of the procedure editor.
![]()
Statements dropped in the orange area will be executed before the test starts, which makes sense because we’ll want to know the location of the escape hole prior to testing.
Section 8
Using Calculations and Time periods to organize the data
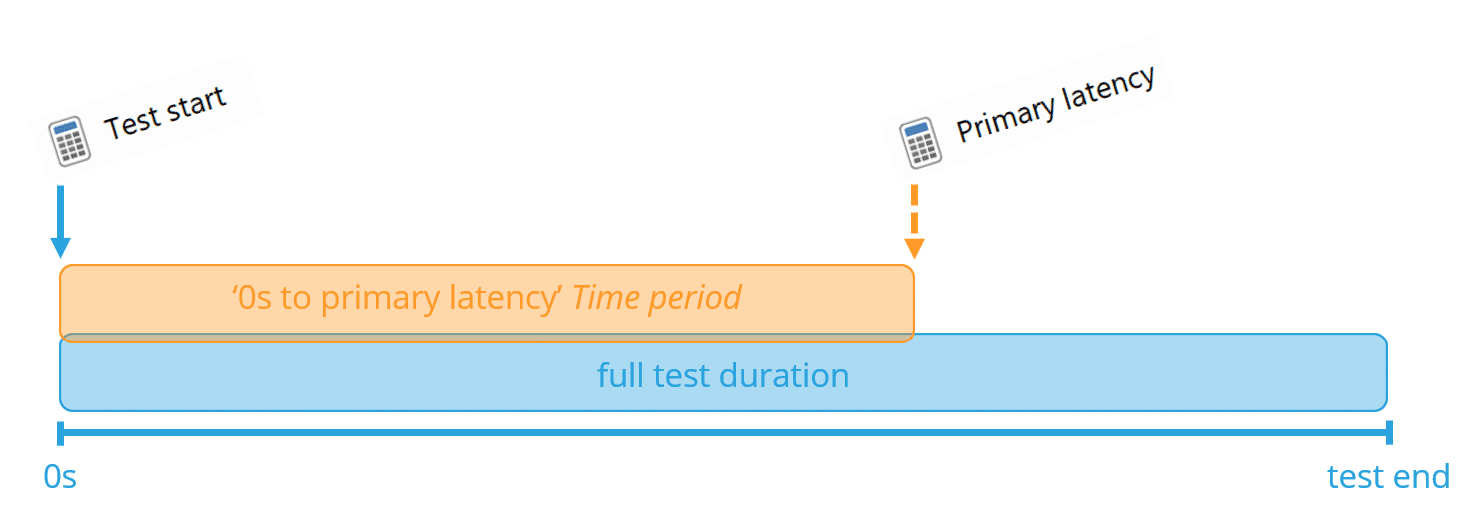
The final Protocol items we’ll set up are Calculations and Time periods. As a reminder, we will be evaluating some measures across the full test duration and some just within the confines of the primary latency period (the period from the start of the test to when the animal locates the escape hole). The table below summarizes each measure of interest, the name of the corresponding built-in measure in ANY-maze, and whether the measure is evaluated within the primary latency.
| Measure | Description | Native ANY-maze measure | Evaluated within: |
| Primary latency | Latency to locate the escape hole | Latency to first entry to the Escape hole (standard) zone | full test duration |
| Primary errors | Number of incorrect holes checked prior to locating the escape hole | Number of entries to the Non-escape holes zone | primary latency period |
| Primary distance travelled | Distance travelled prior to locating the escape hole | Total distance travelled | primary latency period |
| Total latency | Latency to enter the escape hole | Latency to first entry to the Escape hole (hidden) zone | full test duration |
| Total errors | Number of incorrect holes checked prior to entering the escape hole | Number of entries to the Non-escape holes zone | full test duration |
| Total distance travelled | Distance travelled in the full test | Total distance travelled | full test duration |
So, how do Time periods and Calculations play into this?
- We will use a Time period to evaluate the data within the confines of primary latency.
- We will use Calculations to derive our measures of interest from the native ANY-maze measures and give them more familiar names. This isn’t required, but it will make analysis more straightforward.
Marking the primary latency with a Time period
To evaluate some of our measures within the confines of the primary latency, we’ll need to set up a Time period in the Protocol. The start of the Time period will be the same for all tests: 0s into the test. But the end of the Time period will vary between tests since it’s contingent on each animal’s behavior. One way to define the ‘bookends’ of a Time period is to use the result of Calculations. The image below illustrates this concept.
Start by adding a new Calculation to the Protocol. You can call it “Test start”, then simply enter a zero in the calculation entry box at the bottom.
Then add another Calculation and call it “Primary latency”. In the calculation entry box, right-click and select Escape hole (standard) zone measures > Latency to first entry to the Escape hole (standard) zone (s).
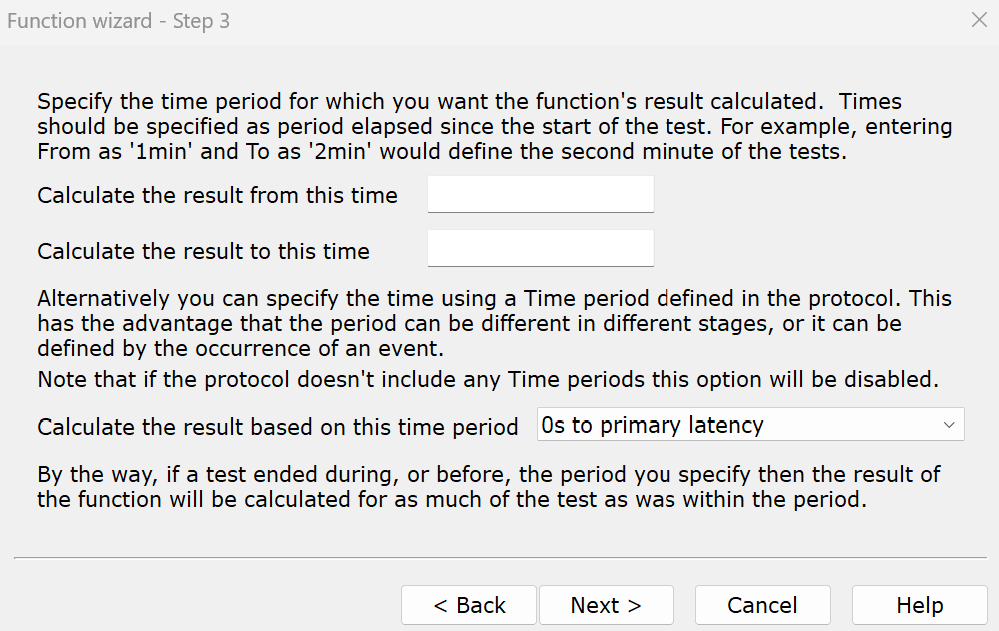
Now that we have the ‘bookends’ created, let’s add a Time period. Find Analysis across time in the Protocol list, right-click it, and select New time period. Call it “0s to primary latency”. Then select the following:

Using Calculations to derive new measures
Now that we have this Time period set up, we can proceed with adding some more Calculations to the Protocol. As I said earlier, we can use Calculations to refer to the native ANY-maze measures by more familiar names. For example, the native measure for Total latency is Latency to first entry to the Escape hole (standard) zone, but we can create a Calculation called ‘Total latency’ and set it equal to Latency to first entry to the Escape hole (standard) zone. Then when we analyze our data, we can refer to the measure called “Total latency” to keep things straightforward. By no means is this required, but it will make your analysis easier.
Since we’re talking about it, let’s start with Total latency. Add a new Calculation to the Protocol and call it “Total latency”. Then define the units as “s” for seconds. Then in the calculation box at the bottom of the page, select Escape hole (standard) zone measures > Latency to first entry to the Escape hole (standard) zone (s).
The next Calculation we’ll set up is for Primary errors. This measure is evaluated within the primary latency period, so we can include a ‘function’ in the calculation to have the calculation only analyze within this Time period. In the calculation box select Add function and click “Next” in the pop-up window. Scroll down and select “ResultForPeriod” (as in Time period). On the next page find Non-escape holes zone measures and select Number of entries to the zone. Then select the “0s to primary latency” Time period – see image below. Finally, click “Next” and “Finish”. That’s it!
Then add a new Calculation for Primary distance travelled, which is also evaluated within the primary latency period. So add a function for the “ResultForPeriod”, select “Total distance travelled” as the measure, and “0s to primary latency” as the time period.
Add another Calculation for Total errors and in the calculation box below, select Non-escape holes zone measures > Number of entries to the Non-escape holes zone.
Lastly, add a Calculation for Total distance travelled, with units of “m”. In the calculation box, select Apparatus measures > Total distance travelled (m).
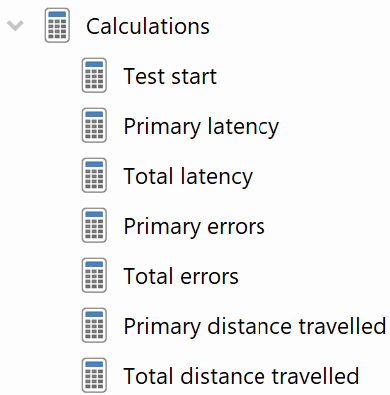
Here’s a final list of the calculations:
By the way, you can click-and-drag these calculations into whatever order you want them (e.g., if you want all of the ‘Primary’ results grouped together).
With your Protocol now complete, it’s a good idea to save it using the Save protocol button in the ribbon bar.
Section 9
Assigning the Escape hole locations on the Experiment page
Moving over to the Experiment page, input your treatment groups and the number of animals per group. Then select View animals at the top of the page, and you’ll see a column titled “Escape hole (standard)”. This is where you’ll assign the escape hole positions for each animal.
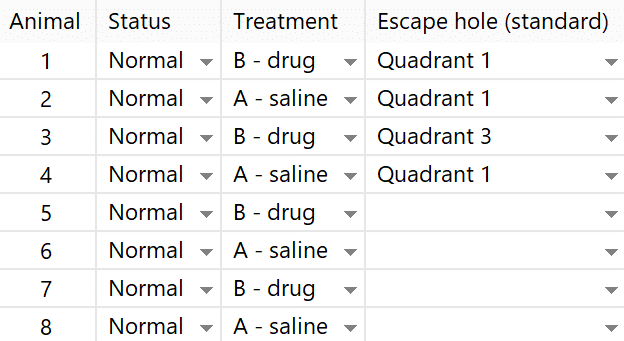
Once you’ve entered the value for each animal, you’ll be ready to perform your tests!
Section 10
Running some tests
Let’s review the steps you should take to run your tests:
- Place your escape tunnel in its correct position, referring to the on-screen label for confirmation (see Section 7).
- With your apparatus clean and empty, click the camera icon above the video image to capture the background picture.
- Place your animal in his start box and step away.
- Click the green Start test button to initiate auto-start.
- Step into frame to remove the starting box and quickly move out of frame.
- Tracking will then start automatically.
Section 11
Analyzing the data
Having performed some tests, you can now evaluate the data using the Results and Data pages. The Results page is used for performing collated analysis within ANY-maze, including statistical analysis, and the Data page is for exporting the raw data in a spreadsheet format.
On the Results page, click “Edit report settings” at the top. Then choose one of the report types:
For the former 3, you’ll start by selecting the results you want to include. Keep in mind that we have most of our results in the form of Calculations, so scroll all the way to the bottom of this list to find those.
Then select how you’d like to group the data. This can be thought of as your independent variable, so your treatment groups for example. Then at the bottom of the page you can optionally filter the data to only include what is selected. For example, if you want to graph the Primary errors from only the ‘Probe’ stage, select Trial > Probe trial. Finally, click “View the report”.
This data selection method is similar on the Data page, as well. Click “Select data” at the top of the Data page, select the data you want to evaluate (again, the Calculations are at the bottom of the list) and optionally include filters. Then click “View spreadsheet”. You can sort the spreadsheet by clicking on a column title. Then to export the spreadsheet, right-click inside any cell, copy, and paste into your program of choice.
Section 12
Summary
That’s a standard Barnes Maze experiment set up in ANY-maze!
Of course, your experiment may differ slightly from this one, in which case you can adapt your protocol to fit your specific paradigm. If you have any questions about how to do that, or about anything else for that matter, please reach out to the ANY-maze support team at [email protected] for help.
To summarize, in this guide you learned how to:
- Draw your apparatus map to include the holes.
- Measure investigations of the Escape hole using a Standard zone and measure entry down into the Escape hole using a Hidden zone.
- Use Procedures to automatically end the test upon entry to the Escape hole and label the Escape hole prior to testing.
- Make the Escape hole zone movable between animals.
- Assign the Escape hole position per animal on the Experiment page.
- Use Time periods and Calculations to evaluate the results within the primary latency period.