 Setting up apparatus
 Video capture & tracking
 Observing behaviour
 Connecting equipment
 Automating complex tests
 Running tests
 Results
 Visualising data
 Analysis
 Transferring data
 Open field
 Water-maze
 Y-maze
 Fear conditioning
 Novel object
 Barnes maze
 Radial arm maze
 Light/dark box
 Operant conditioning
 Zebrafish
 Computers
 Multifunction remote
 Accessories
 Digital interface
 Optogenetic interface
 Synchronisation interface
 Relay interface
 Audio interface
 Touch interface
 Analogue interface
 USB TTL cable
 Animal shocker
 Components
 Place preference
 ANY-box
 T-maze
 Zero maze
 Hole board
 Sociability cage
 OPAD
OPAD RAPC
RAPC Waterwheel forced swim test
 Thermal gradient ring
 Operon
 Activity Wheel
 Full ANY-maze licence
 Other licence types
 Developing countries licence
 Contact support
 Support Policy
 FAQs
FAQs Guides
 Downloads
 Send us files
 Activate a licence ID
 Documentation
 Contact us
 Blog
Blog About
About Testimonials
 Privacy Policy
ANY-maze has the ability to run test in multiple apparatus at the same time, which can dramatically increase throughput in large experiments.
In this guide I’ll walk you through the steps required to successfully set-up a multiple apparatus protocol, and highlight some of the common pitfalls to avoid.
Section 1
Will you be tracking the animal?
As you may know, you can use ANY-maze in experiments where you won’t actually be tracking the animal, for example in an Operant conditioning experiment you probably won’t be tracking the animal, rather you’ll be assessing the behaviour through the use of inputs such as levers or nose-poke holes.
If you won’t be tracking the animals, then many of the considerations for setting up a multiple apparatus protocol won’t apply to you, but there’s still plenty in this guide that will be relevant, so I recommend you read it anyhow, just skip parts which relate to video – indeed you can skip over the next section and jump to Setting up the apparatus.
Section 2
Acquiring video pictures of multiple apparatus
The first consideration for tracking in multiple apparatus is how you’ll acquire the video pictures. As you may already know, video pictures are acquired by the Video source elements of the protocol and here we arrive at our first common mistake:
Rule 1: A video source should show an image of a single piece of apparatus in which there will be a single animal
Obey this rule, and you’ll already be a long way towards getting your protocol set up correctly. One implication of this rule is that we should have one video source in your protocol for every piece of apparatus, so if we have 8 open fields, then we will have 8 video sources. (This can rule and its implication are somewhat distorted by montage video sources, but we’ll ignore them in this guide – follow the link if you’d like to learn more).
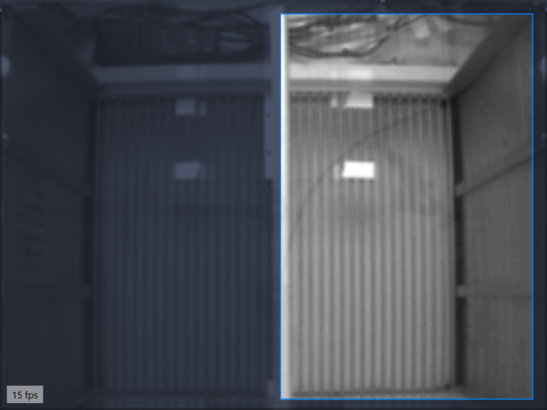
What this rule does NOT mean is that you necessarily need one camera for every apparatus, for example, you could have a single camera which shows two open fields, as in the image below:
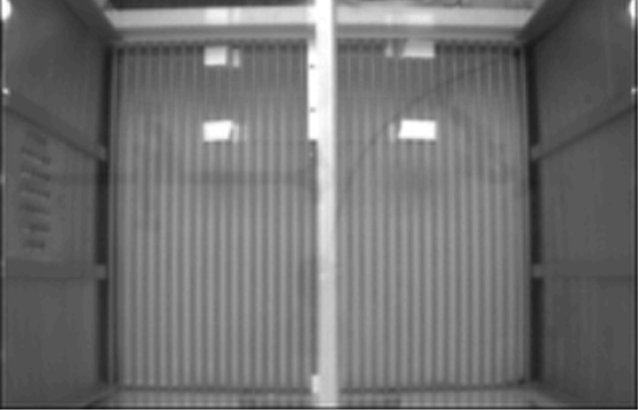
Here you only have one camera, but it shows two cages, so how do we set this up in ANY-maze if we’re not going to break rule 1?
The answer is that you’ll set up two Video sources, one for Cage 1 (on the left) and one for Cage 2 (on the right). But doesn’t that mean that both video sources will see both apparatus, and doesn’t that break rule 1? It would indeed break rule 1, but when you create a video source you can select which part of the camera’s video picture you want the video source to use. You do this simply by ‘drawing’ over the video picture with the mouse.
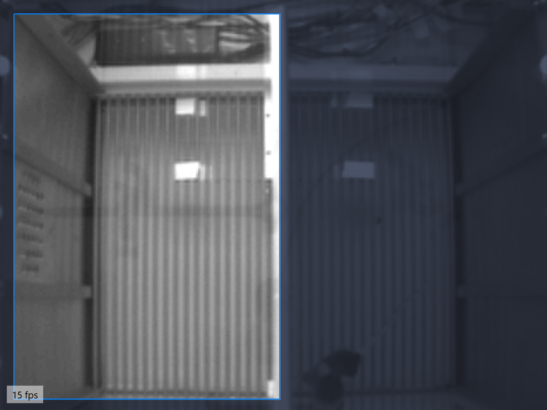
So here I have selected the area of the Cage 1 video source – it’s the unshadded area. I’d then go on and add another video source to the protocol, for Cage 2, and there I’d choose the same camera but select the area on the right of the video picture, like this:
Now I’ll have two video sources, one for each cage and each one showing just a single cage.
There’s nothing to stop you doing this for more than two cages, for example, you might push 4 cages together into a sqaure shape (with one cage in each quadrant) and then place a single camera over them.
But what if you had 8 cages like those shown in the images above? As can be seen, a single camera shows two cages so you’d need four cameras, and this raises the next potential problem, how do you connect multiple cameras to a single computer?
Section 3
Connecting multiple cameras
In the vast majority of cases, ANY-maze is used with USB cameras, so the question of how to connect, for example, 4 cameras to the computer looks like it ought to be pretty trivial: just plug them all into USB ports, and if there aren’t enough USB ports, use a USB hub, right? Wrong!
Unfortunately, you’re likely to come up against a limitation of USB, namely the available bandwidth. Bandwidth is simply how much information can be passed down the USB cable in a unit of time and as you expect, it’s finite. Connect one USB camera and it will typically use around 30% of the available bandwidth, connect a second camera and you’ll be using 60% if the available bandwidth… so you can see that three cameras will work, but if we try to connect a fourth camera we’ll have exceeded the available bandwidth.
Now this question of USB bandwidth is complicated because:
- The bandwidth limitation depends on the video picture size, the camera’s frame rate (i.e. the images the camera sends per second) and whether or not the camera compresses the images.
- The bandwidth limitation applies to each USB controller, and there is not a one-to-one relationship between USB controllers and USB ports, each controller will typically connect to multiple ports.
Add to this the question of USB hubs and you have material for a whole other guide… which of course we’ve written, and you will find here.
So, for the purposes of this guide we’ll assume that you have managed to connect as many cameras as you need to your computer – in our example, this would be 4 cameras, with each one showing two cages.
By the way, there are no rules about the relationship between cameras and the apparatus. So you could have one camera showing 2 apparatus, another showing 1 apparatus and another showing 3. The only rule is that you should (in this case) have 6 video sources in your protocol, one for each apparatus, and for each one you should select the right camera and select the right area of the camera’s picture, so the video source shows just it’s specific apparatus.
OK, enough about video sources, let’s move on to the next step, setting up the apparatus.
Section 4
Setting up the apparatus
As you would expect, you will add one apparatus item to your protocol for every piece of apparatus that you have, so if you have 8 cages then you’ll add 8 apparatus.
If you’re not tracking the animals, then there’s not much more you need to do (just set up the apparatus in usual way) and then you can skip forward to the adding I/O section.
If you are intending to track the animals then you’ll need to select the appropriate video source for each apparatus as you add it. This will be quite straightforward, provided you have followed ‘Rule 1’ as you will have exactly the same number of video sources as you have apparatus and they probably be called something like Cage 1, Cage 2, etc.
One thing you’ll notice when you select a video source is that the video picture of the apparatus will only show the area of the camera’s image that you selected in the video source, so for example, cage 2 from the figure above would appear like this:
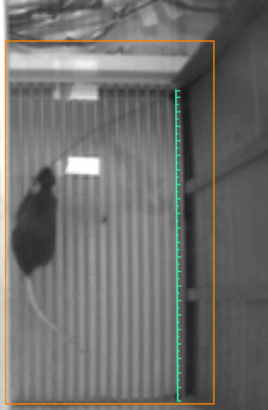
So the video source can be thought of like a sort of virtual camera, which just shows a certain part of the picture from the physical camera.
We quite often see protocols where the video source shows the entire video picture including multiple apparatus, and the apparatus map (the orange lines you draw to indicate the borders of the apparatus and to sub-divide it) is used to define the apparatus, something like this:
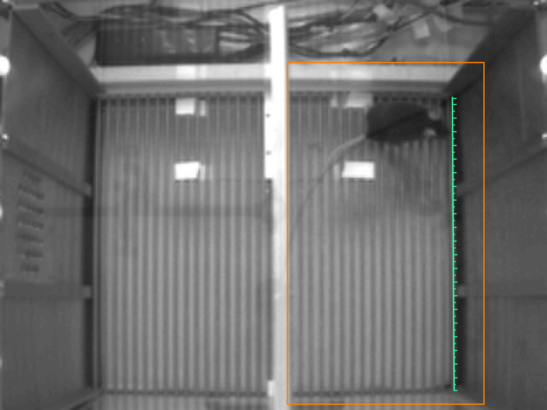
This approach does work, but it can cause a number of problems:
- ANY-maze is going to process the entire picture, which is more than twice as large as the ‘correct’ video source image shown a few paragraphs above. This can be quite significant when working with multiple apparatus as the computer is going to have lots to do.
- The images will take up a lot more space on the computers screen. So if you have multiple apparatus it will be hard to lay then all out nicely without them getting very small.
- ANY-maze does respond to things that happen outside the apparatus (i.e. outside the borders of the orange apparatus map), for example, movement in this area is used by the auto-start feature, so this won’t work in this example, because an animal in the left-hand cage could cause a test in the right-hand cage to start erroneously.
The solution is simple, just make sure you apply Rule 1.
When using multiple apparatus, the actual steps to set up each piece of apparatus are the same as they when using a single piece of apparatus, so I’m not going to go through them in detail here, but a couple of tips:
- Having set up the apparatus map for one apparatus, you can Select all and then Copy and Paste the apparatus map into other apparatus. You may need to make small adjustments as the video picture of the apparatus may differ slightly, but it’s usually helpful, especially if the apparatus map has many parts.
- Make sure that the apparatus maps are basically the same. Remember you are setting up multiple apparatus so you can run tests in parallel, so all the apparatus should be essentially identical and the way you divide it up should also be identical (this will become important when we get to setting up zones). Of course, there may be small differences between the apparatus, but if Cage 1 has an apparatus map with a large circular area in the middle, then Cage 2 (and 3, 4, etc.) should probably also have a large circular area in the middle.
Section 5
Setting up zones
Having set up the apparatus you will usually move on to set up some zones (although this is optional – there’s no requirement to use zones).
A common problem is to think that you will need to set up one zone for each apparatus – for example:
- Top left corner – Cage 1
- Top left corner – Cage 2
This is incorrect. You just need to set up one zone, in this case for ‘Top left corner’ and then select the area, or areas, which constitute the zone in each of the apparatus (they’ll all be shown). This is essentially identical to setting up a zone with just one apparatus, except that you need to tell ANY-maze where the zone is in each of the apparatus that you have.
The advantage of this is that when you look at the results of your tests you’ll see results for ‘Top left corner’ and these will report information about the animals’ behaviour in the top left corner irrespective of the apparatus they were tested in, which is what you will usually want.
In fact, setting up everything else in the protocol is the same, giving us:
Rule 2: Other than for the Video source and Apparatus elements, you should not create different protocol items for different apparatus.
Section 6
Setting up keys
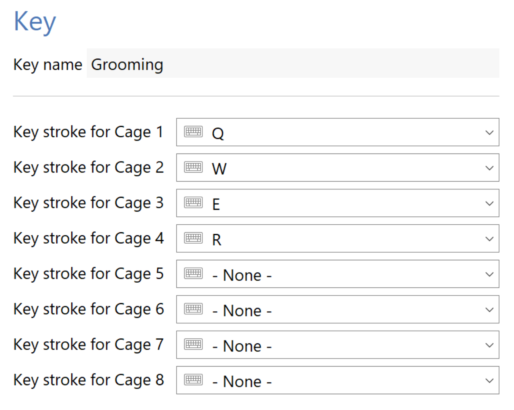
If you want to score some behaviours using keys, for example, grooming, then you will apply Rule 2 and just add a single Key element for Grooming. When you do this you’ll find that ANY-maze asks you to specify the key stroke for each piece of apparatus – see the figure below:
One thing to watch out for is that pressing multiple keys at the same time won’t necessarily work. This is a limitation of keyboard hardware and ANY-maze includes a ‘Multiple key test window’ which allows you to check which keys do work when held down simultaneously – it can be accessed from a link on the Keys ‘root’ element in the protocol (the item actually called ‘Keys’).
In fact, more serious than the limitations of the computer’s keyboard, are likely to be your limitations in actually watching 8 apparatus simultaneously and pressing keys when the animals groom. In some cases you might be able to achieve this because the behaviour being score is rare or long duration, or you might divide the apparatus between two people, one scoring apparatus 1 to 4 and the other 5 to 8. Alternatively, you could use ANY-maze’s ability to Add additional key scoring to a test after it has been performed, although then you’ll somewhat negate the efficiency saving that you gained by track in 8 cages simultaneously.
Section 7
Setting up inputs and outputs
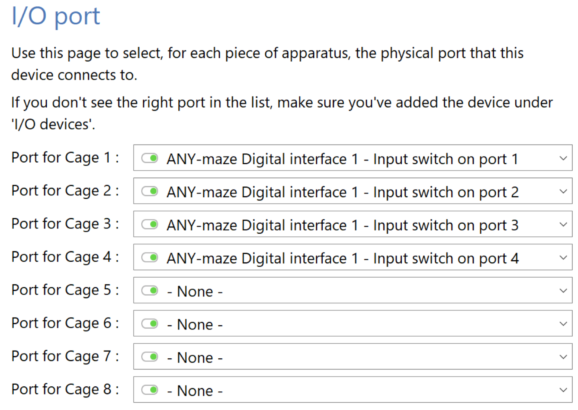
Here again you will apply Rule 2. So if your 8 cages all contain a lever and a pellet dispenser, you will still only add one On/off input (for the lever) and one Pellet dispenser to the protocol. In this case you will then need to specify the ports used by these items for each cage:
Section 8
In summary
Setting up multiple apparatus in ANY-maze is quite straightforward and should go smoothly if you apply the two rules described in this article:
Rule 1: A video source should show an image of a single piece of apparatus in which there will be a single animal.
Rule 2: Other than for the Video source and Apparatus elements, you should not create different protocol items for different apparatus.