 Setting up apparatus
 Video capture & tracking
 Observing behaviour
 Connecting equipment
 Automating complex tests
 Running tests
 Results
 Visualising data
 Analysis
 Transferring data
 Open field
 Water-maze
 Y-maze
 Fear conditioning
 Novel object
 Barnes maze
 Radial arm maze
 Light/dark box
 Operant conditioning
 Zebrafish
 Computers
 Multifunction remote
 Accessories
 Digital interface
 Optogenetic interface
 Synchronisation interface
 Relay interface
 Audio interface
 Touch interface
 Analogue interface
 USB TTL cable
 Animal shocker
 Components
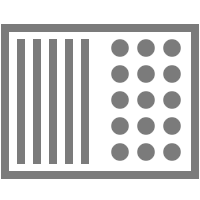 Place preference
 ANY-box
 T-maze
 Zero maze
 Hole board
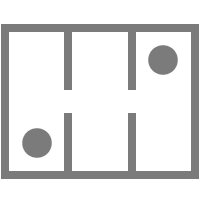 Sociability cage
 OPAD
OPAD RAPC
RAPC Waterwheel forced swim test
 Thermal gradient ring
 Operon
 Activity Wheel
 Full ANY-maze licence
 Other licence types
 Developing countries licence
 Contact support
 Support Policy
 FAQs
FAQs Guides
 Downloads
 Send us files
 Activate a licence ID
 Documentation
 Contact us
 Blog
Blog About
About Testimonials
 Privacy Policy
In the majority of experiments it is simplest, and most efficient, to track animals in live video pictures captured directly from a camera – and indeed this is how ANY-maze is most commonly used.
However, we are often asked if ANY-maze can also track in pre-recorded videos. The answer is an emphatic yes, and in this guide describes how to do it, and how to tackle some common issues you may encounter along the way.
Section 1
Recording videos
If you have pre-recorded videos, you may be tempted to skip this section – but I would encourage you to read it anyhow, as it introduces some important concepts.
Clearly, in order to track from a pre-recorded video, you are going to need to record the video first. Some cameras come with video recording software, so you may wish to use that, but you can also record videos from within ANY-maze. You can do this in a free, unlicensed copy of ANY-maze, meaning your licensed copy can be used simultaneously to perform live tests.
To record a video simply switch to the Video page, select your camera from the list on the left side of the page and then click the Record button, shown above and to the right of the video picture.
However you choose to record your videos, there are a few important things to take into consideration:
Bigger is not always better
Don’t be tempted to record a video at a high resolution unless it is really necessary for your tests. For example, recording a 4K video (3840 x 2160 pixels) is almost never useful, and even Full HD (1920 x 1080) is usually excessive. Reducing the resolution can substantially decrease the amount of data ANY-maze needs to process; for example, an HD video (1280 x 720) will require nine times less processing than 4K. In fact, even HD can be a higher resolution than is really required – for a test such as a mouse in a 40cm x 40cm open field, a 640 x 480 resolution image will be perfectly adequate and will require twenty-seven times less processing than a 4K video!
When choosing the resolution, simply decide whether you can see the animal’s shape clearly – in our example open field you will almost certainly be able to, but if your mouse is in a 3m x 3m open field, then a higher resolution would probably be more appropriate.
Keeping the resolution down will also reduce the size of the videos you record, meaning you can store more of them on your computer.
Higher frame rates are rarely better
As you probably know, video cameras capture many images per second – this is called the camera’s frame rate and is usually reported in units of frames per second or fps. Movies are generally recorded at 24fps, while broadcast TV usually uses 30fps, but some modern cameras (even relatively inexpensive webcams) can generate 60 or even 100fps. There’s no benefit to recording high frame rate videos for use in ANY-maze unless your animals move very quickly.
For example, using a frame rate of 30fps to record a mouse in an open field will mean we detect the position of the mouse about every 3mm when it is just walking, and around every 12mm when it is moving fast, which is usually perfectly adequate. If the mouse was to run as fast as it can (around 2m/s) then at 30fps we would detect its position about every 7cm, which would still probably be acceptable unless it is expected to move at this sort of speed for large parts of the test, in which case using a higher frame rate might be more suitable.
Again, keeping the frame rate down will mean ANY-maze has less data to process and the video files will be smaller.
What to actually record
So, you have chosen an appropriate resolution and frame rate and you are ready to record your open field experiment, but what should you actually record – one long video of the entire experiment, one video of each test… ?
There is no right or wrong answer to this question, but there is one very important consideration: whatever you do you should ensure that the video shows the empty apparatus for around 5 seconds immediately before the beginning of each test. In fact this will usually ‘just happen’, because you will typically clean the apparatus between tests, then disappear from the camera’s view while you get the animal, then reappear and place the animal into the apparatus – while you disappeared from view, the video will have shown the empty apparatus.
It’s very common (and a good idea) to write a reference for the test that is about to be performed on a piece of paper and hold this under the camera before the start of each test. If you do this, then it is best to:
- Start the video (unless it is already recording)
- Hold the paper under the camera
- Disappear from the camera’s view (for around 5 seconds) – usually this will be when you get the animal
- Put the animal into the apparatus
As regards the question of whether to record one long video, or short videos of each test, there are pros and cons to both approaches:
Recording one long video showing the entire experiment is of course simplest – you just start the video recorder and then get on with the experiment, without having to think about the video at all. However, the downside is that the video will be longer, and when you do track the tests in ANY-maze, you’ll probably want to fast-forward through the parts between the tests.
Recording one video per test is a little more work, as you will need to start the recording (which will usually involve typing in the video file’s name) before you start the test, and stop the recording at the end of the test. On the other hand, it will be simpler to track the tests in ANY-maze (no fast-forwarding required) and the video files will be smaller.
I have already recorded my videos and I didn’t follow any of the above guidelines!
If you already have some videos of tests and they don’t follow the above guidelines, don’t worry; there’s a very good chance you will be able to track them in ANY-maze. It just might be a little more complicated – read on for all the details.
Section 2
Setting up the Protocol
Setting up the protocol to track in pre-recorded videos is almost identical to setting it up to track live from a camera.
As is always the case when setting up a video-tracking protocol, the first thing you need to do is add a Video source. In this case you will select that the physical source of the video images is a Pre-recorded video from a video file and then enter (or select) the video which shows the first test in your experiment – see the image below.
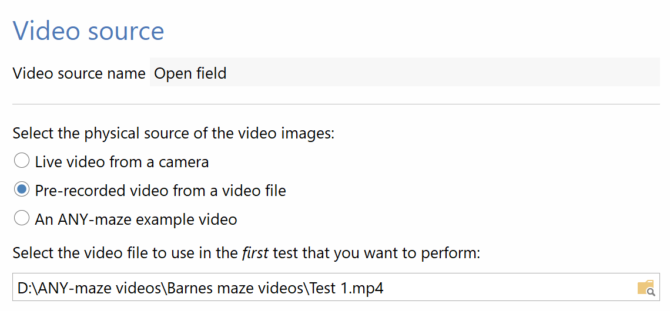
If in your copy of ANY-maze the Video source settings don’t look quite like this, then it’s because you are using a version prior to 7.12. Remember you can update for free; just download the latest version from here. If you’d rather not update now, you can still track from a video using older versions of ANY-maze – just open the Physical source drop list and select the last option: Video file.
After you select the video file, it will begin playing on the right side of the page.
Section 3
Problems with codecs
Sometimes, when you select a video file in ANY-maze, rather than seeing the video playing on the right side of the page, you see a grey rectangle containing the text: ANY-maze can’t play this file. It might be unavailable or you may need to install a video codec to play it.
As you have just selected the file, it clearly is available, so the problem will be that you don’t have a suitable codec to play it.
Video files are stored in an encoded (i.e. compressed) format and they are encoded and decoded by a piece of software called a codec. There are literally hundreds of different formats available, and therefore hundreds of different codecs, and Windows only includes a few as standard. To address this you can install more codecs, which is something described in more detail in this ANY-maze FAQ
Section 4
Cropping the video picture
If your apparatus doesn’t fill the video picture then you can crop it, which is a good idea as it will reduce the amount of processing ANY-maze has to do – and it will make the picture shown on the Tests page (where you’ll actually perform the tests) more relevant.
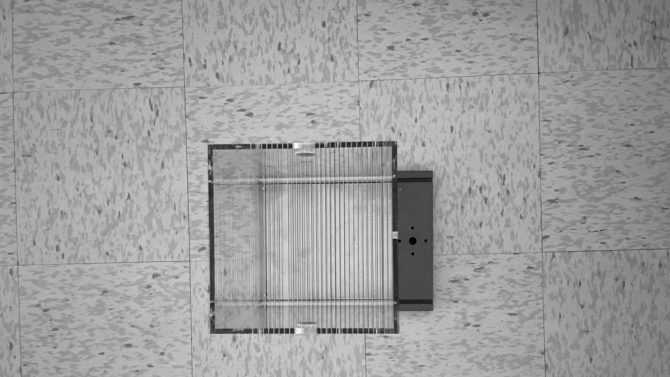
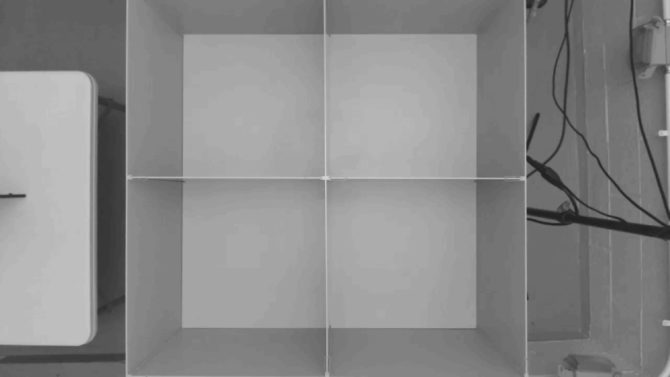
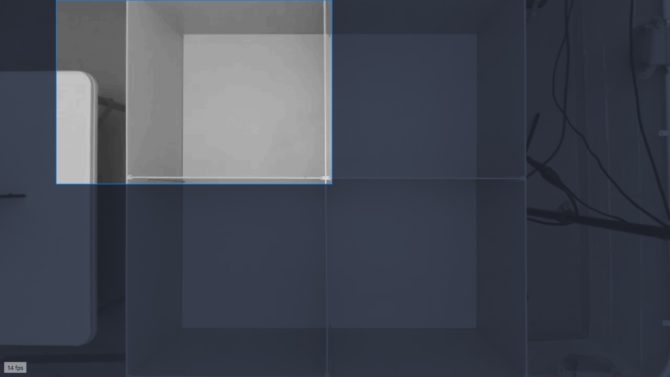
The first image, below, shows the entire video picture of a piece of apparatus. The second image, in which the video has been cropped to show just the apparatus, is three times smaller than the original, meaning ANY-maze will have significantly less information to process.
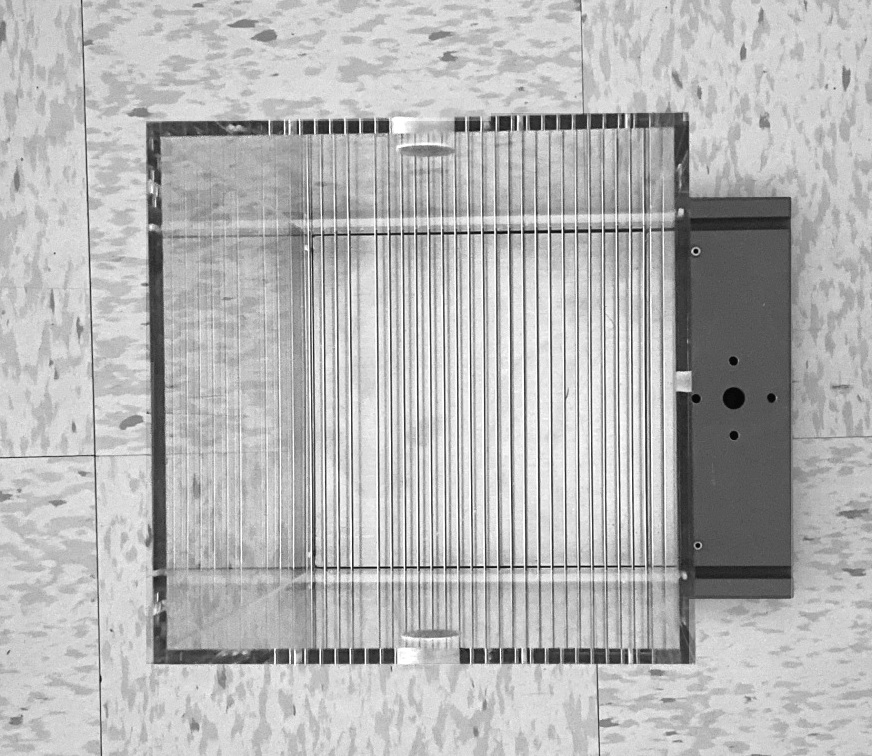
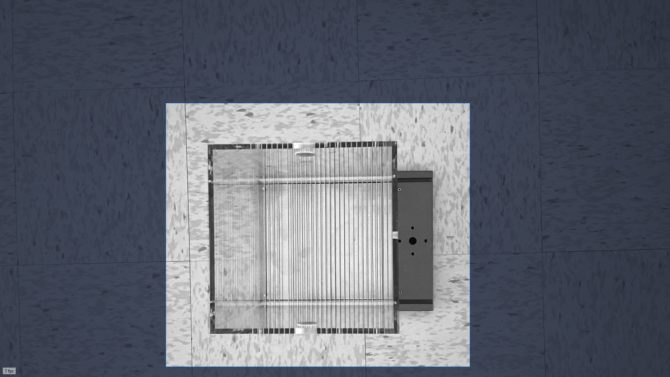
You can crop a video picture on the Video source page simply by dragging the mouse to select the area of the video that you want to use – ANY-maze calls this area the Region of interest. Don’t be tempted to crop the picture too tightly – it is actually better if the region of interest includes some of the area around the apparatus, as in the image below.
After cropping a video picture in this way, everywhere else in ANY-maze (that is, everywhere other than the Protocol’s Video source page) will show just the region of interest as the video picture of the apparatus.
Section 5
Automatically starting tests - yes or no?
As you may know, ANY-maze can automatically start tests when the experimenter leaves the camera’s field of view. When running tests live, this can be really helpful as you are (necessarily) busy putting the animal in the apparatus at the start of the test and therefore not in front of the computer and able to press a ‘Test start’ button. However, when running tests from a video you will be in front of the computer, and so you will easily be able to start the tests manually.
That’s not to say that you can’t still use auto-start if you wish, and doing so will make the tracking of the videos even simpler. If you want to do this, just make sure that your videos show you (or at least your arm) appearing in the video picture, placing the animal in the apparatus, and then leaving the picture – the tests will start at the moment you leave. You can see this in action in some of the ANY-maze examples – such as the Open field example and the Plus-maze example. (To view an example, switch to the File page and select Open example experiment from the list on the left.)
Of course if you are using videos you recorded before reading this guide, they may not show you putting the animal into the apparatus – indeed they may begin at the moment the test started, in which case you will have to start the tests manually.
Having decided whether or not to use auto-start, you should set your protocol accordingly by selecting the relevant option under Automatic starting of tests on the Protocol page.
Section 6
Performing the tests
With the protocol all set up, you are ready to actually track your tests. First you will need to add some Animals and/or Treatment groups to your experiment, which you do on the Experiment page in the usual way. Then you should switch to the Tests page.
Running the first test
On the Tests page you will find that the apparatus is ready to run the first test, and that the video that you selected when you set up the video source in the protocol will already be playing.
Let’s assume this is the video of the first test – in which case you will be ready to run the test, although you may need to rewind the video (which you can do by clicking the Rewind button below the video picture and then clicking Play).
If you are using auto-start, then click the Start test button just before the experimenter comes into the camera’s field of view to put the animal into the apparatus (so at this point the apparatus will look exactly as it will during the test, just without the animal in it). The test will then be shown as Waiting to start. The experimenter will then appear, put the animal in the apparatus and leave, and at the moment they leave the test will begin.
Alternatively, if you are not using auto-start, just wait until the experimenter has placed the animal in the apparatus and no part of the experimenter, such as their hand, lab-coat, etc, is inside the apparatus – then click the Start test button and the test will begin immediately.
The test will then run for the duration specified in the protocol, at which point it will end. If you want to end it before this, you can click the Stop test button. If the video reaches the end before the test ends, then ANY-maze will automatically end the test and record a Test end reason of ‘End of video file’.
Running the next test
When the first test ends, the video you selected when you set up the video source in the protocol will still be playing.
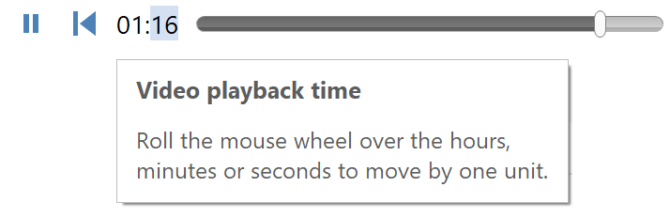
If you recorded one long video of the entire experiment, then this will still be the correct video, although you will probably want to fast-forward so as to skip over parts showing the experimenter cleaning the apparatus between the tests. You can fast-forward by dragging the playback slider (shown below the video), or by positioning the mouse pointer over the hours, minutes or seconds counter and rolling the mouse wheel.
On the other hand, if you recorded one video of each test, then clearly the video that is playing will be the wrong video, as it shows the first test and you are now ready to perform the second one. In this case, what you should not do is go back to the Video source in the protocol and select a different video. Instead, you should click the name of the video, shown just above the video picture – see the image below.
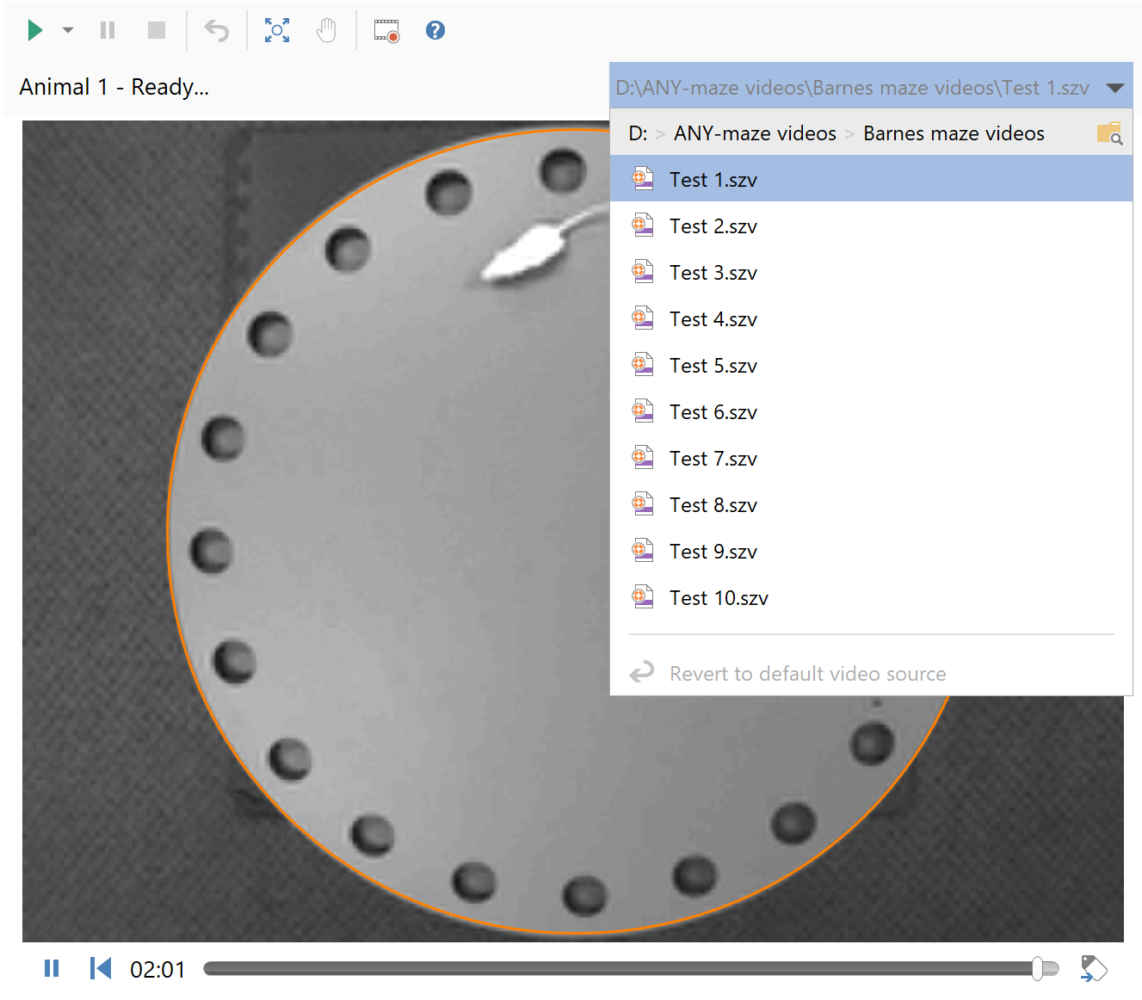
This will cause a menu to open showing all the other video files in the same folder, and you can just select the appropriate video from the list – in our case this would be Test 2. If the video you want is in a different folder, then click the folder name at the top of the list and you’ll be able to navigate to any other folder on your computer or network.
You can the repeat the above steps to track all the tests in your experiment!
Section 7
What if the apparatus has moved between tests?
When you run Test 1, the apparatus map (the orange drawing you made of the apparatus) will exactly align with the video picture, but when you play the video for Test 2 you might find that the apparatus (or camera) has moved slightly (this often happens when you clean the apparatus between tests).
What you should not do is go and move the apparatus drawing in the protocol, as that will affect all the tests (including those you have already performed). Instead, you should use the Adjust the apparatus map button, shown just above the video picture.
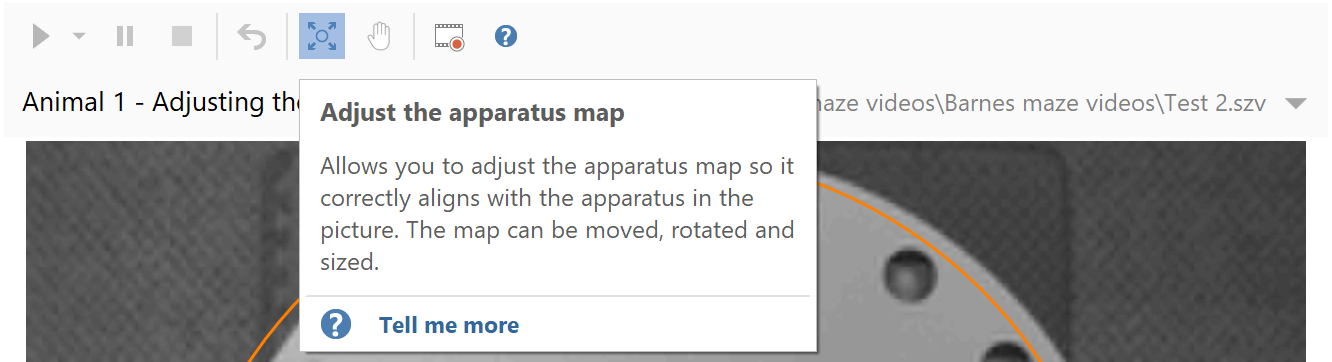
After you select this button you will find you can drag, rotate and even size the apparatus drawing using the mouse.
Adjustments to the alignment are retained from one test to the next, but perhaps as you proceed through the videos you’ll find another one where the apparatus drawing and the video are not aligned – no problem; simply adjust it again.
Section 8
What if the video doesn’t show the empty apparatus for 5s before the test?
In Section 1, I mentioned that when recording a video to be tracked with ANY-maze, you should endeavour to make sure that the video includes a period before each test which just shows the empty apparatus and lasts for about five seconds. What if this simply isn’t possible in your apparatus, or if you have already recorded the videos and they don’t include this?
In this situation, the solution is to go back to the Protocol page, select the Tracking options item and check the box labelled The animal will be in the apparatus before the start of the test. When you return to the Tests page, you will find that there is a new Take background image button shown above the video picture
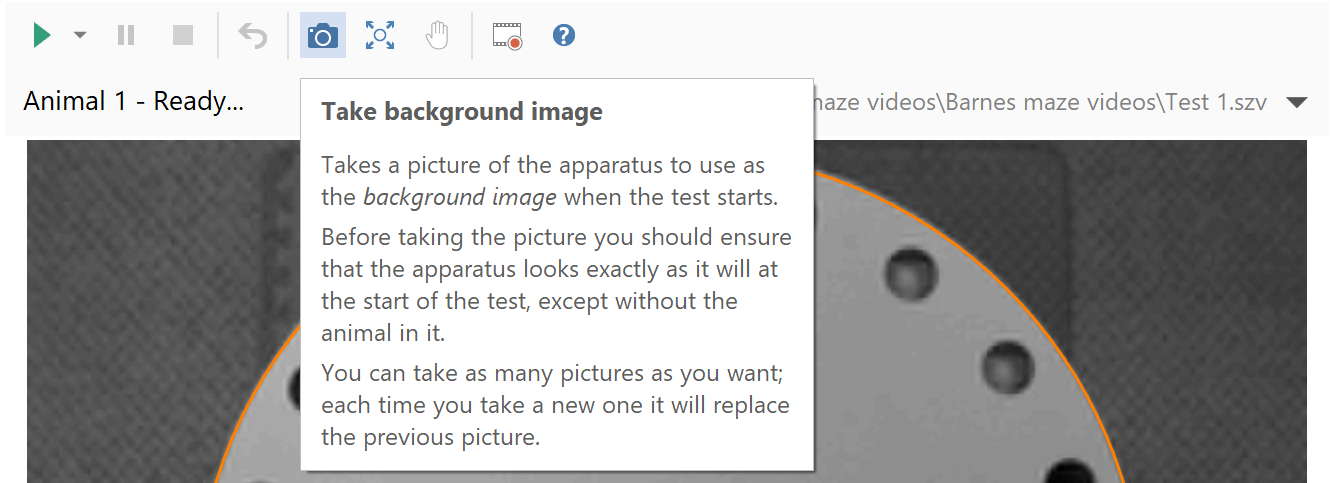
Clicking this button will take a picture of whatever the video is currently showing, and use that as the background image at the very start of the test.
If somewhere in your video there is a part that shows the apparatus exactly as will appear during the test (including being lit in exactly the same way), but without the animal in it, then you can scroll to that point, click the button and then scroll back to the beginning of the test. You can then Start the test in the usual way (don’t try to use auto-start in this situation).
But what if there is no point in the video which shows the empty apparatus? For example, the video starts right at the very beginning of the test with the animal in the apparatus and ends with the animal still there. In this case, you can use a trick:
- Note where in the apparatus the animal is at the start of the test.
- Scroll through the video looking for a point where the animal is at least one animal length (ideally two animal lengths) away from that position, and use the Take background image button to take that picture as the background image.
- Scroll back to the start of the video and immediately start the test.
Note that this trick will NOT work if the Animal colour you specified on the Protocol page was ‘The background and/or the animals are not uniform’. It will also not work if at no point in the video the animal is in a different location to where it started the test – for example, the animal is constrained in a small apparatus.
Section 9
What if the same video shows multiple apparatus?
If your video shows multiple apparatus, as in the left-hand image below, then you will actually need to add one video source to your protocol for each of the apparatus, and for each one select a region of interest which shows just one of the apparatus, as in the right-hand image below
In fact, this requirement for a video source to only show a single piece of apparatus (where an apparatus is where a single animal will be tested) is a standard requirement in ANY-maze, and is no different when working in videos to when working live from a camera. I only mention it here for completeness and because it links in with the next section…
Section 10
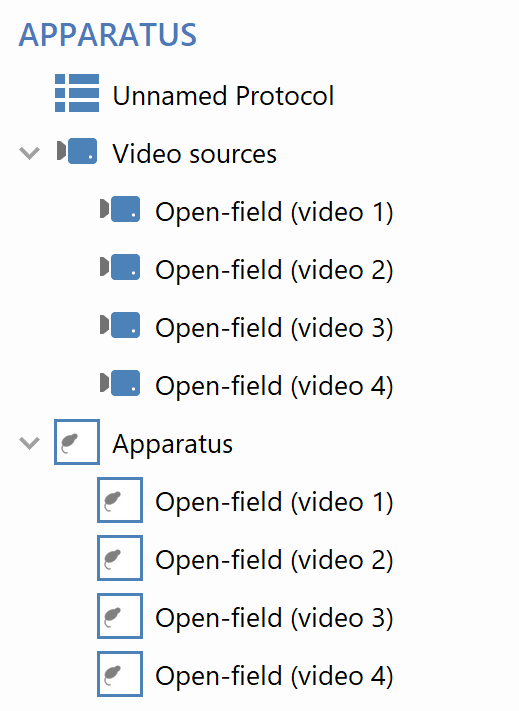
Increasing throughput by tracking simultaneously in multiple videos
One way to speed up experiments in ANY-maze is to track in multiple apparatus simultaneously. Clearly if you are tracking in four pieces of apparatus at the same time, it will take you a quarter of the time to track all the tests compared to tracking in just one. This benefit can easily be applied to video files, even if the tests were actually performed one after the other, and will usually mean you can track an entire experiment quite quickly.
To achieve this, you first need to decide how many videos you want to track in parallel. This will depend on the format of the videos and the speed of your computer, but unless your videos are very large (such as Full HD) and/or high frame rate (i.e. > 30 fps), then with a reasonably modern computer you should have no problem tracking at least four videos at the same time.
The first thing to do is to add multiple Video sources to your protocol, and for each one set the Physical source of video images to be the video of the first, second, third, etc. test.
Next, add multiple apparatus, selecting the first video source for the first one, the second video source for the second, and so on. You will need to draw the Apparatus map (the orange drawing of the apparatus) for the first apparatus, but you can then use the Select all and Copy/Paste buttons to copy and paste the map into each of the other apparatus.
You should end up with a protocol which looks something like this:
To run the tests you should follow the guidance in Section 6 of this guide, most importantly remembering to use the Video file drop lists on the Tests page to work through the files.
While we’re on the subject of increasing throughput, we’re sometimes asked whether ANY-maze can ‘scan video files at high speed’ and/or ‘batch process video files’ – currently, the answer to both questions is no.
Section 11
Summary
In this guide we’ve seen how ANY-maze can be set up to track in pre-recorded video files, whether these are files you plan to record or ones you already have. We’ve looked at solutions to common problems that can arise, such as not having a suitable codec to play a video, or what to do if the video doesn’t include any pictures of the empty apparatus, and we’ve learnt how to increase throughput by tracking multiple videos at the same time.
Hopefully, you’re now feeling equipped to track in your own videos – but if you have any questions at all, just contact us at [email protected] and we’ll be delighted to help.