 Setting up apparatus
 Video capture & tracking
 Observing behaviour
 Connecting equipment
 Automating complex tests
 Running tests
 Results
 Visualising data
 Analysis
 Transferring data
 Open field
 Water-maze
 Y-maze
 Fear conditioning
 Novel object
 Barnes maze
 Radial arm maze
 Light/dark box
 Operant conditioning
 Zebrafish
 Computers
 Multifunction remote
 Accessories
 Digital interface
 Optogenetic interface
 Synchronisation interface
 Relay interface
 Audio interface
 Touch interface
 Analogue interface
 USB TTL cable
 Animal shocker
 Components
 Place preference
 ANY-box
 T-maze
 Zero maze
 Hole board
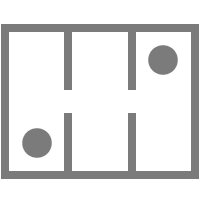 Sociability cage
 OPAD
OPAD RAPC
RAPC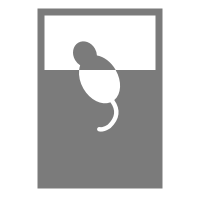 Waterwheel forced swim test
 Thermal gradient ring
 Operon
 Activity Wheel
 Full ANY-maze licence
 Other licence types
 Developing countries licence
 Contact support
 Support Policy
 FAQs
FAQs Guides
 Downloads
 Send us files
 Activate a licence ID
 Documentation
 Contact us
 Blog
Blog About
About Testimonials
 Privacy Policy
Using ANY-maze to run tests in the Maze Engineers Fear Conditioning Chamber is a little different to working with other input/output devices. ANY-maze can’t directly control the speaker, light and shocker in the chamber, rather it has to issue appropriate commands to Maze Engineers’ MazeController software. In this guide I’ll describe the steps required to setup a fear conditioning experiment in this apparatus, with particular emphasis on how to issue the required commands.
Section 1
Setting up the ANY-maze Protocol
- You should first download the latest version of ANY-maze
- Start ANY-maze and create a new, empty experiment from the File page, which will bring you to the Protocol page.
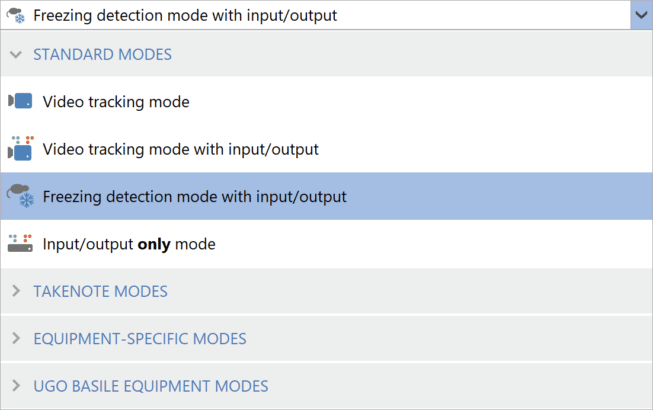
- After naming your protocol, put it into Freezing detection mode with input/output.
- Click the Add item button in the ribbon bar at the top of the page and select New video source. Give it a name, such as ‘Fear conditioning camera 1’, and choose the camera you will be using. Repeat for each camera you have.
- Click Add item > New apparatus. Give it a name, such as ‘Fear conditioning cage 1’. Then select the video source that shows your cage.
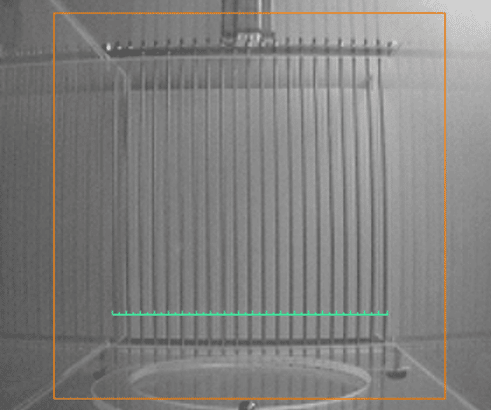
- Using the tools in the ribbon bar, draw the area of the apparatus that will contain your animal – see image below. Then, place the green ruler along the floor of the apparatus and enter the physical length of the floor of your cage.
- In the Protocol list, move down to Animal size and input the approximate length of your animals.
- Under Stages, specify the duration of your tests and the number of trials in each stage. For example, you may have the following Stages :
- Habituation: No scheduled shocks or cues.
- Training: Tone-shock pairing.
- Testing: Tones are presented without shocks. Freezing is analysed.
- Finally, specify the grouping of your Treatment groups.
Section 2
Example used in this guide
Procedures are what you’ll use to control the lights, tones and shocker in your fear conditioning box. In this guide, we will create a set of procedures for the following example protocol:
- During the Training stage, the animal is in the chamber for 3 min before being presented with an auditory cue (4000 Hz) for 30 s. A foot shock (0.5 mA) is delivered during the last 2 s of the tone presentation and co-terminated with the tone. A total of 3 tone-shock presentations occur with a 15 s inter-trial interval. The animal is removed from the cage 1 min after the last foot shock.
- The Testing stage is almost identical to the Training stage, just the shock is not delivered
Section 3
Controlling the chamber
Before you start writing your Procedures, you will need to have downloaded the Maze Engineers ‘MazeController.exe’ program. In this guide we have assumed this has been placed in the folder C:\Program Files\ME
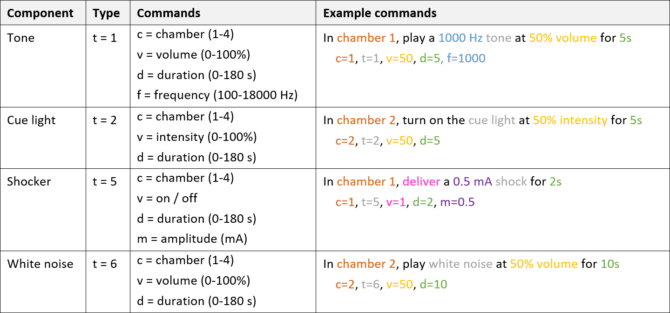
Unlike other input/output devices in ANY-maze, which the system can control directly, the Maze Engineers Fear Conditioning chamber is controlled via Maze Engineers’ own MazeController software. This software accepts a range of commands which can be used to control the chamber’s tone generator, cue light, shocker and white noise generator – see the table below.
Tone generation
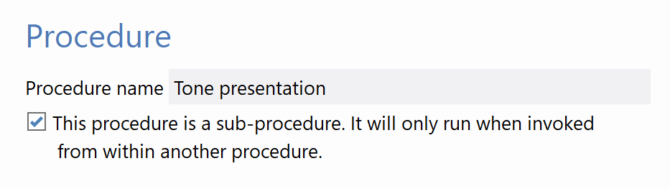
- Click Add item > New procedure. Call it ‘Tone presentation’. Then, select that this is a sub-procedure, as pictured below.
- Click-and-drag a green Action… statement into the white area to the right.
- Click the drop-down arrow inside that and select Run a program > Run a program.
- In the pop-up window, you’ll first select the location of the Maze Engineers MazeController.exe program on your computer. Then, enter the parameters which will control the tone. For example to play a 4KHz tone at 50% volume for 30s in cage 1, the parameters would be: c=1,t=1,v=50,d=30,f=4000
Note how the individual commands are separated by commas.
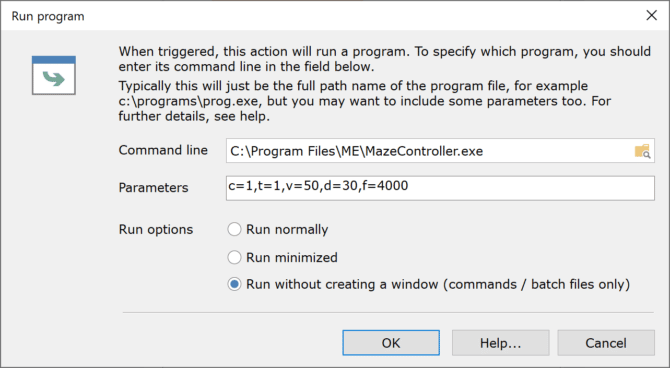
- Select Run without creating a window and then click OK.
- Your procedure should look like this:

Shock delivery
- Add a new Procedure using Add item > New procedure. Call it ‘Shock delivery’, then select that it is a sub-procedure.
- Add a green Action… to the white area, and in the drop-down select Run a program > Run a program.
- In the pop-up window, select your Maze Engineers program again, and enter the parameters which will control the shocker. For example, to deliver a 0.5mA shock for 2 seconds in chamber 1, the commands would be: c=1,t=5,v=1,d=2,m=0.5
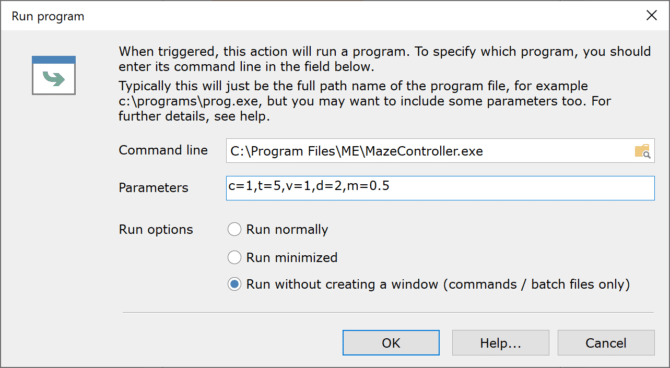
- Select ‘Run without creating a window’ and click OK.
- Your procedure should look like this:

Section 4
Controlling the tests
- Add another Procedure to your protocol and call it ‘Tone-shock pairing’.
- First, we want to wait 3 min before we present the tone for the first time. Click-and-drag a red Wait until… statement into the white area to the right (do NOT place this in the orange area at the top). Click the drop-down arrow, select Timers > Time elapsed, and enter ‘3min’.
- Click-and-drag an orange Repeat… Forever… statement just beneath that. Click the arrow next to ‘Repeat’ and select ‘A number of times’. Enter ‘3’ to tell ANY-maze how many times we want it to present the tone-shock pairing.
- After the first 3 minutes we want to present a tone (the parameters of the tone are already specified in the sub-procedure). Place a Run sub-procedure… statement inside of the orange brackets. Choose Tone presentation from the drop-down.
- Place another Wait until… beneath the sub-procedure, and select Timers > Time elapsed, then enter ‘28s’.
- Place an If… then… statement below that. Then under Statements > Comparison operators, place the equals sign inside the blue If… then…
- Select Variables > Test information and place Current stage into the first circle of the If… Then in the drop-down that appears, select Training.
- After the tone has played for 28s, we want to deliver a shock to the animal, but only if he’s in the Training stage. Place a Run sub-procedure… statement inside of that If… then… and select Shock delivery from the drop-down.
- We then want ANY-maze to wait 2s while the shock is activated, plus 15s for the inter-trial interval before repeating the steps. Add a Wait until… beneath the ‘Shock delivery’, still inside the orange brackets. Select Timer > Time elapsed, and enter ‘17s’.
- Add another Wait until… at the very bottom, outside of the orange brackets. Select Timer> Time elapsed, and enter ‘45s’.
- Finally, place an Action… command at the very bottom. Select Test control > End the test. So, after the last foot shock terminates, ANY-maze will wait 15s + 45s = 60s before it ends the test.
Your Procedure should look like this: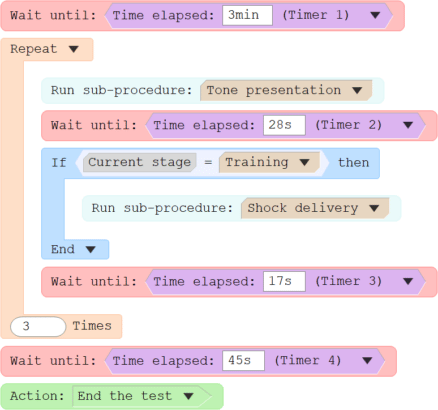
Section 5
Saving your protocol and running some tests
- Save your Protocol by clicking the Save protocol button at the top of the page. You can re-use this Protocol as a template for future fear conditioning experiments.
- Proceed to the Experiment page where you’ll add your treatment groups and assign animals to each treatment.
- Proceed to the Tests page to begin testing.
- To start a test, simply click the Start test button. The test will stop once it reaches the test duration you specified under Protocol > Stages, or until it is commanded to end the test in your Procedure.
- After running a test, you can view the freezing data for that test by selecting the test number from the list on the left. To customize the data that is displayed here, click the Animal and test reports.

- You can view your collated data on the Results page and export your raw data from the Data page.
- Finally, to save your Experiment file, select File > Save as.
If you have any questions while using ANY-maze, you can reach out to ANY-maze Support at [email protected] – remember we support all ANY-maze users for ever and for free.