 Setting up apparatus
 Video capture & tracking
 Observing behaviour
 Connecting equipment
 Automating complex tests
 Running tests
 Results
 Visualising data
 Analysis
 Transferring data
 Open field
 Water-maze
 Y-maze
 Fear conditioning
 Novel object
 Barnes maze
 Radial arm maze
 Light/dark box
 Operant conditioning
 Zebrafish
 Computers
 Multifunction remote
 Accessories
 Digital interface
 Optogenetic interface
 Synchronisation interface
 Relay interface
 Audio interface
 Touch interface
 Analogue interface
 USB TTL cable
 Animal shocker
 Components
 Place preference
 ANY-box
 T-maze
 Zero maze
 Hole board
 Sociability cage
 OPAD
OPAD RAPC
RAPC Waterwheel forced swim test
 Thermal gradient ring
 Operon
 Activity Wheel
 Full ANY-maze licence
 Other licence types
 Developing countries licence
 Contact support
 Support Policy
 FAQs
FAQs Guides
 Downloads
 Send us files
 Activate a licence ID
 Documentation
 Contact us
 Blog
Blog About
About Testimonials
 Privacy Policy
In this guide, I will explain how to set up a standard Three-Chamber Sociability and Social Novelty experiment in ANY-maze. I will go over how to draw an apparatus map to include your cups, how to use moveable zones to counterbalance your cups, how to automatically assign the cup positions between animals, and how to view the results of your tests.
Section 1
The paradigm
To walk you through this setup, I’ll use a standard three-chamber sociability and social novelty paradigm conducted in 3 parts:
Habituation: No cups are present in the chamber. The animal is allowed to explore all three chambers for 5 minutes. Time spent in the left, right, and center chambers is evaluated.
Sociability: A cup containing a stranger animal (Stranger 1) is placed in one of the lateral chambers, and an empty cup is placed in the lateral chamber opposite to that. The subject animal is allowed to investigate for 5 minutes, and time spent investigating the cups is evaluated.
Social Novelty: The following day, the cup containing Stranger 1 is moved to the chamber opposite to where it was for Sociability testing. A second stranger animal (Stranger 2) is placed in a cup in the chamber opposite to Stranger 1. The subject animal is allowed to investigate for 5 minutes, and the time spent investigating the cups is evaluated. The position of the stranger cups is counterbalanced between treatment groups to control for bias (i.e. Stranger 1 will either start in the left chamber or the right).
Now that we understand the paradigm, let’s start by creating a new experiment, which you can do by selecting New experiment on the File page.
Section 2
Drawing the apparatus map
First we need to build the Protocol, which we’ll do using the Add item button in the ribbon bar. Let’s start by adding a Video source. Here you will select the camera or video that shows your apparatus.
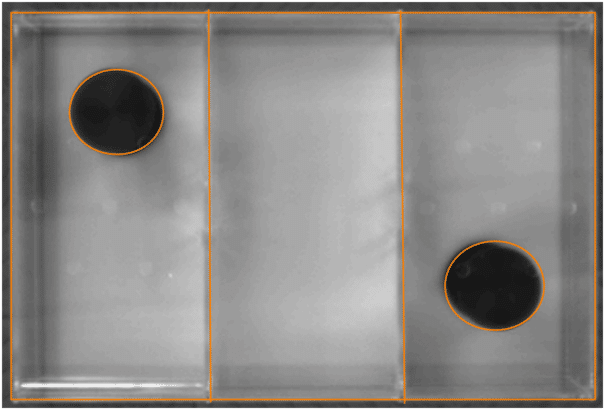
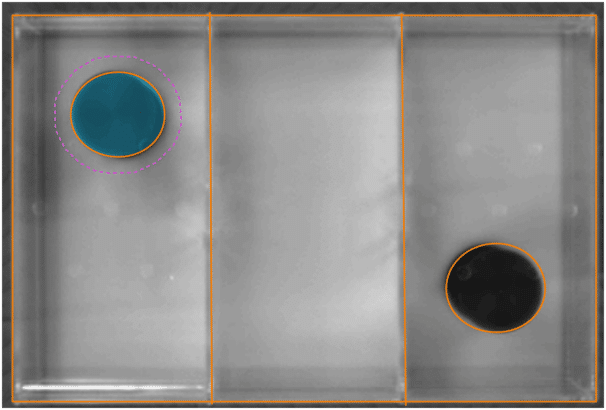
Then you’ll need to add an Apparatus which corresponds to your video source. It is here that you’ll draw the apparatus map, which defines both the outline of the arena and any important areas within it – in this case, the chambers and the cups. Note that you should draw tightly around the cups, as you’ll be adding an investigation perimeter to them in the next step – see figure below.
Section 3
Adding investigation zones
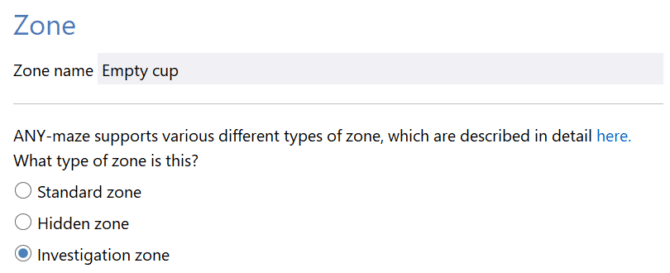
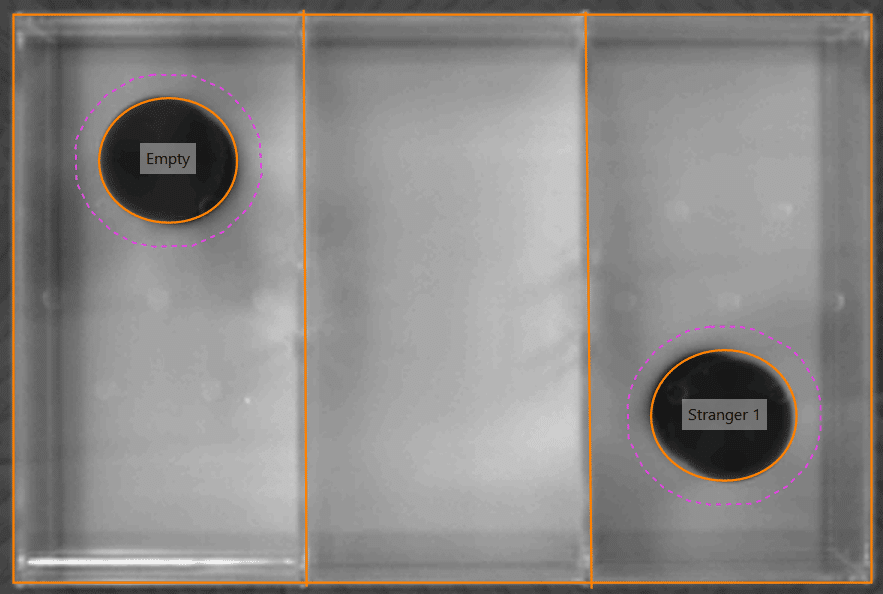
With the apparatus map drawn, you will then add three Zones for your cups. We’ll call them Empty cup, Stranger 1 cup and Stranger 2 cup, as these are the 3 iterations of cups in the experiment. And because you’re interested in measuring the animal’s investigative behaviour of these cups, you’ll want to choose that these are Investigation zones.
Unlike a Standard zone, which an animal is meant to go into with his body, an Investigation zone is used to measure the animal’s exploration around an area, using his head. So, you will need to specify the distance from the object of this perimeter of exploration (the dotted line in the picture below) – the animal’s head must enter this perimeter to be counted as investigating the cup.
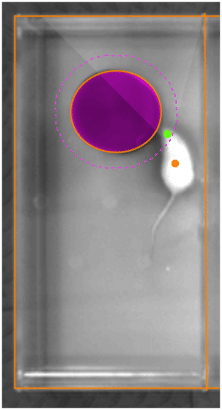
You can also specify whether the animal must be oriented toward the cup to be considered investigating it (in the image above, the cone shape protruding from the animal’s head represents the animal’s orientation). For instance, you may not consider the animal to be investigating the cup if he happens to walk next to it but doesn’t actually inspect it. You can also change the angle of this orientation cone under the Orientation and movement item in the Protocol list.
One other consideration is whether you want ANY-maze to ignore instances when the centre of the animal is inside the zone (i.e., inside the solid line), in general, this means the animal is standing on top of the cup.
Section 4
Making the zones moveable
At this point you have your zones created for your cups, but how do we tell ANY-maze that the Stranger 1 cup zone will be in the left chamber for some animals and the right chamber for others, or that no cups will be present in the Habituation stage? To set this up, you will make your zones into moveable zones.
From ANY-maze’s perspective, a zone that is moveable is the same zone at the end of the day, regardless of its position. This means that when you go to analyse your results for investigation of the Stranger 1 cup, you don’t need to consider that the cup containing Stranger 1 was on the left for one animal and on the right for another; ANY-maze will cope with this for you and simply display the results for the Stranger 1 cup.
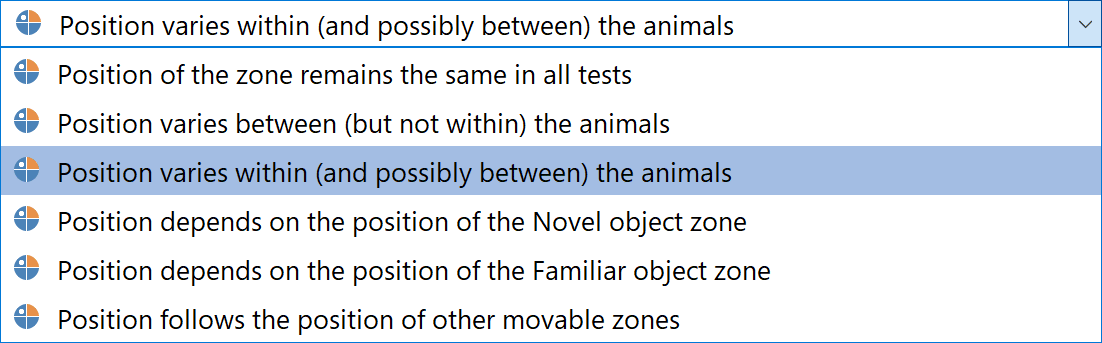
To make your zones moveable, select one of your zones (we’ll start with the Empty cup zone) and expand the drop-down menu where it says Position of the zone remains the same in all tests. Change this to The position varies within (and possibly between) the animals. This is telling ANY-maze that the cups can assume more than one position – thus, moveable zones.
Now you need to tell ANY-maze exactly where the cups can move to. Using the Add item button in the ribbon bar, let’s add a New zone position. The first position name will be Left. Then in the video picture, click inside the left cup on your apparatus map – see figure below.
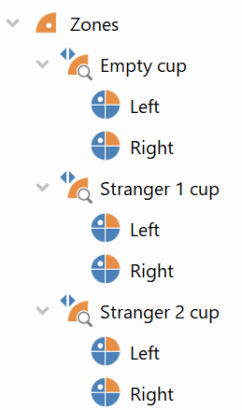
Add a second zone position for the Empty cup zone and call it Right. Then, click inside the right cup on your apparatus map. Repeat the exact same setup for the Stranger 1 cup and Stranger 2 cup zones as you did for the Empty cup zone. Each will have a Left and Right zone position.
Your zone list should now look like this:
Section 5
Adding zones for the three chambers
Because we also want to evaluate the time the animal spends in each chamber, we’ll need to add zones for the chambers as well. Simply add a zone for each chamber: Left chamber, Right chamber, and Center chamber.
These three zones are going to be Standard zones because we want to measure when the animal enters into the zone with his body.
One important point when creating these zones is that for the Left chamber and Right chamber, be sure to select both the floor of the chamber as well as the area the cup occupies – see figure below. This is to ensure that all time spent in this chamber is considered, even if the animal is standing on top of the investigation cup.
Section 6
Dividing your experiment into Stages
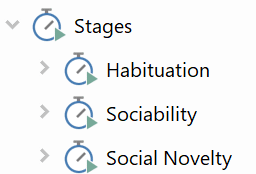
Now that we’ve finished setting up our zones, the next thing to consider is the fact that our experiment is divided into three parts: Habituation, Sociability, and Social Novelty. In ANY-maze, these different parts are called Stages.
In fact, all experiments in ANY-maze consist of at least one stage, which is why you’ll notice there’s a stage already added for you. You can rename this stage to Habituation, as this will come first in our experiment. Then add a second stage for Sociability and a third for Social Novelty just beneath that.
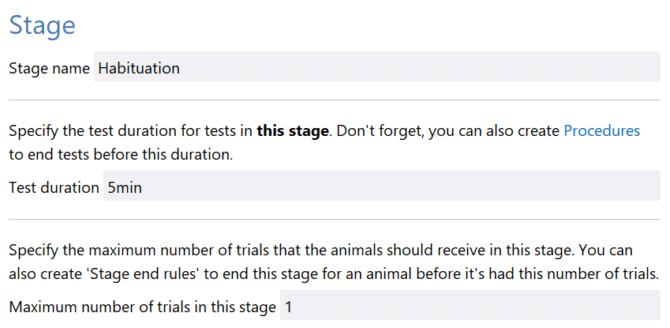
Within each stage, you’ll specify the Test duration (I’ve used 5 minutes) and the Number of trials. In this example, we only have 1 trial per stage because the animal will only be tested once in each stage.
With your stages now set up, you’ll find listed beneath each stage are three items related to the locations of your zones – see figure below.
![]()
This is ANY-maze asking where you want the cups to be in each stage, as they vary between stages. Here we will tell ANY-maze that we have no objects present in the Habituation stage and that we want it to automatically assign the cup positions in the Sociability and Social Novelty stages.
Habituation stage
Starting with the Habituation stage, first select Stages > Habituation > Location of the Empty cup zone during this stage and then choose the option The location is irrelevant because this zone isn’t used in this stage. Select this same option for the Stranger 1 cup and Stranger 2 cup zones.
Sociability stage
Moving on to the Sociability stage, for the Empty cup and Stranger 1 cup zones, choose The location will be set by a procedure.
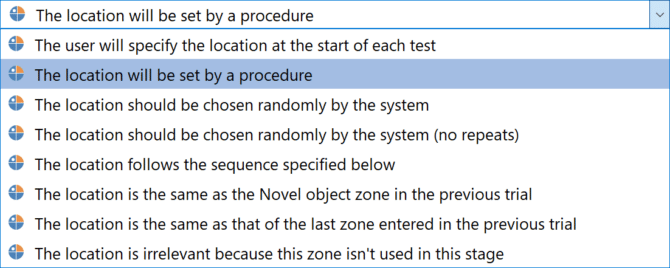
For the location of the Stranger 2 cup zone, select The location is irrelevant because this zone isn’t used in this stage.
Social Novelty stage
In the Social Novelty stage, the Empty cup is not used, so select The location is irrelevant because this zone isn’t used in this stage. And for the Stranger 1 and Stranger 2 cups, choose The location will be set by a procedure.
I’ll explain how to create the Procedure that will actually set the zones’ locations in a later section, but first we need to learn about Fields.
Section 7
Setting up Fields to assign cup locations
You will probably already have a list of your animals and their pre-assigned cup locations – what we need to do now is input this into ANY-maze, which we can do by using Fields.
First you need to add a new field to the protocol and call it Empty cup starting position. As you’ll be assigning a cup position for each animal, you should select that the field applies to ‘Animals’. Then specify the field type as ‘Choice’, and finally, enter the choices separated by a comma. In this experiment, the choices are Left and Right.

On the Experiment page, you’ll now be able to specify for each individual animal, the Empty cup’s starting position – but before we do that let’s first complete the Protocol setup.
Section 8
Writing the Procedures
We’re going to create a procedure that will automatically select the zone position in each test based on the Field assignments of the animal.
Set cup positions
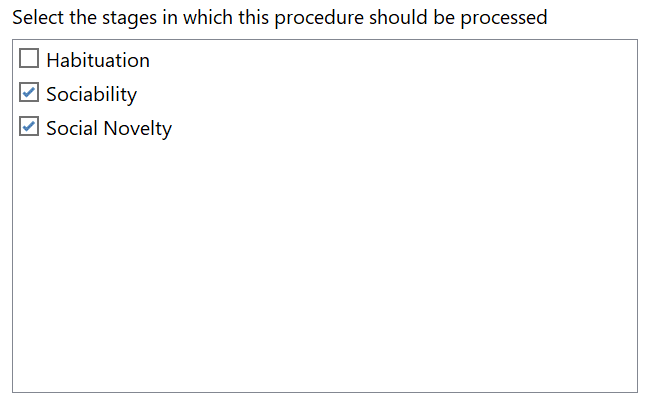
First, let’s add a new procedure to the protocol – we can call it ‘Set cup positions’ to describe what it will be doing. Then beneath that, un-tick the box for Habituation, since we won’t need this procedure to run in that stage because there will be no cups present.
You construct a procedure by clicking and dragging items in the procedure editor, pictured below. Specifically you’ll drag items from the left into the blank area on the right.

The 4 categories of items available to you in the procedure editor are:
- Statements – These are the building blocks of the procedure, providing instructions for what it should actually do. For example, ‘Wait until:animal enters the target zone / Action: activate the cue light’.
- Events – These are things that occur in a single moment in time. For example, the animal enters the target zone.
- Variables – These represent the state of the test as it progresses. For example, a variable might be Animal is in the target zone. At any time, we can check whether this variable is true or false.
- Actions – These are commands given to ANY-maze to do. For example, Activate the cue lightor End the test.
Usually, a good first step in creating a procedure is to write in your own words what you want it to do. In our case we want it to set the position of our moveable zones as follows:
When we’re in the Sociability stage:
If the field for Empty cup starting position is ‘Right’, then set the Empty cup zone to be in the ‘Right’ position and the Stranger 1 cup zone to be in the ‘Left’ position.
Otherwise, if the field for Empty cup starting position is ‘Left’, then set the Empty cup zone to be in the ‘Left’ position and the Stranger 1 cup zone to be in the ‘Right’ position.
When we’re in the Social Novelty stage:
If the field for Empty cup starting position is ‘Right’, then set the Stranger 1 cup zone to be in the ‘Right’ position (because it adopts the same position that the Empty cup had in the Sociability stage) and the Stranger 2 cup zone to be in the ‘Left’ position.
Otherwise, if the field for Empty cup starting position is ‘Left’, then set the Stranger 1 cup zone to be in the ‘Left’ position and the Stranger 2 cup zone to be in the ‘Right’ position.
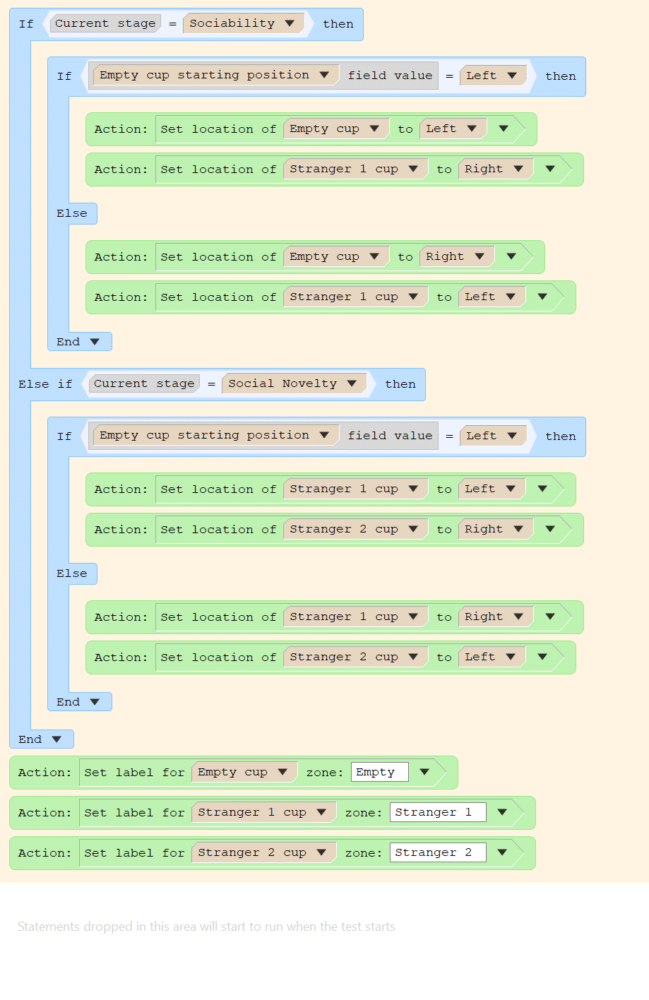
Now we can start building the procedure, which we’ll do by placing statements inside the orange area at the top of the page (as opposed to the white area below it). ANY-maze will perform these statements when the test is in the Ready state, i.e. before the test starts. This makes sense, because we’re using the procedure to set the location of our cups, so that we know what the cup assignments are before the test begins.
The video below shows how to build the procedure – as you’ll see, it’s quite simple and ends up being very similar to the description we wrote above.
Label zones
Next, we’ll write a few more lines beneath the Procedure we just wrote to label the zones so that you know which object to place on which side before each test. Having learned how to build a procedure in the previous step, I expect you can add on to this by simply referencing the image below. The last three lines are the ones we’ve added to label the zones.
With your procedures written and your Protocol now complete, it’s a good idea to save it using the Save protocol button in the ribbon bar.
Section 9
Assigning the cup locations on the Experiment page
Now we can set up our Experiment page. You’ll first need to tell ANY-maze about your animals and treatment groups for this particular experiment. Then select View animals in the ribbon bar, and you’ll find you have a column titled Empty cup starting position. This is where you’ll assign the Field value we set up in Section 7.

Once you’ve entered the value for each animal, you’ll be ready to perform your tests!
Section 10
Running the tests
Tests in the Habituation stage
There is nothing special you need to do with your cup positions in this stage, as there will be none! We’ve already specified that all three zones are irrelevant to this stage. However, you will still see the cup circles shown on the apparatus map during tests in this stage, but they will have no actual function in the test, so you can ignore them.
Proceed by clicking the Start test button, then place the animal in the arena and step out of the video picture. The test will start automatically and end after 5 minutes. When the test is complete, click the orange, circular arrow to prepare the next test – see image below. The next set of object labels will then appear on screen.

Tests in the Sociability stage
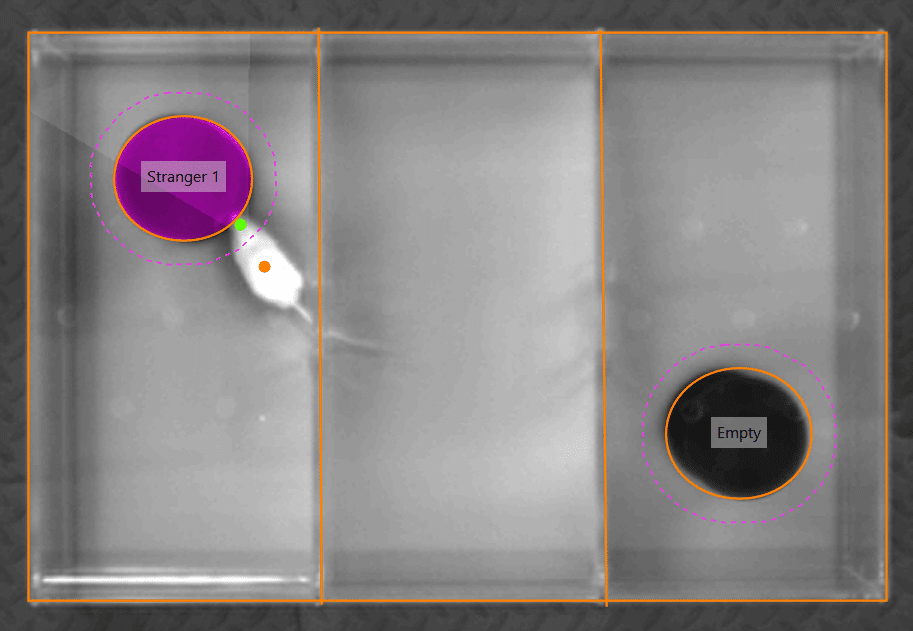
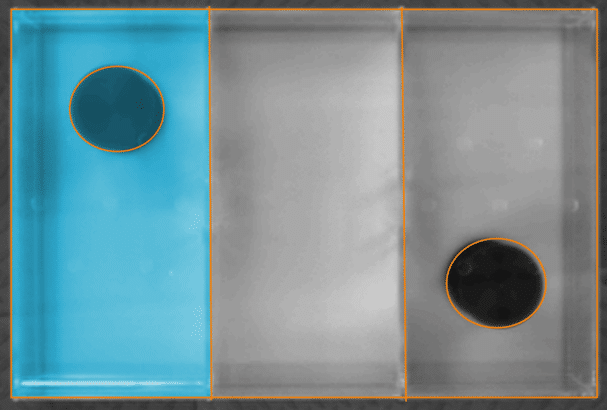
Once your animals advance to the Sociability stage, you’ll find you now have labels on your video picture indicating the type of cups that should be present. For example, in the image below, ANY-maze is indicating that we should place Stranger 1 in the right cup and leave the left cup empty.
If you’re running tests live, you can place the objects in the arena according to these on-screen labels (be careful to place the cups inside the orange shapes you’ve drawn in). Then when you’re ready, click the Start test button, place your animal in the arena, step away, and your test will start automatically.
Tests in the Social Novelty stage
Tests in the Social Novelty stage will be much the same as in the Sociability stage, except that the cups will instead be labeled as ‘Stranger 1’ and ‘Stranger 2’.
Section 11
Viewing your results
After performing a test, you’ll probably want to see how much time the animal spent investigating the cups. You can view the results of an individual test by selecting the test number of interest on the Test Schedule Report (the list of tests shown on the left side of the Tests page), which will bring you to the Test Details Report.

When you do this, you may not see the same results as I have listed above. This is because you need to tell ANY-maze which results you’d like to have included in your Test Details Report. Simply select the Animal and test reports link to choose the results displayed here.
You’ll also notice that the Time investigating the Stranger 2 cup zone has #N/A as the result. This is because the report I’ve chosen in this example is a test from the Sociability stage, in which the Stranger 2 cup zone was irrelevant.
Section 12
Summary
That’s a standard three-chamber sociability and social novelty experiment set up in ANY-maze!
Of course, your experiment may differ slightly from this one, in which case you can adapt your protocol to fit your specific paradigm. If you have any questions about how to do that, feel free to reach out to the ANY-maze support team at [email protected] for help.
To summarize, in this guide you learned how to:
- Draw your apparatus map to include both positions of your cups.
- Create investigation zones.
- Make the investigation zones moveable (i.e., adopt different positions in different tests) so as to counterbalance between the treatment groups.
- Use Fields to assign cup positions to each animal.
- Use Procedures to automatically select the position of the cups before each test based on Fields.
- View the results of a test.