This guide explains the pros and cons of each of the camera types that ANY-maze supports and details the important characteristics to look for. It also describes lenses and how to calculate the correct lens angle for your apparatus; things to consider when connecting multiple cameras to your computer; and how to track in low light or even total darkness.
Section 1
Introduction
ANY-maze supports a broad range of different camera types, but some of these are now considered to be legacy devices and if you’re planning to buy a new camera then you’ll essentially be choosing between:
- A USB webcam
- An industrial USB camera
- An analogue camera
USB webcams
USB webcams are inexpensive and provide good quality images in most conditions. They do, however, have a couple of drawbacks. They have fixed lenses (you can’t change the lens) usually with a lens angle of around 40°; this might be a problem if you have a large piece of apparatus, as the only way to get the apparatus into the camera’s field of view will be to move it further away. Also, they usually have quite short captive cables, which means you can’t unplug the provided cable and plug in a longer one, although you can purchase extension cables.
Key points:
- Low cost
- Can’t change the lens
- Short, captive cable (but can be extended by 4.8m)
- Good for use in normal lighting conditions
- Some cameras are infrared sensitive and can be used with infrared lights to track in the dark
- Recommended for apparatus which is not very large and which is not used in low light, for example Plusmaze, Y-maze, open-field, etc.
Industrial USB cameras
Generally speaking, industrial USB cameras are the best choice for ANY-maze. They provide good quality images in most lighting conditions, have interchangeable lenses and are always infrared sensitive, which means you can use them to track in darkness using infrared lights. They don’t have captive cables, although their cable length is still limited to maximum USB cable length of 15 feet (4.8m), although this can be extended by an additional 15 feet using a USB active extension cable.
Key points:
- Extremely flexible
- Interchangeable lens
- Maximum 4.8m cable (can be extended by an additional 4.8m)
- Good for use in all lighting conditions (except very low light)
- Infrared sensitive – can be used with infrared lights to track in the dark
- Recommended for all apparatus
Analogue cameras
Analogue cameras are designed for security applications and generally work very well in even extremely low light. They also have interchangeable lenses and an essentially unlimited cable length. However, to connect them to a PC requires a digitizer card which fits in a PCIe slot, something only found on desktop computers. They also need to be connected to power, whereas USB cameras are powered by the USB cable.
Key points:
- Extremely flexible
- Interchangeable lens
- Unlimited cable length
- Good for use in all lighting conditions, including very low light
- Infrared sensitive – can be used with infrared lights to track in the dark
- Recommended for all apparatus
- Require a digitizer card (which can only be installed in a desktop computer)
Using multiple cameras
If you want to track in multiple apparatus simultaneously then you may need multiple cameras (remember you can place multiple apparatus under a single camera, if they’ll all fit). The issues relating to connecting multiple cameras to a PC are discussed fully in the Connecting multiple cameras section below, but the key points are:
- Connecting up to 3 USB cameras to a notebook is straightforward
- Connecting up to 6 USB cameras to a notebook can usually be achieved but depends on the computer
- Connecting up to 15 USB cameras to a desktop is achievable, although usually it’s cheaper and simpler to use analogue cameras
- A single digitizer can be connected to up to 4 analogue cameras. It’s usually possible to install up to 4 digitizers in a desktop computer, for a total of 16 cameras.
Section 2
USB cameras
USB cameras are usually the best choice for ANY-maze. USB webcams are inexpensive and work well in many situations, while Industrial USB cameras are flexible and work very well in almost all apparatus. That said, there are still some circumstances where analogue cameras can provide better performance and/or a cheaper option.
- Webcams – recommended specifications
- Industrial cameras – recommended specifications
- Extending a USB cable
- Mounting a USB camera
Webcams – recommended specifications
Most modern USB web cams are suitable for use with ANY-maze although we’d advise against very cheap devices as these can provide poor quality images. We recommend devices from manufacturers such as Microsoft and Logitech.
The only significant choice you’ll need to make when selecting a webcam is the resolution. Although it might seem that higher resolution will be better, this isn’t usually the case as high resolution images just require more processing without adding much additional information (from a tracking point of view). However, if you only plan to use a single camera then (unless you have an old computer) any resolution should be fine, but if you want to connect multiple cameras, using devices with lower resolutions would be better.
Industrial cameras – recommended specifications
We recommend the industrial USB cameras from The Imaging Source, specifically their USB 2.0 Monochrome Industrial Cameras. However, devices from other manufactures should work fine, as long as they are provided with a DirectShow driver (most will be).
A few points to note:
- There is no benefit in using a colour camera with ANY-maze as it only processes and displays black and white images.
- As is the case for USB webcams, choosing a high resolution Industrial camera is usually not beneficial and, if you plan to connect multiple cameras, can actually be detrimental. A resolution of 640×480 is usually perfectly adequate.
- Industrial cameras are available with two types of image sensor, CMOS and CCD. Both are good and it makes no difference in ANY-maze which you use. These sensors also come in different sizes, typically 1/4 inch, 1/3 inch and 1/2 inch. Large sizes are more expensive, but 1/4 and 1/3 inch sensors are perfectly adequate for ANY-maze.
- There are no significant benefits to using USB 3.0 cameras with ANY-maze and, as these devices are usually significantly more expensive than USB 2.0 cameras, we don’t recommend them, although they should work fine.
Choosing a lens
Industrial cameras are not supplied with a lens, so you will need to purchase one separately. Choosing a lens is relatively simple once you’ve calculated the minimum lens angle you need – see Lens calculations below. However, you still need to consider the following points:
- Make sure you buy a lens that matches the sensor size of your camera. As mentioned above cameras are available with different sized sensors and you must use a lens which matches the camera’s sensor size.
- Make sure you buy a lens that’s compatible with your camera’s lens mount, either C or CS. Some cameras can accept either type of lens but some will only work with one or the other.
- Some lenses have fixed irises, some have manual irises and some have automatic irises. Most industrial cameras do not support automatic irises so, you should use avoid this type of lens. We recommend a manual iris lens.
- If you expect your target animals to be close to the lens (for example, if you’ll be tracking inside a place-preference box) then check that the lens will be able to focus at that distance.
- Generally speaking the best type of lens to buy is a vari-focal lens as these allow you to zoom in and out so that your apparatus nicely fits the camera’s field of view. This is particularly beneficial if you want to work with different sized pieces of apparatus – a rat plusmaze and a mouse Y-maze, for example.
Extending a USB cable
USB webcams are usually supplied with captive cables (you can’t unplug the cable) of about 2 or 3 metres length. As the camera has to be mounted over the apparatus and the computer will ideally be positioned out of the animal’s view, these short cables can be a problem.
Industrial USB cameras don’t have a captive cable so you can purchase a long USB cable and use that, but be careful – the USB specification mandates that cables are no longer than 15 feet (4.8m), some manufacturers do make longer cables but these can be unreliable and we’d strongly advise against using them.
If you need to extend a USB cable then you should use what’s called an Active extension cable. These include electronics which “repeats” the USB signal, thus allowing it to travel another 15 feet. Again, some manufacturers exceed the distance specification, but you should avoid cables which are longer than 15 feet as they may prove to be unreliable. You should also avoid any extension cable which is not active, unless the total length of all the cables from the camera to the computer will be no more than 15 feet.
We don’t recommend connecting multiple extension cables together – so using a standard 15 foot cable with a single 15 foot active extension, giving 30 foot (around 10m) in total, is the maximum distance you can achieve.
We don’t recommend a specific product, but a search of Google for “Active USB extension cable” will usually turn up a wide range of options.
Finally, there are USB extension cables available which convert the USB signal to a network signal, which can then be transmitted through a long (50m or more) network cable, before being converted back to USB again. In theory these should allow you to extend a USB cable well beyond the 10m limit, but we have never tried them and so can’t provide any sort of recommendation.
Mounting a USB camera
While it might seem an obvious thing to mention, don’t forget that you’ll have to mount your camera above your apparatus. Industrial cameras come with a standard fitting in their base which allows them to be screwed onto a camera mount, however USB web cams don’t include this feature.
As web cams are usually very light the easiest way to mount them is simply to stick them to the ceiling with duct tape – not too elegant but it works. Alternatively, if you have a suspended ceiling, cut a hole the size of the lens in a ceiling panel and stick the lens through the hole – the panel will easily be strong enough to support the camera’s weight.
Section 3
Analogue cameras and digitizers
ANY-maze will work with almost any analogue video camera you might encounter. There are a few specialist cameras you can’t use but any standard CCTV (closed circuit TV) camera, such as a security camera will work fine (subject to the considerations described below).
Before going into the details, it’s important that you understand that to use an analogue camera with ANY-maze you’ll need a digitizer (sometimes called a frame grabber or a capture card). These devices convert the analogue video signal from the camera into digital data which ANY-maze can process. This, by the way, is the key difference between analogue and USB cameras – USB cameras don’t need a digitizer, the video signal already being digital.
- Choosing an analogue camera
- Choosing a lens
- Choosing a digitizer
- Video cables, connectors and camera mounts
Choosing an analogue camera
As I already mentioned, ANY-maze will work with almost any analogue camera. However, if you plan to work in low light you should pay particular attention to the camera’s sensitivity. Here are the recommended specifications.
| Camera type | Use a black and white camera. ANY-maze will work with colour cameras but it doesn’t use the colour information so buying a colour camera is a waste of money. Indeed, even if you use a colour camera the video pictures in ANY-maze will still be black and white. |
| CCD size | Modern analogue cameras use devices called CCDs to capture the video picture. These come in various sizes but the most common are half inch and third inch. If you’re going to buy a camera for ANY-maze, buy one with a third inch CCD – they’re cheaper and perfectly good enough for ANY-maze. You may also encounter quarter inch CCDs – they’re not as good as third inch devices but should work OK. |
| Sensitivity | If you plan to work in low light conditions then make sure your camera has a sensitivity of 0.1 lux or below. If low light work is not relevant then you don’t need to concern yourself about the camera’s sensitivity. Note that colour cameras generally have a much lower sensitivity than black and white cameras. |
| Infrared sensitivity | All black and white cameras are sensitive to infrared light, but some include an IR block filter. Make sure you choose a camera without a filter as you’ll then be able to use infrared lights to track in darkness. |
| Resolution | Unless you plan to track very small targets (in relation to the apparatus size) then the camera resolution is not likely to be important. If you do want to track small targets then a horizontal resolution of 500 lines or greater is best. |
| Video output | 1.0Vp-p 75ohms. |
As I said almost all cameras will meet this specification so, apart from sensitivity in low light, how do you choose one? Well, there are some considerations.
- There are two common types of lens mount: C and CS. Some cameras use one type and some use both. Be careful that your lens and your camera use the same type otherwise the lens won’t fit – in fact you can irreparably damage a camera by trying to attach the wrong type of lens.
- Some lenses (see below) include an automatic irises so they can adjust to changing light levels. This can be very useful if you plan to track in various lighting conditions – perhaps with different apparatus. However, for auto irises to work the lens must connect to the camera, so if you want to use an auto iris you need to make sure your camera will support this feature – ask your supplier to confirm this.
- Different cameras use different power supplies. Some connect directly to the mains power (120VAC or 240VAC), some connect to 24VAC power supplies and some to 12VDC supplies. If you use a camera that uses 24VAC or 12VDC you will need to buy a separate power supply too. For this reason we recommend you try to use a mains powered camera.
- If you plan to mount the camera inside a box (for example inside a light-dark box) or close over an animal’s home cage, then a board camera is probably the best solution. These are very small cameras (typically 2-3 cm cubes) which usually use have a pre-installed (although interchangeable) lens. They’re cheap and their image quality is not fantastic, but if the target animal is close to the camera they work well and take up almost no space.
- Although you might find some very cheap cameras on the market, the image quality is likely to be poor. Although ANY-maze doesn’t demand perfect quality, these cameras probably won’t be good enough. Expect to pay around $150 for a good camera.
Choosing a lens
Choosing a lens is relatively simple once you’ve calculated the minimum lens angle you need – see Lens calculations, below. However, you still need to consider the following points:
- Make sure you buy a lens that matches the CCD size of your camera. As mentioned above cameras are available with third inch and half inch CCDs (we recommend third inch), and you must use a lens which matches the camera’s CCD size.
- Make sure you buy a lens that’s compatible with your camera’s lens mount, either C or CS. Some cameras can accept either type of lens but some will only work with one or the other.
- Some lenses have fixed irises, some have manual irises and some have automatic irises. Using a fixed iris lens is not recommended with ANY-maze because you’re likely to want to track in various lighting conditions and a fixed iris will be restrictive. An auto iris is nice, but costs more and must be supported by your camera – see above.
- If you expect your target animals to be close to the lens (for example, if you’ll be tracking inside a place-preference box) then check that the lens will be able to focus at that distance.
- Generally speaking the best type of lens to buy is a vari-focal lens as these allow you to zoom in and out so that your apparatus nicely fits the camera’s field of view. This is particularly beneficial if you want to work with different sized pieces of apparatus – a rat plusmaze and a mouse Y-maze, for example.
Choosing a digitizer
A digitizer is a device which converts the video signal from an analogue video camera into digital data which a computer can process. You may sometimes hear digitizers referred to as frame grabbers, capture cards or video acquisition cards.
As you might expect, analogue cameras are being replaced for most uses with digital cameras, and as a result there are fewer digitizers available today than there used to be. We recommend the Picolo series from Euresys S.A. These are still widely available and the Picolo Alert PCIe is particularly good as it can capture from up to 4 cameras simultaneously.
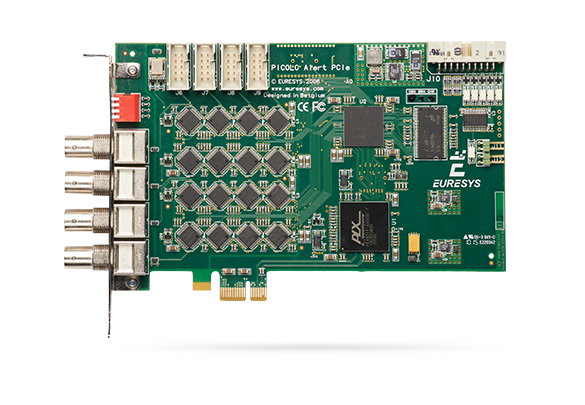
Figure 1. The Picolo Alert PCIe digitizer, which we recommend for use with ANY-maze.
How a digitizer connects to your computer
The Picolo devices are PCIe expansion cards which fit into a slot inside a desktop computer. This means that your computer must have a free PCIe slot for the card, something which modern ‘compact’ desktops sometimes lack.
Video cables, connectors and camera mounts
Analogue cameras are rarely supplied with a video cable so you’ll need to buy one. This isn’t actually such a bad thing as you can then buy a cable that’s just the right length to reach from your camera to your computer. However, be careful with connectors. There are two types of connectors in common use with cameras, BNC and RCA. You need to check the type of connector on your camera and on the digitizer – which is what the camera is going to connect to. You may well find that the camera has a BNC connector and the digitizer has an RCA connector. Don’t worry – the company that supplies the camera can probably make a suitable length cable for you with the correct connectors on it. You can also buy adaptors to convert from BNC to RCA or vice versa.
Don’t forget you’ll need a mount for your camera. Although these are simple to find you need to make sure that you buy one which will allow the camera to be mounted pointing straight down when the cable’s attached – see figure 2.
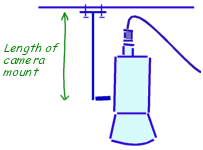
Figure 2. Make sure your camera mount is big enough to allow the camera to point straight down when the cable is connected.
Section 4
Connecting multiple cameras
There are a number of situations when you may want to use more than one camera in ANY-maze:
- When you want to be able to be able to switch between different apparatus for different experiments.
- When you want to track in more than one piece of apparatus at the same time.
- When you need more than one camera to see an entire piece of apparatus.
As ANY-maze can be used with USB or analogue cameras there are three possible situations to consider:
- Connecting multiple USB cameras
- Connecting multiple analogue cameras
- Connecting a mix of USB and analogue cameras
Connecting multiple USB cameras
There are three different scenarios to consider depending on what you’re trying to achieve:
Scenario 1. Switching between different apparatus
In this scenario you don’t intend to use more than one camera at the same time, rather you just want to switch to different cameras depending on the apparatus you intend to use.
This is the simplest scenario and there are no special considerations. You can simply plug your cameras into any available ports on your computer (or on a hub) and then switch between them from within ANY-maze. For example, you might install one camera over a plusmaze and another over a water-maze – you could then simply select the appropriate camera depending on the experiment you wish to perform.
Scenario 2. Tracking in more than one piece of apparatus at the same time
This scenario is a little complicated because of issues with USB bandwidth. The USB bandwidth defines how much data can be transferred across a USB connection in a set period of time. Suffice to say that as you connect more cameras so the amount of data that need to be transferred increases and eventually you’ll reach the bandwidth limit. Now, you might be thinking that this shouldn’t really be a problem if you simply connect one camera to one USB port and another camera to another port and so on. However, things aren’t that simple because the bandwidth limitation doesn’t apply to the USB port, it applies to the USB controller, which is built into your computer. So, for example, you might have 3 USB ports on your notebook but they may all connect to the same USB controller – this means they’ll all have to share the same USB bandwidth.
Trying to quantify the exact bandwidth limitation gets technical, but usually you can connect 3 USB cameras to a single controller before you’ll have any problems. So, if you want to connect, for example, 5 cameras, you’ll need two USB controllers. Fortunately, most computers have multiple controllers in them and you’ll often find that the some of the computer’s USB ports connect to one controller and some to another. So, in our example, you could connect 3 cameras to ports that connect to one controller (using a USB hub, if necessary) and 2 cameras to ports that connect to the other controller.
Clearly this requires that you know the relationship between the USB ports and the USB controllers in your computer and this is something that you can find out using the USB viewer built into ANY-maze.
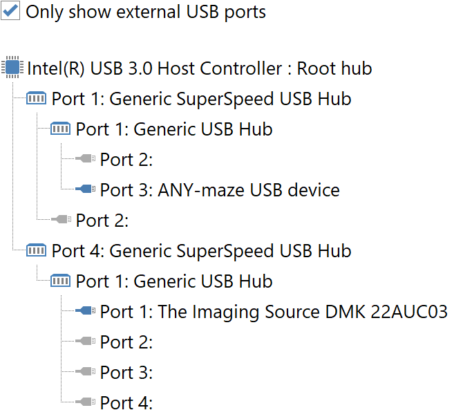
Figure 3. The ANY-maze USB viewer shows the USB controllers in your computer and the ports connected to each one.
As mentioned above, some computers have USB ports which connect to different USB controllers, but in some machines all the ports connect to one controller and in any case it’s unlikely that there’ll be more than two controllers with external ports. This raises the question, how do you connect more cameras if you’ve exhausted all the ports/controllers that are available? There are a couple of things you can do:
- You can reduce the frame rate of the cameras, which means they’ll send fewer images per second which in turn means they’ll use less bandwidth. Note that this doesn’t always work, because not all cameras can have their frame rate adjusted.
- You can add another USB controller to your computer. USB controllers can be purchased on expansion cards which plug into a PCIe slot in your computer. Each card usually has a single USB controller, so this means you can connect up to 3 more cameras to each card. Only desktop computers have PCIe slots (and even then you should check, because so-called compact desktops sometimes exclude them). This means you can’t add more controllers to a notebook PC.
Scenario 3. You need more than one camera to see the entire apparatus
This scenario is very similar to the previous one, in that you will need to connect more than one camera and capture images from all of them and the considerations are identical.
Connecting multiple analogue cameras
As you would expect, if you want to connect more than one analogue camera to your computer then each one will need to connect to a digitizer. As for USB cameras, the exact requirements will depend on what you’re trying to do.
Scenario 1. Switching between different apparatus
The simplest solution in this case is to just use a single digitizer and physically plug in the correct camera for your experiment. However some digitizers, including the recommended Picolo Alert PCIe device, have connections for more than one camera, allowing you to connect multiple cameras and simply switch between them from within ANY-maze.
Scenario 2. Tracking in more than one piece of apparatus at the same time
In this scenario you will obviously need to have multiple cameras connected to your computer at the same time. In this regard, using the recommended Picolo Alert PCIe digitizer is the best solution, as it includes four camera inputs all of which can capture images simultaneously.
Of course, there’s nothing to stop you using more than one digitizer so, for example, by using 4 Picolo Alert PCIe cards you could capture on 16 inputs simultaneously, although this would require that you are using a desktop computer with 4 available PCIe slots.
Scenario 3. You need more than one camera to see the entire apparatus
This scenario is very similar to the previous one, in that you will need to connect more than one camera and capture images from all of them.
Connecting a mix of USB and analogue cameras
There’s no reason why you shouldn’t use a mixture of USB and analogue cameras with ANY-maze – indeed if you want to automate a range of apparatus this may offer the best solution.
For example let’s imagine we want to automate the following equipment:
- A plusmaze
- Two place preference boxes
- A water-maze in which you want to track in low light
A good solution might be:
- A USB webcam, to automate the plusmaze.
- Four industrial USB cameras (one on either side of each box) to automate the place preference boxes.
- A good quality analogue camera (which will be very sensitive in low light) connected to a Picolo Alert PCIe digitizer to automate the water-maze.
With this set up you’d be able to choose whether to perform an experiment in the plusmazes, in the two place-preference boxes simultaneously or in the water-maze, without having to move or reconnect any cameras.
Section 5
Lens calculations
To ensure that your apparatus will fit in your camera’s field of view you need to perform a simple calculation. This will tell you the minimum lens angle that you need.
Lens angles
Any lens has a value called its lens angle (sometime also called its angular field of view) which essentially tells you how wide the camera’s view is – see figure 4.

Figure 4. The lens angle alpha determines how wide the camera’s field of view is.
As you may realise, a lens might have a different lens angle in the horizontal and vertical planes and, in fact, there are three lens angles you might encounter – horizontal, vertical and diagonal, but the horizontal angle is the most commonly quoted. What’s more if you know one you can make an approximate calculation of the others:
Horizontal = Vertical / 0.75
Horizontal = Diagonal x 0.80
These won’t give exact answers but should be close enough for our purposes. Nevertheless, if at all possible, I’d suggest you try to find out the horizontal angle of any lens you want to use.
Calculating the required horizontal lens angle
Generally speaking you’ll be constrained to a minimum lens angle by the size of your apparatus and the height of the ceiling in the room you want to use. As you’d expect the bigger your apparatus is, the further away from it the camera will have to be in order to see it all. However if the camera reaches the ceiling and still can’t see all the apparatus then you’ll need a wider angle lens – see figure 5.
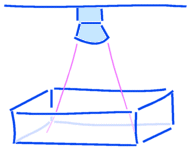
Figure 5. With this lens the camera can’t see the entire open field. You’d need to move the camera up (which is likely to be difficult) or use a lens with a wider angle.
To calculate the lens angle, the first thing you need to do is to measure: the distance from the camera lens to the surface of the apparatus, the width of the apparatus and the depth of the apparatus – we’ll call these measurements a, b and c respectively and they should be in centimetres – see figure 6.
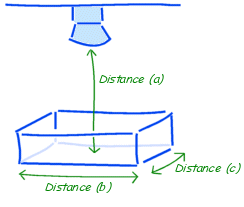
Figure 6. The three dimensions you need to measure to calculate the required lens angle for a piece of apparatus.
Next follow these steps:
- If c is greater than b then swap b and c
- If c ÷ 0.75 is greater than b then make b = c ÷ 0.75
- Multiply b by 1.1
- Divide b by 2
- Subtract the approximate height of the animal (when rearing) from a. For a rat a value of 15cm is OK.
- The required horizontal lens angle = arc tan (b ÷ a) x 2.
You can use the calculator that’s part of Windows to calculate the arc tan. Open the calculator, which can usually be found on the Start menu under Programs – Accessories. Select the View menu and if Scientific isn’t selected then select it. Calculate b ÷ a. Next ensure that the Degrees option is selected, then check the Inv box and finally click the tan button. Don’t forget that the final lens angle is this value multiplied by 2.
Here’s a worked example for a typical plusmaze, where: a = 200 b = 110 c = 110
- b and c are the same so nothing to do
- c ÷ 0.75 = 147 147 is greater than 110 therefore b = 147
- b = 147 x 1.1 = 162
- b = 162 ÷ 2 = 81
- a = 200 – 15 = 185
- Lens angle = (arc tan (81 ÷ 185)) x 2 = arc tan(.438) x 2 = 23.5 x 2 = 47°
We need a lens with a horizontal lens angle of at least 47°. In fact, in the 3rd step we added 10% to the value of b giving us a little leeway in the minimum acceptable value for the lens angle – for example, a 45° lens would be fine.
Of course, if you’re planning to use ANY-maze with different pieces of apparatus, a plus-maze and a Y-maze perhaps, then you should calculate the required lens angle for each of them and use a lens with at least the largest angle reported, although in this situation you’d probably do better to use a vari-focal lens.
Vari-focal lenses
If your budget will run to it then, without doubt, the best type of lens to use with ANY-maze is a vari-focal lens. With these lenses you can alter the lens angle and thus zoom in and out so your apparatus nicely fits the camera’s field of view. This can be particularly important if you plan to use different apparatus, especially if they’re dramatically different sizes. For example, if you have a fixed angle lens suitable for a rat water-maze then, if you put a mouse plus-maze under it, the apparatus will only fill a small part of the picture and the mouse itself will be tiny. Of course, even a vari-focal lens only has a range of lens angles (perhaps 35º-75º) so you should still check that your apparatus will fit it.
Section 6
Working in low light or darkness
Many behavioural experiments are performed in either low light or complete darkness, but clearly you’ll still want to track your animals; this section explains how you can do this.
Tracking in low light
Some black and white analogue cameras are extremely sensitive and can produce surprisingly clear images even in very low light conditions. For example, cameras with sensitivity of 0.01 lux are not uncommon (or very expensive) and these will work well in even extremely dim conditions. Note that colour cameras don’t share this high sensitivity.
Black and white industrial USB cameras are also quite sensitive, although not to the same extent as analogue cameras. Nevertheless, they can often create usable images in low light. USB webcams, on the other hand, are usually even less sensitive and while they may produce an image in low light, it will typically be low contrast and quite noisy.
Having said all that, if you have high contrast between your animal and the background of the apparatus (for example, a white rat on a black maze), ANY-maze will usually track satisfactorily even if the image quality is quite poor. However, if you want to detect the full area of the animal, for example to determine precisely when the animal enters a zone, or you want to detect freezing, then low-contrast, noisy images will not suffice. In these cases you should use a very sensitive camera and/or use the techniques for tracking in darkness – see the next section.
Tracking in darkness
Most of the cameras you can use with ANY-maze are infrared sensitive. This means you can illuminate your apparatus with infrared light, which the animal won’t be able to see, but which will allow the camera to produce an image as if the apparatus were brightly lit.
To use this technique you will need two things:
- An infrared sensitive camera. Almost all analogue and industrial USB cameras are infrared sensitive and many USB webcams are too. Any easy way to check is to view an image from the camera (for example, in the ANY-maze Video page), then point a television remote control at the camera and press a button. If you see a bright spot appear at the end of the remote control then the camera can see infrared. By the way, here we are talking about near infrared, there are also thermal imaging cameras available which are sensitive to long-wavelength infrared, but these are very expensive.
- Infrared lights to illuminate the apparatus. Infrared lights are quite inexpensive and usually take the form of a bank of infrared emitting LEDs – see figure 7. We can supply an infrared illuminator but you can also find them quite easily by searching Google for “Infrared illuminator”. One thing to be careful about is the beam angle, if it is narrow then you’ll be lighting the apparatus with something like a flash-light, which will tend to make the centre very bright and the edges dim. One way to address this is to point the device upwards so the light reflects of the ceiling, which usually helps to disperse it.
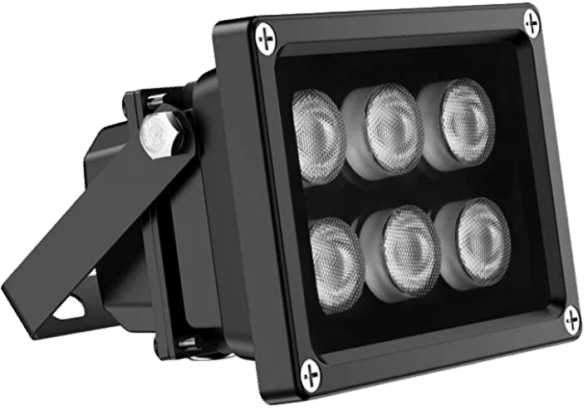
Figure 7. Infrared illuminators are inexpensive and can be used “light” the apparatus so ANY-maze can track in darkness.

 Setting up apparatus
 Video capture & tracking
 Observing behaviour
 Connecting equipment
 Automating complex tests
 Running tests
 Results
 Visualising data
 Analysis
 Transferring data
 Open field
 Water-maze
 Y-maze
 Fear conditioning
 Novel object
 Barnes maze
 Radial arm maze
 Forced swim test
 Light/dark box
 Operant conditioning
 Zebrafish
 Computers
 Accessories
 Digital interface
 Optogenetic interface
 Synchronisation interface
 Relay interface
 Audio interface
 Touch interface
 Analogue interface
 USB TTL cable
 Animal shocker
 Components
 Place preference
 ANY-box
 T-maze
 Zero maze
 Hole board
 Sociability cage
 Tail suspension
 OPAD
OPAD Parallel rod test
 RAPC
RAPC Thermal gradient ring
 Operon
 Activity Wheel
 Full ANY-maze licence
 Other licence types
 Developing countries licence
 Contact support
 Support Policy
 FAQs
FAQs Guides
 Downloads
 Send us files
 Activate a licence ID
 Contact us
 Blog
Blog About
About Testimonials
 Privacy Policy