 Setting up apparatus
 Video capture & tracking
 Observing behaviour
 Connecting equipment
 Automating complex tests
 Running tests
 Results
 Visualising data
 Analysis
 Transferring data
 Open field
 Water-maze
 Y-maze
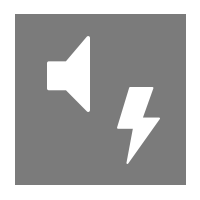 Fear conditioning
 Novel object
 Barnes maze
 Radial arm maze
 Light/dark box
 Operant conditioning
 Zebrafish
 Computers
 Multifunction remote
 Accessories
 Digital interface
 Optogenetic interface
 Synchronisation interface
 Relay interface
 Audio interface
 Touch interface
 Analogue interface
 USB TTL cable
 Animal shocker
 Components
 Place preference
 ANY-box
 T-maze
 Zero maze
 Hole board
 Sociability cage
 OPAD
OPAD RAPC
RAPC Waterwheel forced swim test
 Thermal gradient ring
 Operon
 Activity Wheel
 Full ANY-maze licence
 Other licence types
 Developing countries licence
 Contact support
 Support Policy
 FAQs
FAQs Guides
 Downloads
 Send us files
 Activate a licence ID
 Documentation
 Contact us
 Blog
Blog About
About Testimonials
 Privacy Policy
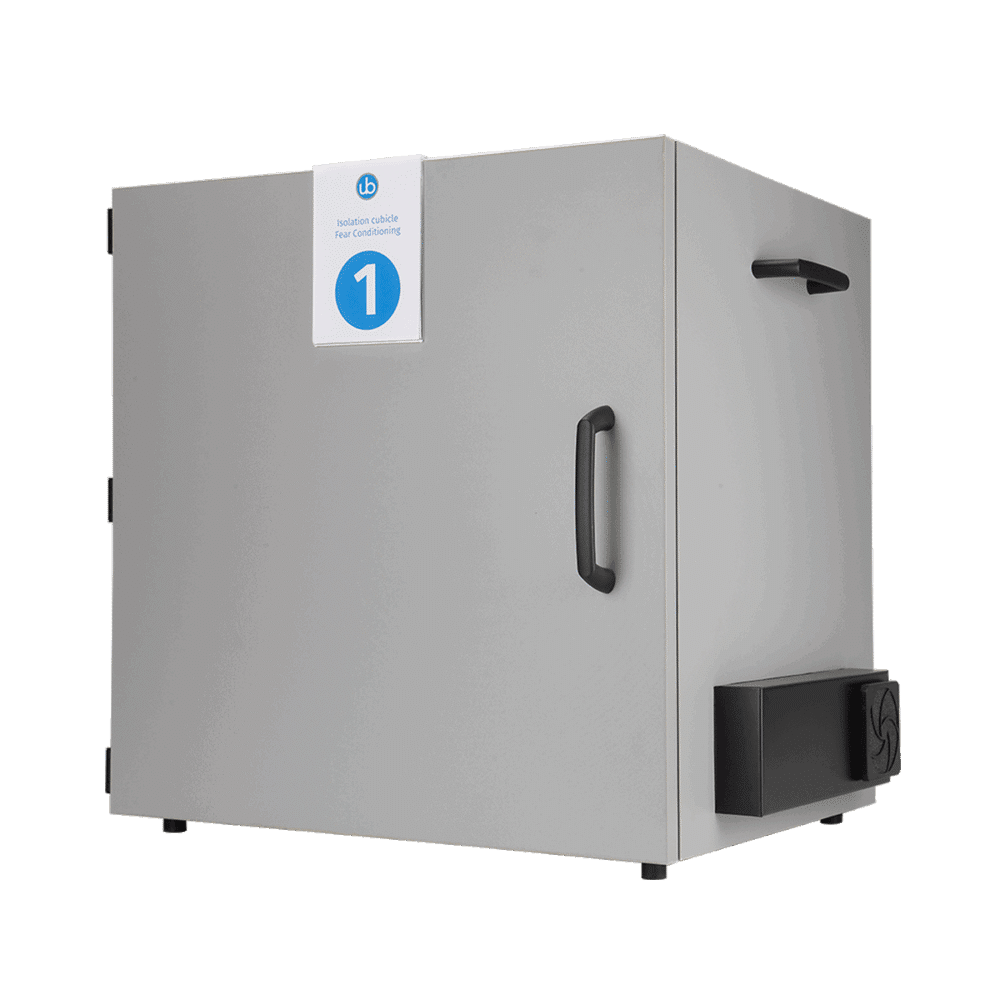
The Ugo Basile Fear Conditioning (UBFC) unit interfaces directly with ANY-maze, making it an ideal choice for your fear conditioning experiments. In this guide, I will walk you through how to test the components (lights, shocker, etc.), build a Protocol, and view your data.
Section 1
The paradigm
To walk you through this setup, I’ll be using a standard fear conditioning (FC) paradigm conducted in 2 parts:
Day 1 Conditioning: The animal is placed in the box for a 5min habituation period then presented with a 10s tone (3000Hz, 75dB) followed by a 1s foot shock (0.6mA) that co-terminates with the tone. After a 60s ITI, this repeats a total of 5 times. Total duration = 650s.
Day 2 Testing: We’ll repeat the same paradigm as Day 1 Conditioning, except there will be no shock deliveries. The animal’s freezing is measured during the 10s tones. Total duration = 650s.
Section 2
Testing the unit on the I/O page
Let’s start by testing the unit(s), just to be sure everything is properly connected.
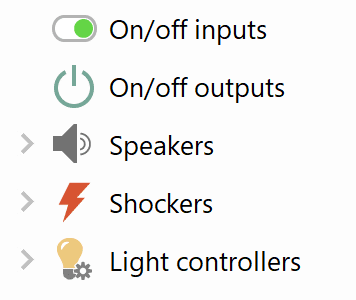
Plug the UBFC unit(s) into the computer via USB and open ANY-maze to the I/O page. You should see each unit shown on the left. Select one and you’ll see the various components, as shown below.
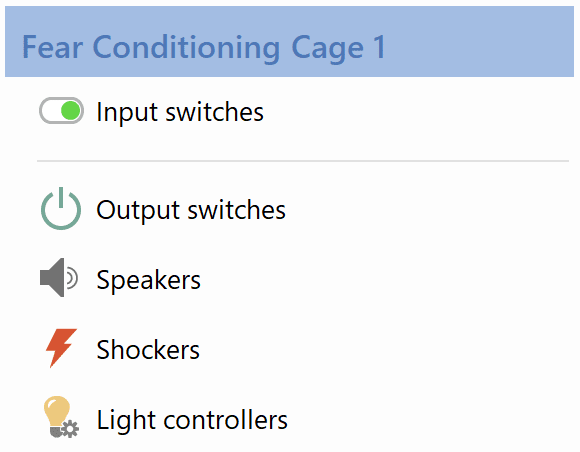
Starting with Input switches, this is the switch that will activate when you close the door of each unit. So, close the door all the way and this square should turn green on screen. This can be used to automatically start tests in ANY-maze when you close the door.
You can skip the Output switches and move down to Speakers. This time, because a speaker is an output, the command to turn it on must come from ANY-maze. So, test the speaker by clicking on the “Tones” and “White noise” squares on-screen, one at a time, checking that the speaker is indeed playing.
Then test the Shockers and Light controllers in the same way, activating the output from ANY-maze.
Repeat these steps for each UBFC unit you have. Once you’re satisfied that everything is working, we can move on to build a Protocol.
Section 3
Building the Protocol
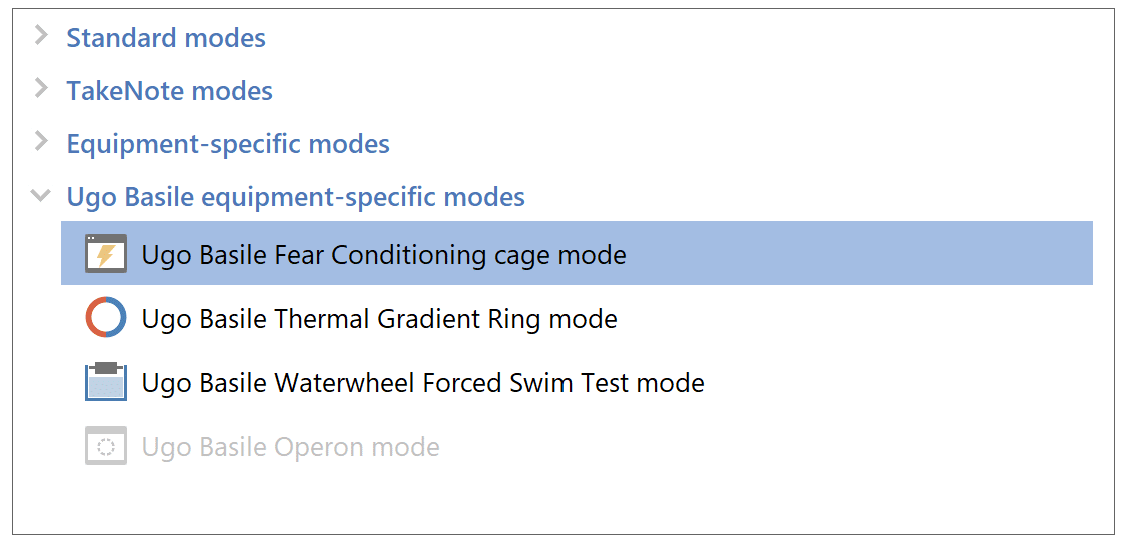
Select the Protocol mode
Starting on the File page, select “New experiment” then “New empty experiment”. Then on the Protocol page, select the Ugo Basile Fear Conditioning cage mode, as shown below.
Add your cages
Next, right-click on Apparatus, select “New Fear conditioning cage” and add all connected units. This will pop up a wizard to help you configure the various components. It’s easiest if you can enter everything accurately here, but don’t worry if you don’t have all the details – you can edit this later.
In sticking with our paradigm outlined above, we’d enter the following for Sounds:
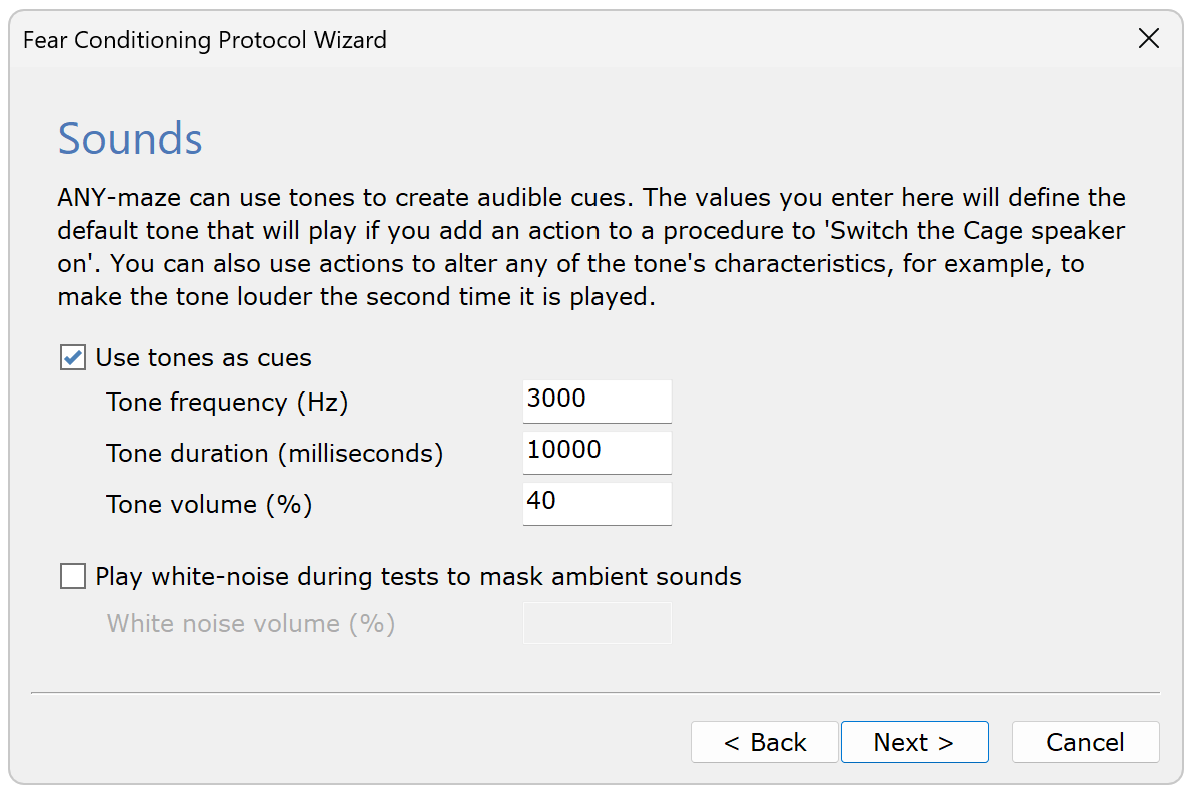
Note: The tone volume is an arbitrary setting. To set your tones at a particular decibel level, you’d need to use a decibel meter to measure the sound output in your particular setup.
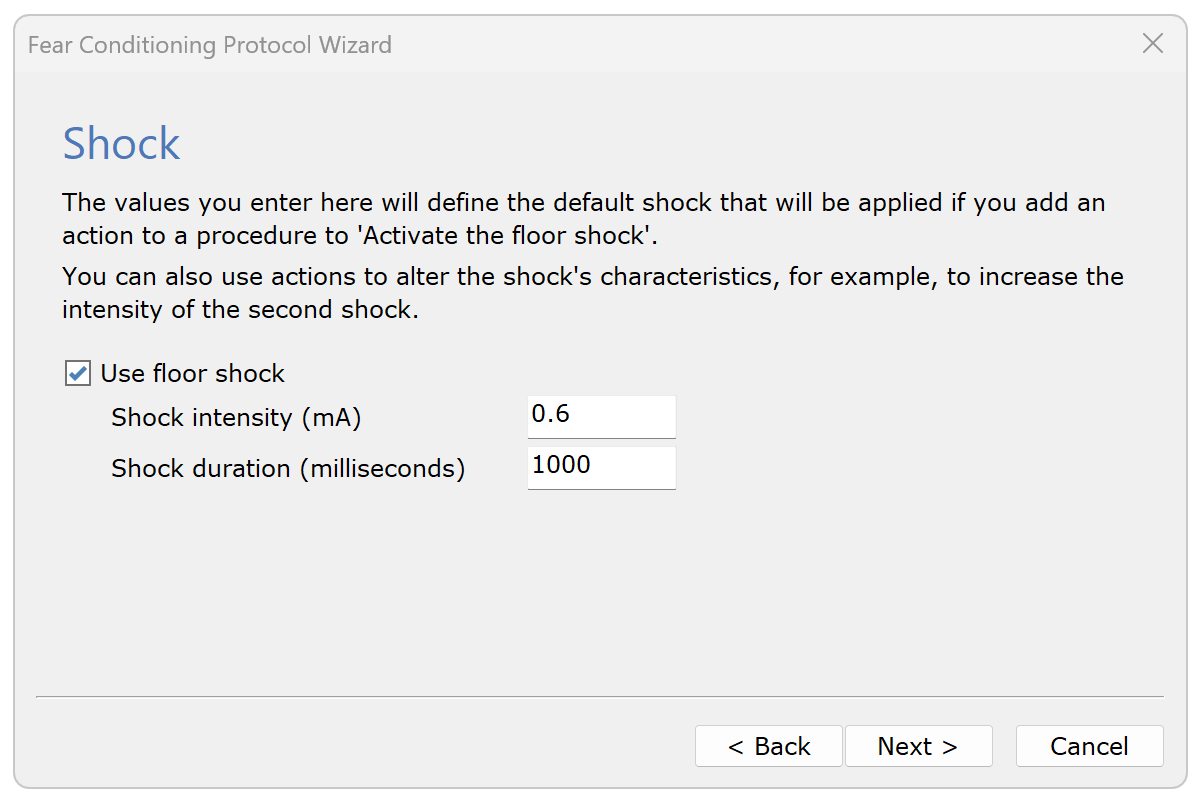
Likewise, the Shock settings should be:
Adjust the camera
After adding your FC boxes as Apparatus, ANY-maze will automatically identify the Video source (camera) for each box. Select each Video source to view the live video picture and make any adjustments to the camera’s focus and the position of the inner chamber. To adjust the focus, simply screw/unscrew the lens from the camera.
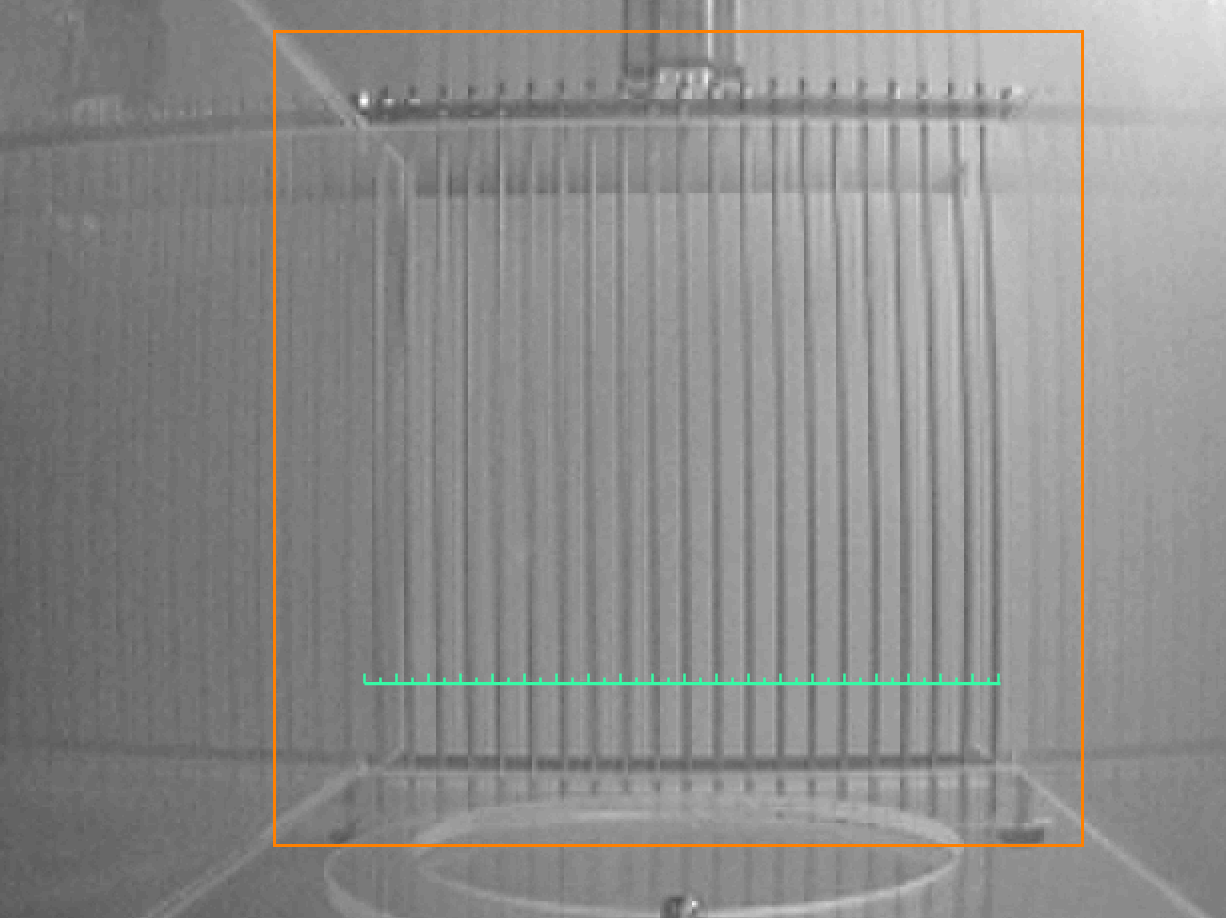
Draw the apparatus map
Next, draw the apparatus map under Apparatus. Simply outline of the chamber with the ‘Rectangle tool’, then calibrate the size of the chamber by stretching the green ruler along the chamber floor and entering its known length.
Inputs and outputs
Moving down to the “Inputs and Outputs” section, you’ll find each FC component (speakers, lights, shockers). Click each one to see the settings you chose. You can edit them here, including their names.
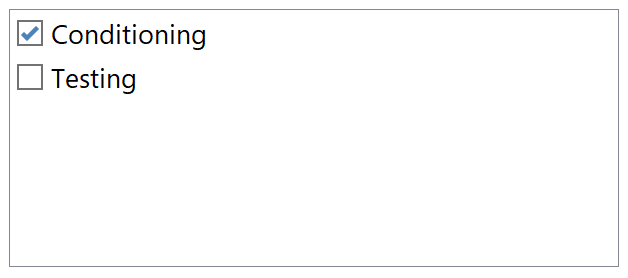
Stages
Next, scroll down to Stages. Stages are how ANY-maze divides an experiment into different phases. In our paradigm, we’ll have 2 stages: Conditioning and Testing. The first stage is already added for you, so you can just rename it from “First stage” to “Conditioning”. Then set the test duration to 650s.
Add another Stage by clicking “Add item” at the top of the screen, or right-click on “Stages” and select “New stage”. Again, set the test duration to 650s.
For both stages, an animal will only undergo one round of testing per stage, so we’ll keep the “Maximum number of trials in this stage” as 1. “Trials” in ANY-maze are repeated tests within a Stage.
Treatment groups
The final required protocol item is Treatment groups. Here you’re asked to select how you want ANY-maze to assign treatments to your animals. For example, if you choose the 3rd option, “Assign the 1st animal to the 1st group, the 2nd to the 2nd group, etc.”, then if you have 2 treatment groups and 8 animals, they’ll be assigned as follows:
- Animal 1 – Treatment 1
- Animal 2 – Treatment 2
- Animal 3 – Treatment 1
- Animal 4 – Treatment 2
- Animal 5 – Treatment 1
- Animal 6 – Treatment 2
- Animal 7 – Treatment 1
- Animal 8 – Treatment 2
While those are all the required protocol items done, there is one more protocol item you’ll need to set up before you run tests, and that is Procedures. Procedures will tell the program exactly when to activate the lights, tones, and shocker, so they’re imperative for this FC experiment.
Section 4
Writing the procedures
As I said, we’ll use procedures to tell ANY-maze exactly when to activate the outputs in this FC protocol. We’ll write 2 separate procedures: one for Conditioning and one for Testing.
Start by adding a new procedure to the protocol – we can call it ‘Conditioning’. Then beneath that, un-tick the box for Testing, since we only want the procedure to run in the Conditioning stage.
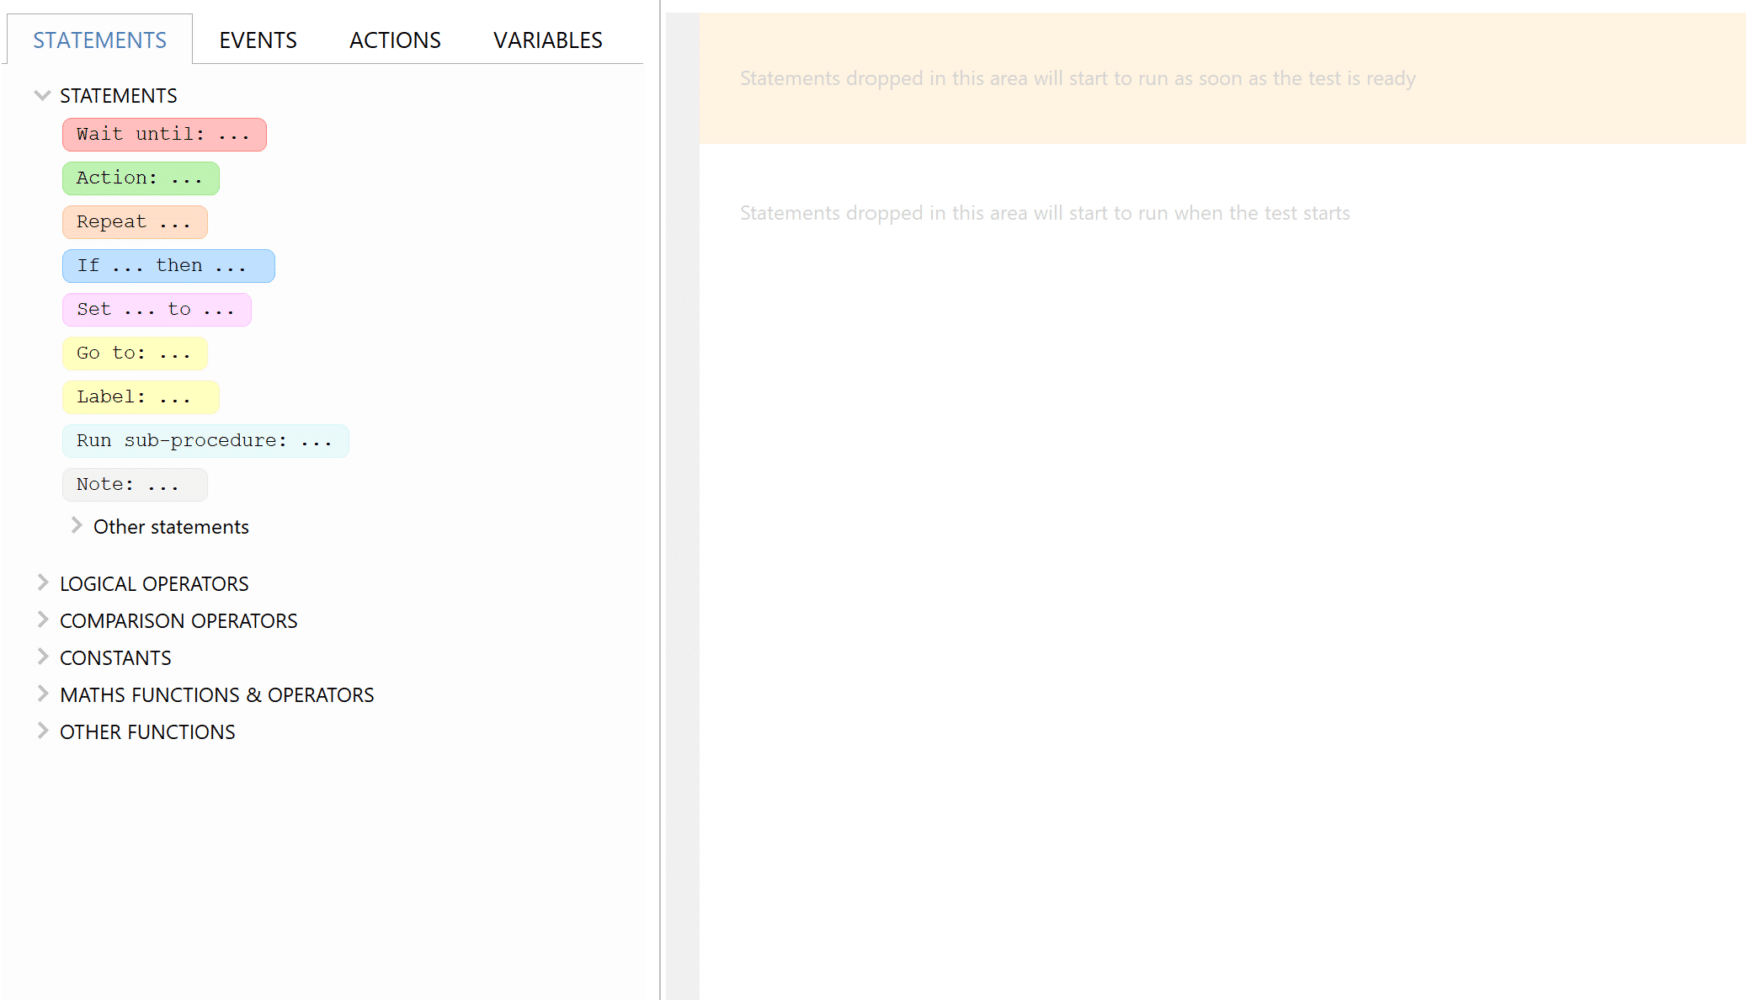
You’ll construct the procedure by clicking and dragging items in the procedure editor, pictured below. Specifically, drag items from the left into the blank area on the right. Then ANY-maze will read them from top to bottom during the test.
Usually, a good first step in creating a procedure is to write in your own words what you want it to do:
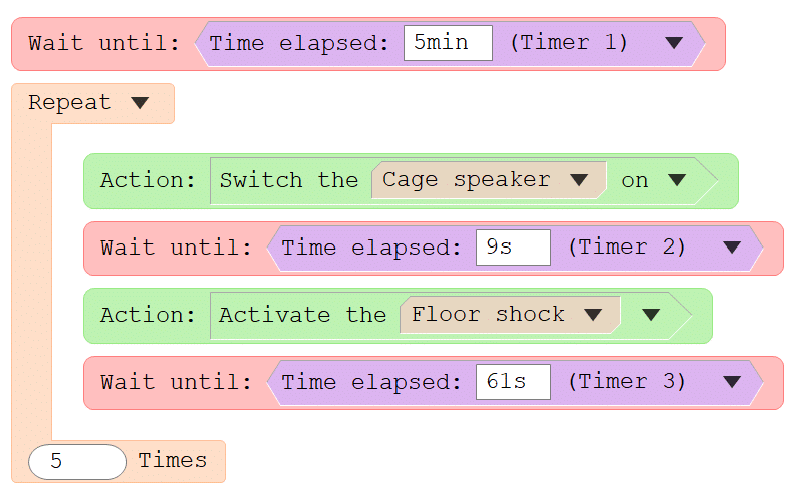
Wait for 5min while the animal habituates, then play the tone for 10s. On the 9th second of the tone, we also want it to deliver a shock for 1s. After that, wait for 60s then repeat that a total of 5 times.
So, the procedure will be as follows:
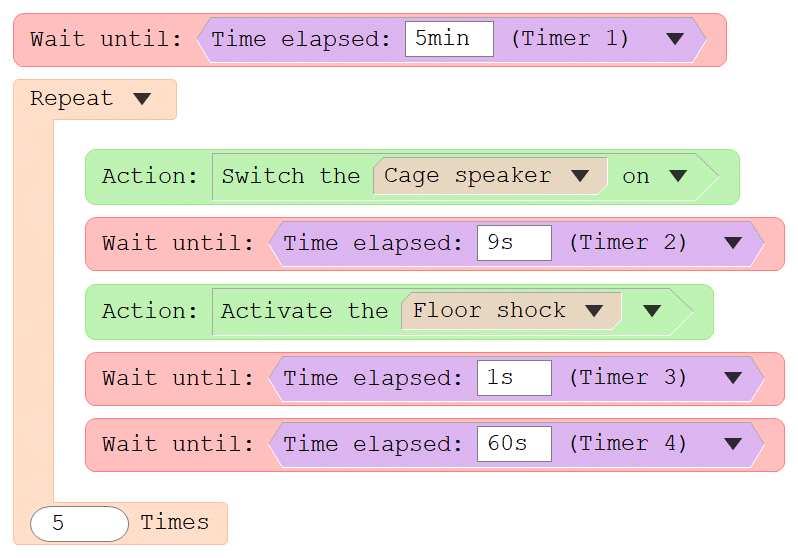
You’ll notice that after switching the cage speaker on, we’ve told ANY-maze to wait for 9s. This is very important to include and often overlooked! If you don’t tell the procedure to wait for those 9s, then it would turn the cage speaker on then immediately activate the shocker at the same time. Likewise, we also needed to tell the procedure to wait for 1s after turning on the shocker.
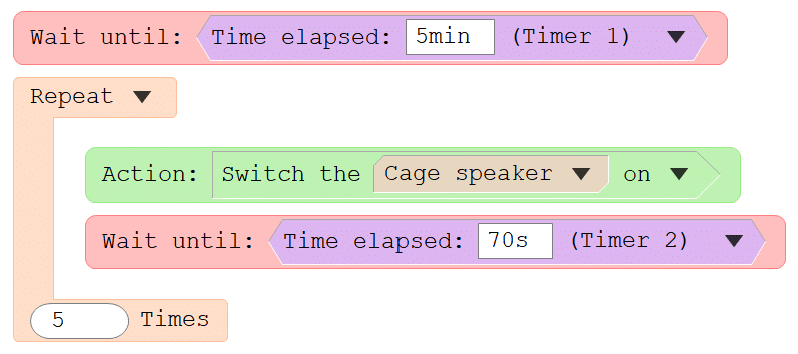
While this procedure will work as-is, it could be simplified by combining the 1-second and 60-second timers into a single 61-second timer, like this:
That’s that procedure done! Let’s now add a new procedure for the Testing stage. I’d call it “Testing” and select only the Testing stage beneath that.
Then, build the procedure, this time excluding the shocker activation:
Again, we can clean it up a bit:
At this point you can add your treatment groups and animals to the Experiment page, then run your tests using the Tests page. For assistance with these steps, please review our “Introduction to ANY-maze” video and/or write to our support team at [email protected] with any questions.
In the next section, I’ll explain how to analyze your freezing data during the 10-second tones.
Section 5
Analyzing freezing during tones
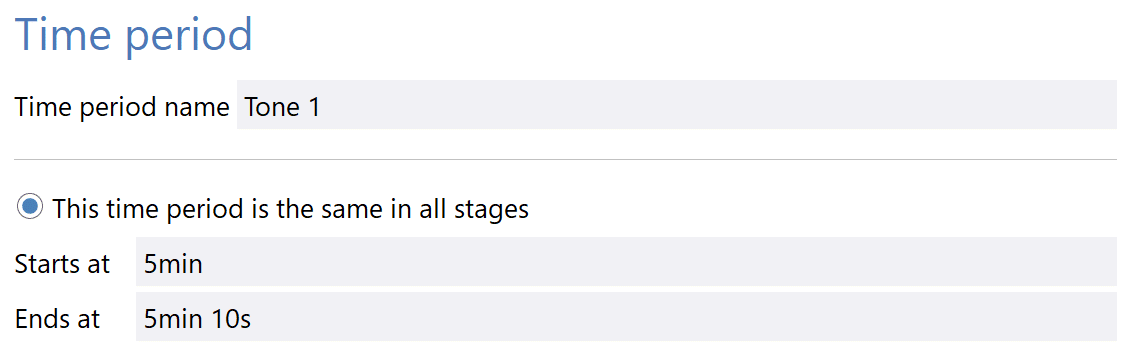
After running some tests, ANY-maze will present results for the entire test. But to view freezing only for specific chunks of time (e.g., only during the 10s tones), you’ll need to define those chunks using Time periods.
Start by going to the Protocol page and scrolling down to Analysis across time. Right-click this and select “New time period”. Let’s call this “Tone 1”. Then enter the start and end times, as shown below.
Then add another Time period for Tone 2:

You get the idea…
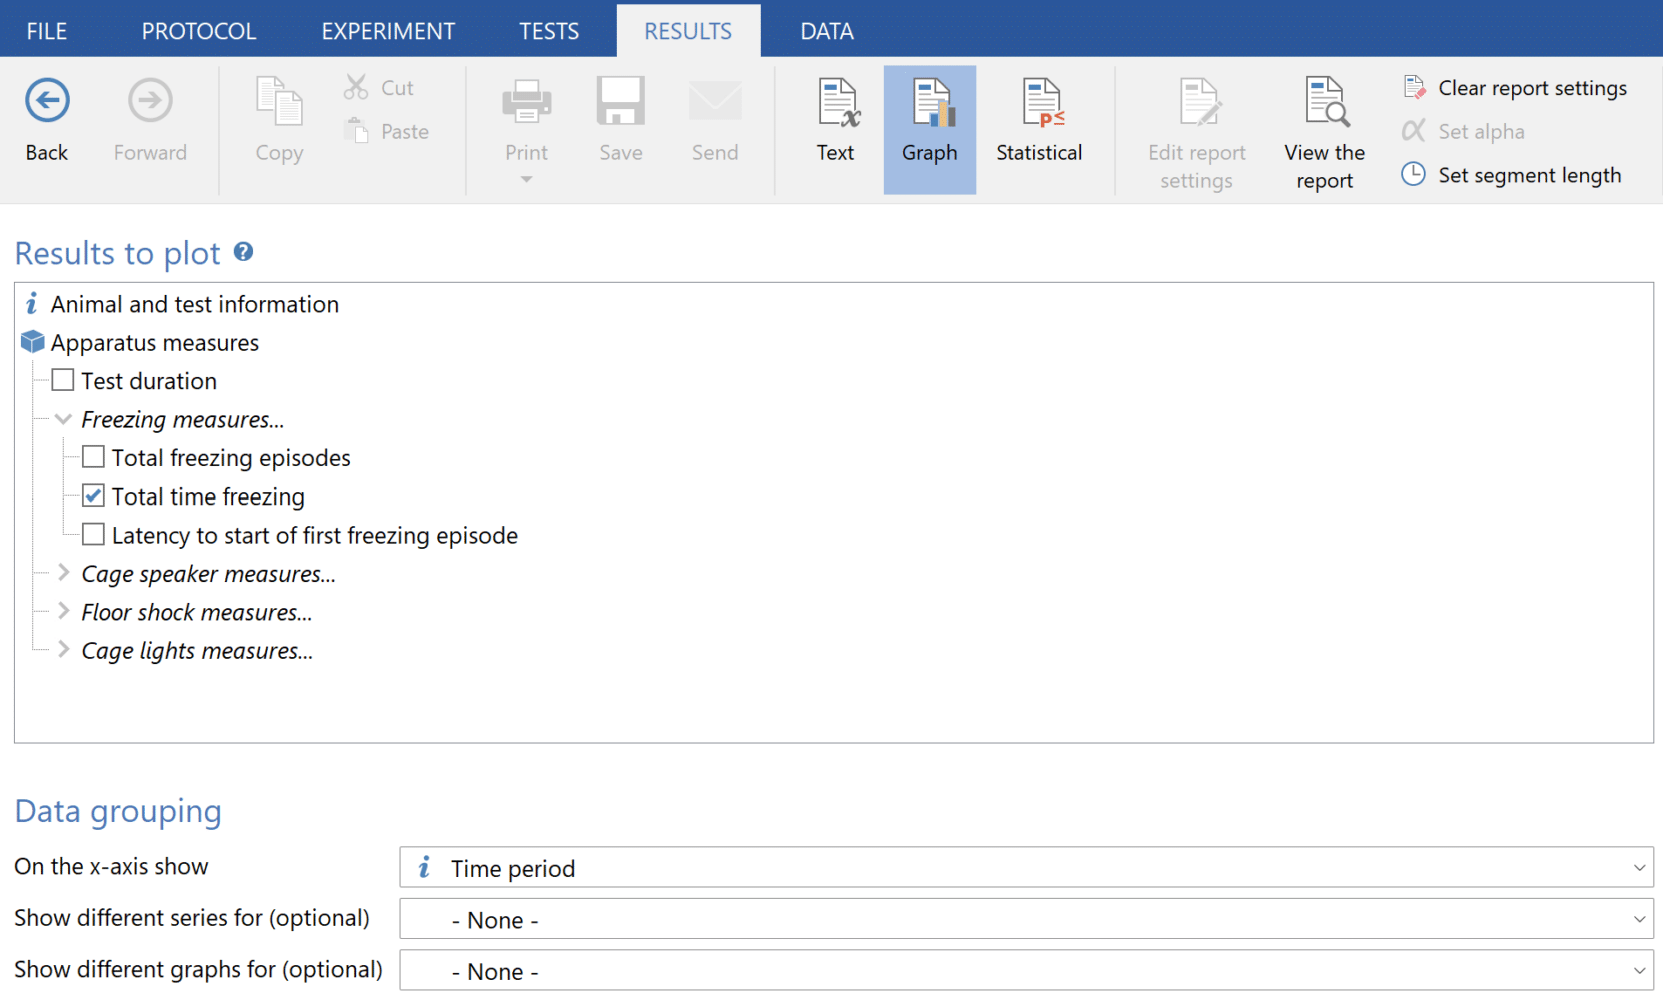
Once you’ve added Time periods for all 5 tones, you can group and filter your data by Time period. For example, on the Results page, you can graph Total time freezing and group the data (“On the x-axis show”) by Time period, as shown below.
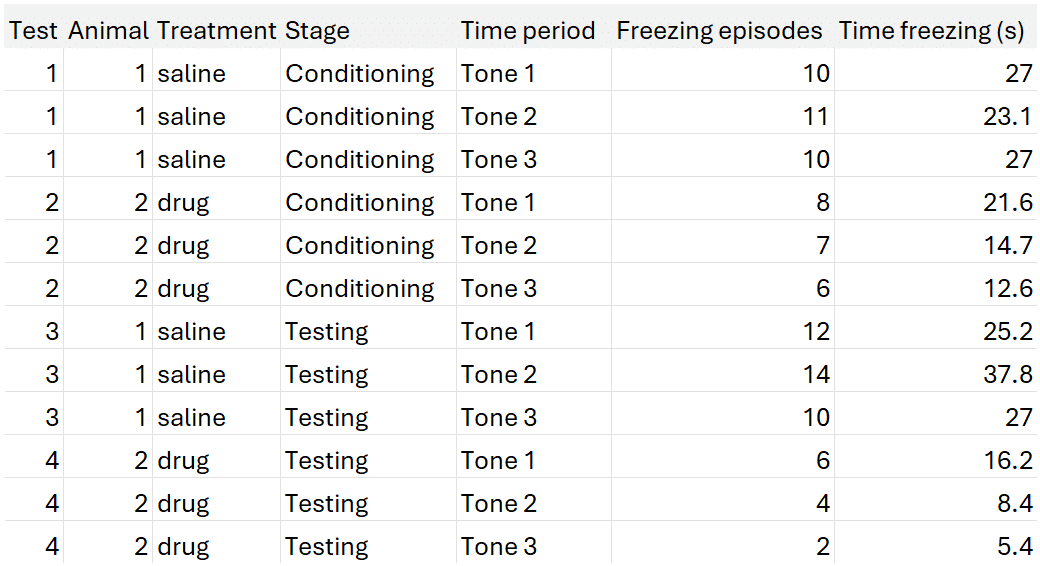
Or, on the Data page, include “Time period” as a column to display data only within those time periods. The resulting spreadsheet would look something like this:
Section 6
Summary
In this guide, you learned:
- How to test the I/O components of the Ugo Basile Fear Conditioning unit
- How to set up a Protocol using the Ugo Basile Fear Conditioning cage mode
- How to write Procedures to initiate the lights, tones, and shockers
- How to use Time periods to analyze freezing within specific chunks of time
If you have any questions or need more help getting your Ugo Basile Fear Conditioning unit set up, please email [email protected] and we’ll be ready to help!