 Setting up apparatus
 Video capture & tracking
 Observing behaviour
 Connecting equipment
 Automating complex tests
 Running tests
 Results
 Visualising data
 Analysis
 Transferring data
 Open field
 Water-maze
 Y-maze
 Fear conditioning
 Novel object
 Barnes maze
 Radial arm maze
 Light/dark box
 Operant conditioning
 Zebrafish
 Computers
 Multifunction remote
 Accessories
 Digital interface
 Optogenetic interface
 Synchronisation interface
 Relay interface
 Audio interface
 Touch interface
 Analogue interface
 USB TTL cable
 Animal shocker
 Components
 Place preference
 ANY-box
 T-maze
 Zero maze
 Hole board
 Sociability cage
 OPAD
OPAD RAPC
RAPC Waterwheel forced swim test
 Thermal gradient ring
 Operon
 Activity Wheel
 Full ANY-maze licence
 Other licence types
 Developing countries licence
 Contact support
 Support Policy
 FAQs
FAQs Guides
 Downloads
 Send us files
 Activate a licence ID
 Contact us
 Blog
Blog About
About Testimonials
 Privacy Policy
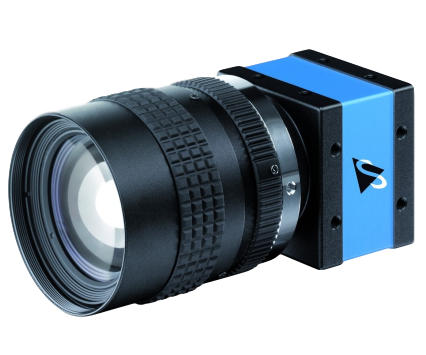
So you’ve just received your ANY-maze USB camera(s) in the mail, and you’re looking to get it mounted in your lab and set up in ANY-maze. This guide explains everything you need to know.
Section 1
Assembling the camera mount
If you purchased a camera mount with your camera, start by unboxing it and laying out all the pieces. You’ll find:
- (A) a tri-footed attachment
- (B) a drop-ceiling attachment
- (C) a ball joint piece with a silver adjustment knob
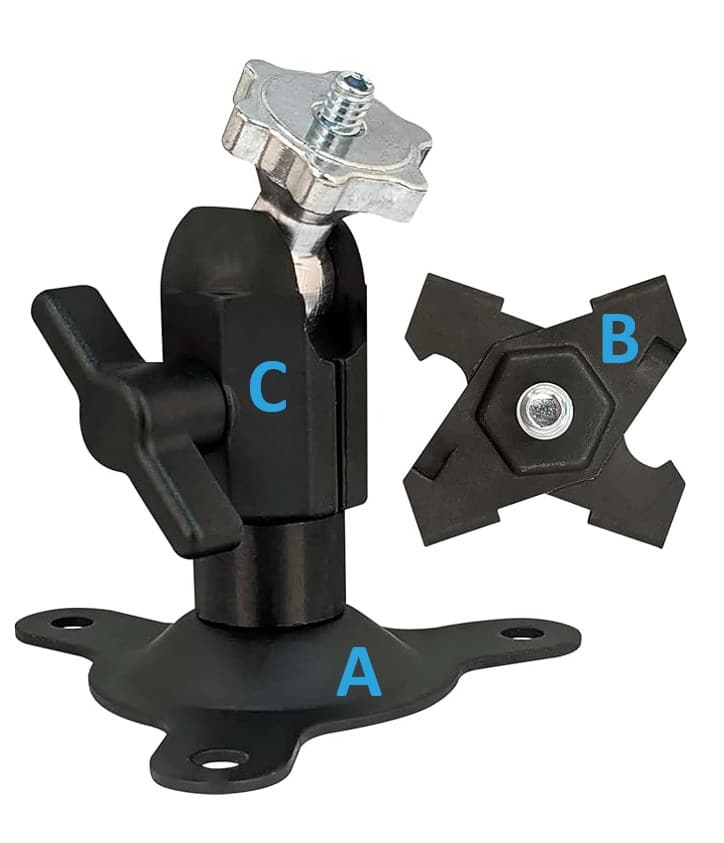
- If you have a drop-ceiling, then you’ll want to use the drop-ceiling attachment (B) to mount the camera; it simply clips onto the metal grid. Otherwise, you’ll need to use the tri-footed mount (A) to screw into your ceiling.
- Once you’ve chosen your mounting attachment, remove the rubber tip from the attachment piece to reveal a screw underneath. This screws into the ball joint piece (C).
- Lastly, screw the camera onto the silver part of the ball joint piece. But don’t mount the camera just yet – you’ll need to see what the camera sees first to ensure it is properly positioned. Proceed to the next section for further instruction.
Section 2
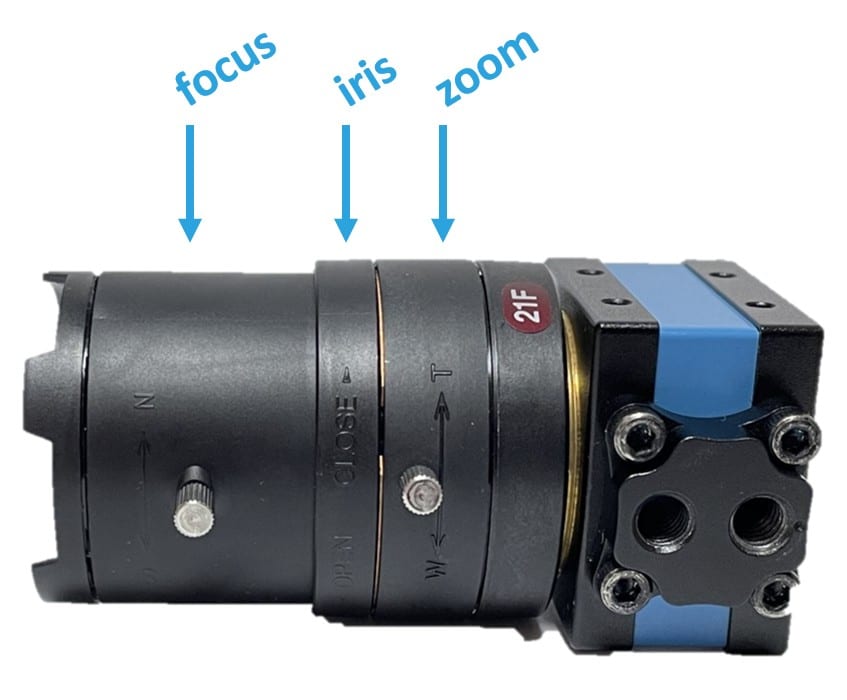
Adjusting the lens
- Connect the camera to the computer using the USB cable provided.
- Open ANY-maze and navigate to the Video page. You’ll see your camera appear on the left-hand side – select it. You should then see the live video feed on the right. This video feed will be necessary to reference while you make your lens adjustments in the next few steps.
- Referring to the live video feed, make sure the camera is positioned directly over the center of the apparatus, then mount the camera in place. The “Show reticle” tool on the Video page will help with this!
- Referring to the lens diagram below, start by turning the iris ring so it is letting in as much light as possible.
- Next, adjust the zoom and focus on the lens so that your apparatus appropriately fills the video frame. Note: If the zoom and focus rings are hard to move, you may need to loosen the silver knobs on the side. Once you have the zoom and focus where you want them, re-tighten the silver knobs to ‘lock it in place’.
- Once you’re happy with the lens settings, proceed to the next section to adjust the camera settings.
Section 3
Adjusting the camera properties
- Right-click the live video feed and select “Show frame rate”. This will matter later.
- Right-click the video again and select “Properties…”.
- Starting on the Image control tab, un-tick all of the “Set automatically” boxes. Generally speaking, you don’t want the camera making any automatic adjustments as tracking is under way. We like to say the only thing that should be ‘moving’ during the test is your animal.
- Then, for now, make sure the brightness and gain sliders are pulled to the left, meaning they’re turned off. We’ll come back to this in a bit.
- Click on the Camera control tab and un-tick the “Set automatically” boxes.
- Then, adjust the Exposure slider so your video image looks as close to real-life as possible. A quick way to set the exposure is to select the “Set automatically” box, then de-select it. Otherwise, you can manually adjust the slider. (Note: As you adjust the exposure, it’s important that you not over-expose the image. Over-exposure will mean the lightest parts of your video image are stark white. Another risk to over-exposing the image is that the frame rate could decrease, so keep an eye on the frame rate as you do this. Your frame rate should be between 15 and 30 fps for optimal tracking.) So, set the exposure as high as you need it without impacting the frame rate.
- If the image is still not bright enough, then return to the Image control tab and adjust the brightness, followed by gain if needed. (Note: Gain will increase the image noise, which can be disadvantageous for tracking if overdone.)
If you have any questions along the way, please email us at [email protected] and we’ll be happy to help! We know it can be quite tricky to optimize your camera settings, especially if you’re tracking in low-light conditions, so we might be able to suggest alternative solutions, such as incorporating an infrared light source.